Vallox Exxeo 150 Скачать руководство пользователя страница 17

17

© Vallox Oy - All rights reserved

MAINTENANCE 


In normal use, the roof fan does not require maintenance 

in addition to the annual inspection and cleaning 

described below:

•  Checking the vibration and noise level

•  Checking the condition and integrity of the fan 

wheel blades.

•  Overall visual check of the fan 

•  Checking the free rotation of the fan wheel 

•  Cleaning the fan wheel

•  Cleaning the motor

•  General cleaning (insulations, roof plate, etc.) 
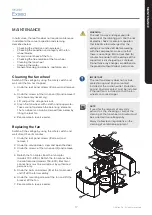
Replacing the fan

Switch off the voltage by using the safety switch and 

wait at least five (5) minutes. 

1.  Undo the roof panel screws (8 screws) and 

remove it.

2.  Undo the service door screw and open the door.
3.  Undo the screws of the rain cover (4) and remove 

it.

4.  Detach the fan cables from the fan motor 

(models 700–4100). Detach the fan cables from 

the control panel (models 150–300). Electrical 

connections must be carried out by authorised 

persons only.

5.  Undo the bolts and screws (8) of the fan bracket 

and lift off the fan assembly.

6.  Undo the mounting screws of the fan and lift the 

bracket off the fan.

7.  Reassemble in reverse order.

 MAINTENANCE

WARNING

The roof fan may endanger your life 

because of the rotating parts and the risk 

of electric shock. It contains capacitors 

that take time to discharge after the 

voltage is switched off. Before working 

with the components, make sure that 

there is no voltage. Wait at least five (5) 

minutes to ensure that the voltage of the 

capacitors is discharged to a safe level. 

Do not make any changes or additions to 

the product without Vallox’s permission. 

6

2

3

5

4

1

5

5

5

a

b

c

c

d

Cleaning the fan wheel

Switch off the voltage by using the safety switch and 

wait until the fan has stopped. 

a.  Undo the roof panel screws (8 screws) and remove 

it.

b.  Undo the screws of the rain cover (4) and remove it 

(not absolutely necessary).

c.  Lift and pull the side panels out.
d.  Clean the fan wheel with a cloth and soapy water. 

Take care not to detach the balancing elements. 

The fan wheel can also be cleaned from below by 

tilting the roof fan.

e.  Reassemble in reverse order.

MAINTENANCE

IMPORTANT

The roof fan delivery does not include 

protection against physical contact 

installed at the suction outlet. Protection 

against physical contact must be installed 

if the roof fan is installed so that the fan 

wheel can cause danger. 

NOTE

If used for the removal of very dirty 

exhaust air, the checking as well as the 

cleaning of the fan wheel and motor must 

be carried out more frequently. 
Always follow local regulations on the 

cleaning of ventilation equipment.

Содержание Exxeo 150

Страница 1: ...Exxeo 700 DS Vallox Exxeo 700 DPC Vallox Exxeo 1400 Vallox Exxeo 1400 DS Vallox Exxeo 1400 DPC Document D11341 Valid from 01 12 2023 Updated 10 11 2023 Roof fans MANUAL Vallox Exxeo 2000 Vallox Exxeo...

Страница 2: ...use of the ventilation system or control unit Incorrect or inappropriate installation setup or use Negligence of instructions concerning transport installation use or maintenance Changes made to the...

Страница 3: ...tages INTRODUCTION TRANSPORT AND STORAGE Check the roof fan for any transport damage immediately after receiving it If you detect damage caused during transport contact the transporter immediately The...

Страница 4: ...ting cable with 7 poles 2x3 phase supply PE model marking e g Vallox Exxeo 4100 DS air volume 4 100 dm s ps 150 Pa NOTE If the roof fan is used as an extract fan for a kitchen grease duct grease remov...

Страница 5: ...o 2500 DS 101 3 400 VAC 50 Hz 1 100 1 85 IP55 Similar to an old AC dual speed roof fan Vallox Exxeo 2500 DPC 99 3 400 VAC 50 Hz 1 100 1 85 IP55 2 speed or 0 10 V control pressure and air volume contro...

Страница 6: ...V 8 V 8 V 10 V Sound values 40 65 45 50 55 60 0 70 75 0 1 0 05 0 15 0 2 0 25 4 V LwA 6 V LwA 10 V LwA 8 V LwA Static pressure difference p Pa Air volume flow rate m3 s Input power P W Air volume flow...

Страница 7: ...0 3 0 4 0 5 10 V 8 V 6 V 4 V 4 V 6 V 8 V 10 V Sound values 40 65 45 50 55 60 0 15 0 70 75 0 05 0 1 0 25 0 2 0 3 0 35 0 4 0 45 4 V LwA 6 V LwA 10 V LwA 8 V LwA Static pressure difference p Pa Air volu...

Страница 8: ...8 V 10 V Sound values 45 70 50 55 60 65 0 3 0 75 80 10 V LwA 8 V LwA 6 V LwA 4 V LwA 0 1 0 2 0 5 0 4 0 6 0 7 0 8 0 9 Air volume flow rate m3 s Input power P W Air volume flow rate m3 s Air volume flo...

Страница 9: ...V 6 V 4 V 4 V 6 V 8 V 10 V Sound values 45 70 50 55 60 65 0 6 0 75 85 0 2 0 4 1 0 0 8 1 2 1 4 1 6 80 4 V LwA 6 V LwA 8 V LwA 10 V LwA Air volume flow rate m3 s Air volume flow rate m3 s Air volume flo...

Страница 10: ...0 50 60 1200 10 V 8 V 6 V 4 V 4 V 6 V 8 V 10 V Sound values 45 70 50 55 60 65 0 75 0 5 1 0 1 5 2 0 80 10 V LwA 8 V LwA 6 V LwA 4 V LwA Air volume flow rate m3 s Input power P W Air volume flow rate m3...

Страница 11: ...80 1400 1200 3 0 3 5 60 70 10 V 8 V 6 V 4 V 4 V 6 V 8 V 10 V Sound values 45 70 50 55 60 65 0 5 1 0 0 2 5 1 5 2 0 75 3 0 80 10 V LwA 8 V LwA 6 V LwA 4 V LwA Air volume flow rate m3 s Air volume flow...

Страница 12: ...V 8 V 6 V 4 V 4 V 6 V 8 V 10 V Sound values 50 70 90 55 60 65 0 75 0 5 1 0 1 5 2 0 80 2 5 3 0 3 5 4 0 4 5 85 10 V LwA 8 V LwA 6 V LwA 4 V LwA Air volume flow rate m3 s Input power P W Air volume flow...

Страница 13: ...flue or roof penetration part Lift the fan from the enclosure lugs Pay attention to the lifting angle of the sling The lifting angle of the slings should be less than 50 MAX 50 A Mounting of the fan t...

Страница 14: ...oof structures The roof penetration part includes a cable trough through which the feed and control cables can be led to the fan INSTALLATION DIMENSIONS A B C D Vallox Exxeo 150 380 255 370 240 Vallox...

Страница 15: ...der the mounting frame must be smooth such as sheet metal The mounting frame is fastened to the supporting penetration structure with eight screws Masonry pipe or other penetration structure INSTALLAT...

Страница 16: ...te freely and that there are no loose or extra objects inside the duct system or the roof fan Switch the fan on briefly to check its stable operation If everything is OK the roof fan can be started up...

Страница 17: ...he risk of electric shock It contains capacitors that take time to discharge after the voltage is switched off Before working with the components make sure that there is no voltage Wait at least five...

Страница 18: ...230 VAC 50 Hz max 16 A fuse L2 L3 N BN BU YE GN T3 T2 N Safety switch T1 L1 3 400 VAC 50 Hz max 16 A fuse BK GY Exxeo 2000 4100 Exxeo 150 1400 Cable included in delivery Cable included in delivery Cab...

Страница 19: ...IN 11V OUT CO NC NO CO NC NO EXTL GND EXTH GND NTC1 GND NTC2 GND CTRL Display buttons EXT CTRL FAN OUT IN MENU SENSORS Relay Relay 0 10V TACHO A B GND ALARM STATUS P METER EXT CTRL SENSORS ALARM STATU...

Страница 20: ...TER 24VAC VDC 0 10V 0 2000ppm 0 10V 0 50 C SENSORS NTC1 GND NTC2 GND TP1 TP2 Temperature Potentiometer Clock switch N L 1 2 3 230 VAC EXT CTRL EXTL GND EXTH GND Humidity CO2 RH TE 24V GND GND 0 10V IN...

Страница 21: ...l panel BN BU YE GN N T1 T2 T3 Safety switch YE GN BU BN 6 1 2 3 Y E G N 2 1 3 BU BN N L3 L2 L1 A D B D Analog In 0 10V PWM MODBUS RS 485 L N BN YE GN BU 4120153 4120159 4118178 GND B A GND B A CTRL F...

Страница 22: ...on box L3 L2 PE L1 N BN BU BN Y E G N YE GN BK GY BN BK GY YE GN YE GN BN BU BK GY N T1 T2 T3 Safety switch YE GN BU GY BK BN 6 1 2 3 4 5 6 2 1 5 4 3 BU BN N L3 L2 L1 4120154 4120159 4118174 4120157 G...

Страница 23: ...NOTE Neutral wires their adequacy Cable with 7 poles safety switch L3 L2 N L3 L2 N E g from contactor control of a 2 speed 3 phase AC roof fan Cable included in delivery 1 230 VAC 50 Hz 4 2 6 10 8 Co...

Страница 24: ...C 50 Hz Bypass thermal protectors or check their adequacy 2 x 3 phase supply PE connected to existing Cable with 7 poles safety switch Cable included in delivery 4 2 6 10 8 Connection instructions for...

Страница 25: ...Dual Speed transformer 4118758 YE GN BU BN Fan YE GN 6 1 3 1 6 5 Cable included in delivery Cables included in delivery 2 2 950026 3 4 2 6 10 8 INTERNAL ELECTRICAL CONNECTION VALLOX EXXEO 150 DS AND...

Страница 26: ...4120314 11 7 12 E1 D1 GND 10V 24V PORT2 PORT1 GND ID1 B D A D GND ID1 B D A D YE GN 4120154 6 5 YE GN 3 2 6 1 4 5 6 1 1 6 3 3 A1 A2 262 261 K2 A1 K1 261 262 A2 3 13 1 14 6 4 2 5 6 4 2 14 13 1 3 3 E1 2...

Страница 27: ...078 7a Safety switch 948180 10h Vallox Exxeo potentiometer 986010 11f Vallox Exxeo temperature sensor for wall 986030 7b Safety switch Vallox Exxeo DS 948110 10i Vallox Exxeo clock switch 986020 11h V...

Страница 28: ...er 949078 7a Safety switch 948180 10h Vallox Exxeo potentiometer 986010 11f Vallox Exxeo temperature sensor for wall 986030 7b Safety switch Vallox Exxeo DS 948110 10i Vallox Exxeo clock switch 986020...

Страница 29: ...an operating voltage of 11 V for 0 10 V stepless control of the potentiometer Dimensions w x h x d 82 x 82 x 65 mm The potentiometer can be immersed in the outlet box IP44 or mounted on the wall surfa...

Страница 30: ...asuring element NTC 10 Protection class IP54 Bushing seal M16 x 1 5 Measuring range 50 C 50 C Time constant 25 s Materials Box lid PC base PBT bushing seal PA Conduit Ms 8 mm length 250 mm Flange PA V...

Страница 31: ...31 Vallox Oy All rights reserved...

Страница 32: ...Vallox Oy All rights reserved D11341 10 11 2023 www vallox com Vallox Oy Myllykyl ntie 9 11 32200 LOIMAA FINLAND...

Отзывы: