background image

17

EN

Useful information

C

Helpful hints and tips

Hints for freezing

To help you make the most of the freezing process, here are 

some important hints:

•  The maximum quantity of food which can be frozen in 24 

hrs.is shown on the rating plate;

•  The freezing process takes 24 hours. No furtherfood to be 

frozen should be added during this period;

•  Only freeze top quality, fresh and thoroughly cleaned, 

foodstuffs;

•  Prepare food in small portions to enable it to be rapidly and 

completely frozen and to make it possible subsequently 

to thaw only the quantity required;

•  Wrap up the food in aluminium foil or polythene and make 

sure that the packages are airtight;

•  Do not allow fresh, unfrozen food to touch food which is 

already frozen, thus avoiding a rise in temperature of the 

latter;

•  Lean foods store better and longer than fatty ones; salt 

reduces the storage life of food;

•  Water ices, if consumed immediately after removal from 

the freezer compartment, can possibly cause the skin to 

be freeze burnt;

•  It is advisable to show the freezing in date on each 

individual pack to enable you removal from the freezer 

compartment, can possibly cause the skin to be freeze 

burnt;

Содержание CNF 326 D X742C

Страница 1: ......

Страница 2: ...une mauvaise installation d une utilisation incorrecte ou de l usure anormale du produit sur pr sentation du ticket de caisse NL GARANTIEVOORWAARDEN Dit product wordt gegarandeerd voor een periode van...

Страница 3: ...326 D X742C 2 2 12 2022 V1 Fridge freezer R frig rateur cong lateur Koelkast diepvriezer Frigor fico congelador INSTRUCTIONS FOR USE 02 CONSIGNES D UTILISATION 24 GEBRUIKSAANWIJZINGEN 46 INSTRUCCIONES...

Страница 4: ......

Страница 5: ...1 2 3 4 5 6 7...

Страница 6: ......

Страница 7: ......

Страница 8: ......

Страница 9: ...ted and recommended by ELECTRO DEPOT the products of the VALBERG brand are easy to use reliable and of an impeccable standard Thanks to this appliance you can be sure that each use will bring you sati...

Страница 10: ...A 3 EN Table of contents A Preview of the appliance C Useful information BUsing the appliance Installation Door reversibility User interface Helpful hints and tips Cleaning and care Troubleshooting De...

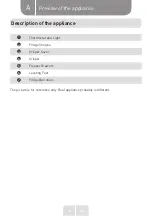
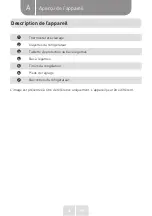
Страница 11: ...ance A Description of the appliance 1 Thermostat and Light 2 Fridge Shelves 3 Crisper Cover 4 Crisper 5 Freezer Drawers 6 Leveling Feet 7 Fridge Balconies The picture is for reference only Real applia...

Страница 12: ...nded to be used at ambient temperatures ranging from 10 C to 32 C SN temperate this refrigerating appliance is intended to be used at ambient temperatures ranging from 16 C to 32 C N subtropical this...

Страница 13: ...e rating plate correspond to your domestic power supply The appliance must be earthed The power supply cable plug is provided with a contact for this purpose If the domestic power supply socket is not...

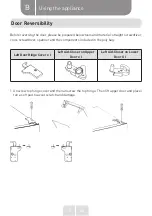
Страница 14: ...straight screwdriver cross screwdriver spanner and the components included in the poly bag Left Door Hinge Cover x I Left Aid Closer on Upper Door x I Left Aid Closer on Lower Door X I 1 Unscrew top h...

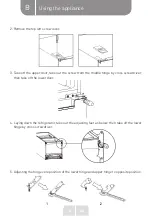
Страница 15: ...t the screw from the middle hinge by cross screwdriver then take off the lower door 4 Laying down the refrigerator take out the adjusting feet as below then take off the lower hinge by cross screwdriv...

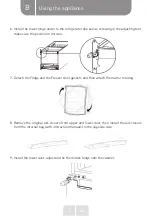
Страница 16: ...position in horizon 7 Detach the Fndge and the Freezer door gaskets and then attach them after rotating 8 Remove the original aid closers from upper and lower door then install the aid closers from th...

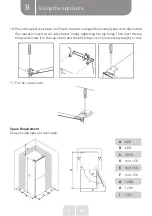
Страница 17: ...t the seal are closed on all sides before finally tightening the top hinge Then inert the top hinge and screw it to the top of unit and then fix hinge cover in accessary bag by screw 11 Fix the screw...

Страница 18: ...ng the appliance B Levelling the unit To do this adjust the two levelling feet at front of the unit If the unit is not level the doors and magnetic seal alignments will not be covered properly Shorten...

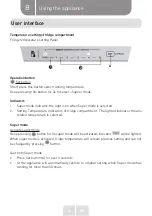
Страница 19: ...ected 2 Setting Temperature indicators of fridge compartment The lighted indicat or means related temperature is selected Super mode Activate super mode Keep pressing button for 3s super mode will be...

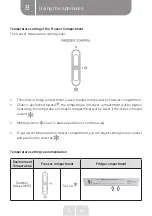
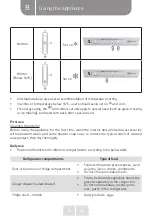
Страница 20: ...erature in freezer compartment will be higher Contrarily the temperature in freezer compartment will be lower if the slider is moved toward Middle position slicer is aavisea position ior normai using...

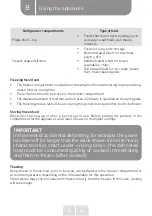
Страница 21: ...interior and all internal accessories with lukewarm water and some neutral soap so as to remove the typical smell of a brand new product then dry thoroughly Daily use Position different food in differ...

Страница 22: ...on the rating plate The freezing process lasts 24 hours during this period do not add other food to be frozen Storing frozen food When first starting up or after a period out of use Before putting th...

Страница 23: ...onies To permit storage of food packages of various sizes the door balconies can be placed at different heights To make these adjustments proceed as follows gradually pull the balcony in the direction...

Страница 24: ...frozen and to make it possible subsequently to thaw only the quantity required Wrap up the food in aluminium foil or polythene and make sure that the packages are airtight Do not allow fresh unfrozen...

Страница 25: ...iler Be sure that frozen foodstuffs are transferred from the food store to the freezer in the shortest possible time Not open the door frequently or leave it open longer than absolutely necessary Once...

Страница 26: ...egetables these should be thoroughly cleaned and placed in the special drawer s provided butter and cheese these should be placed in special airtight containers or wrapped in aluminum foil or polythen...

Страница 27: ...k Hot vapors can lead to the damage of plastic parts The appliance must be dry before it is placed back into service IMPORTANT Ethereal oils and organic solvents can attack plastic parts e g lemon jui...

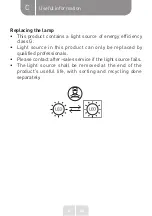
Страница 28: ...of energy efficiency class G Light source in this product can only be replaced by qualified professionals Please contact after sales service if the light source fails The light source shall be removed...

Страница 29: ...e has blown or is defective Check fuse replace if necessary Socket is defective Mains malfunctions are to be corrected by an electrician The food is too warm Temperature is not properly adjusted Pleas...

Страница 30: ...hing another part of the appliance or the wall If necessary carefully bend the component out of the way Water on the floor Water drain hole is blocked See the Cleaning and Care section Side panels are...

Страница 31: ...LECTRO DEPOT les produits de la marque VALBERG sont simples d u t i l i s a t i o n t o u t e n o f f ra n t d e s p e r fo r m a n ce s fiables et une qualit irr prochable Gr ce cet appareil vous tes...

Страница 32: ...es A Aper u de l appareil C Informations utiles B Utilisation de l appareil Installation R versibilit de la porte Interface utilisateur Conseils et astuces utiles Nettoyage et entretien D pannage Desc...

Страница 33: ...ermostat et clairage 2 Clayettes du r frig rateur 3 Tablette de protection du bac l gumes 4 Bac l gumes 5 Tiroirs du cong lateur 6 Pieds de r glage 7 Balconnets du r frig rateur L image est pr sent e...

Страница 34: ...l appareil Pour les appareils de r frig ration avec une classe climatique temp r e largie cet appareil de r frig ration est con u pour tre utilis des temp ratures ambiantes allant de 10 32 C SN temp r...

Страница 35: ...nt de brancher la fiche v rifiez que la tension et la fr quence indiqu es sur la plaque signal tique correspondent celles de votre alimentation lectrique domestique L appareil doit tre reli la terre L...

Страница 36: ...es composants se trouvant dans le sachet plastique Cache charni re de porte gauche x 1 Aide fermeture gauche pour la porte du haut x 1 Aide fermeture gauche pour la porte du bas x 1 1 D vissez le cach...

Страница 37: ...vis cruciforme puis retirez la porte inf rieure 4 En laissant le r frig rateur l horizontal retirez les pieds d ajustement comme indiqu ci dessous puis retirez la charni re du bas l aide d un tournevi...

Страница 38: ...7 D montez les joints des portes du r frig rateur et du cong lateur puis r installez les apr s avoir proc d l inversion 8 Retirez les ferme portes d origine des portes sup rieure et inf rieure puis i...

Страница 39: ...es c t s avant de serrer la charni re sup rieure puis injectez la charni re sup rieure et vissez la sur le dessus de l unit et fixez le couvercle de la charni re dans le sac d accessoires l aide d une...

Страница 40: ...se niveau de l appareil Mettez niveau votre cong lateur l aide des deux pieds de r glage situ s l avant de l appareil Si l appareil n est pas droit les portes et joints magn tiques ne seront pas corre...

Страница 41: ...er est s lectionn 2 T moins de r glage de temp rature du compartiment r frig rateur Le t moin allum signifie que la temp rature correspondante est s lectionn e Mode Super Activer le mode super Continu...

Страница 42: ...r Si la glissi re est d plac e vers la temp rature du compartiment sera plus lev e l inverse la temp rature dans le compartiment cong lateur sera plus basse si la glissi re est d plac e vers La tranch...

Страница 43: ...glage sur Les informations ci dessus donnent aux utilisateurs des recommandations de r glage de la temp rature En hiver ou lorsque la temp rature est inf rieure 16 C les utilisateurs doivent viter un...

Страница 44: ...ananes d oi gnons de pommes de terre ou d ail Clayette du milieu Produits laitiers ufs Clayette du haut Aliments ne n cessitant pas de cuisson comme les aliments pr ts manger la charcuterie les restes...

Страница 45: ...niques sous la mention Autonomie les denr es d congel es doivent tre consomm es rapidement ou cuites imm diatement puis recongel es une fois cuites D cong lation Les denr es surgel es ou congel es peu...

Страница 46: ...ts de porte peuvent tre plac s des hauteurs diff rentes Pour effectuer ces r glages proc dez de la mani re suivante tirez progressivement le balconnet dans les sens des fl ches jusqu le sortir enti re...

Страница 47: ...ment propres Pr parez de petites portions pour qu elles puissent congeler int gralement et rapidement et pour ensuite pouvoir d congeler uniquement la quantit requise Emballez les denr es dans de l al...

Страница 48: ...nr es alimentaires surgel es ont t correctement conserv es par le vendeur veiller ce que les denr es congel es soient transf r es du magasin au cong lateur le plus rapidement possible viter d ouvrir f...

Страница 49: ...umes ils doivent tre soigneusement nettoy s et plac s dans le s bac s pr vu s cet effet Beurre et fromage ils doivent tre plac s dans des r cipients herm tiques sp ciaux ou emball s dans de l aluminiu...

Страница 50: ...les composants lectriques provoquant un risque de choc lectrique Les vapeurs chaudes peuvent endommager les pi ces en plastique L appareil doit tre sec avant d tre remis en service IMPORTANT Les huil...

Страница 51: ...laire et essuyez les Remplacement de la lampe Ce produit contient une source lumineuse de classe d efficience nerg tique G La lampe de ce produit peut uniquement tre remplac e par un professionnel qua...

Страница 52: ...d alimentation n est pas bien branch Ins rez la fiche secteur Le fusible a saut ou est d fectueux V rifiez le fusible remplacez le si besoin La fiche est d fectueuse Les dysfonctionnements du secteur...

Страница 53: ...l entre en contact avec une autre partie de l appareil ou le mur Si n cessaire courbez d licatement cet l ment pour l loigner De l eau coule sur le sol L orifice d vacuation d eau est bouch R f rez vo...

Страница 54: ...47 Notes...

Страница 55: ...est en beveelt de producten van het merk VALBERG aan Ze zijn eenvoudig te gebruiken betrouwbaar en van onberispelijke kwaliteit Dankzij dit toestel kunt u er zeker van zijn dat u bij elk gebruik volle...

Страница 56: ...beeldweergave van het toestel C Nuttige informatie B Het toestel gebruiken Installatie Omkeerbaarheid van de deur Gebruikersinterface Nuttige tips en trucs Reiniging en onderhoud Probleemoplossing Bes...

Страница 57: ...g van het toestel 1 Thermostaat en licht 2 Legplanken koelkast 3 Afdekking groentelade 4 Groentelade 5 Diepvrieslades 6 Verstelbare voetjes 7 Deurrekken koelkast De afbeelding dient enkel als referent...

Страница 58: ...uur overeenkomt met de klimaatklasse die aangegeven wordt op het typeplaatje van het toestel Voor koeltoestellen met klimaatklasse uitgebreid gematigd Dit koeltoestel werd ontworpen voor gebruik bij e...

Страница 59: ...e frequentie op het typeplaatje overeenkomen met de elektrische voeding bij u thuis voor u de stekker van het toestel in het stopcontact steekt Dit toestel dient geaard te worden De stekker van de voe...

Страница 60: ...iskopschroevendraaier sleutel en de onderdelen die in het meegeleverde zakje zitten Scharnierdeksel linker deur x 1 Hulpsluiter links op bovenste deur x 1 Hulpsluiter links op onderste deur x 1 1 Schr...

Страница 61: ...wijder de bovenste deur verwijder de schroef met de kruiskopschroevendraaier uit het middelste scharnier en verwijder de onderste deur 4 Leg de koelkast neer verwijder de verstelbare voet zoals hieron...

Страница 62: ...kast zoals hieronder afgebeeld draai de verstelbare voet in en zorg ervoor dat het toestel horizontaal staat 7 Maak de deurdichtingen van de koelkast en diepvriezer los en maak ze terug vast nadat u z...

Страница 63: ...ervoor dat de deur horizontaal en verticaal afgelijnd is zodat de dichtingen aan alle zijden gesloten zijn alvorens het bovenste scharnier vast te draaien Plaats vervolgens het bovenste scharnier en...

Страница 64: ...ot geopend kan worden A 600 B 600 C 2010 D min 50 E min 50 F min 50 G 1200 H 1200 I 135 Het toestel waterpas plaatsen Pas de twee verstelbare voetjes aan de voorkant van het toestel aan Indien het toe...

Страница 65: ...56 NL Gebruik van het toestel B Verkorten Verlengen...

Страница 66: ...mperatuurinstelling van het koelcompartiment De brandende indicator geeft aan dat de desbetreffende temperatuur is geselecteerd Supermodus Supermodus activeren Druk 3 seconden lang op de knop de super...

Страница 67: ...t aan te passen De schuiver wordt verschoven naar de temperatuur in het diepvriescompartiment wordt hoger Omgekeerd zal de temperatuur in het diepvriescompartiment lager zijn wanneer de schuiver verpl...

Страница 68: ...nter of bij een temperatuur lager dan 16 C zouden gebruikers moeten vermijden om in te stellen op en kouder Om energie te besparen is de instelling en kouder van toepassing voor speciale noden zoals s...

Страница 69: ...ewaard kan blijven Onderste lade legplank voor rauw vlees gevogelte vis Middelste lade legplank voor bevroren groenten frietjes Bovenste lade legplank voor roomijs bevroren fruit bevroren bereide goed...

Страница 70: ...bruik of op kamertemperatuur afhankelijk van de tijd die u heeft Kleine stukjes kunnen ook uit de diepvriezer gehaald worden en direct bereid worden In dit geval is de bereidingstijd langer Toebehoren...

Страница 71: ...62 NL Gebruik van het toestel B Demonteer de onderste lade 1 Trek de onderste lade tot de stopper positie 2 Til de voorste lade op 3 Trek de onderste lade uit...

Страница 72: ...g kan afkoelen en u later enkel de hoeveelheid die u nodig heeft dient te ontdooien Verpak de voeding in aluminiumfolie of polyethyleen en zorg ervoor dat de verpakkingen luchtdicht zijn Zorg ervoor d...

Страница 73: ...e ingevroren voeding zo snel mogelijk van de winkel naar de diepvriezer gebracht wordt Ervoor te zorgen dat u de deur niet te vaak opent en ze niet langer open laat dan strikt noodzakelijk Eens voedin...

Страница 74: ...oongemaakt worden en in de speciale lades geplaatst worden Boter en kaas moeten in luchtdichte doosjes geplaatst worden of in aluminiumfolie gewikkeld of in zakken in polyethyleen opgeborgen worden om...

Страница 75: ...ektrische componenten wat kan leiden tot elektrische schokken De hete dampen kunnen de plastic onderdelen beschadigen Het toestel dient droog te zijn alvorens het in werking wordt gesteld BELANGRIJK E...

Страница 76: ...roduct heeft een lichtbron van energie effici ntieklasse F De lichtbron van dit product mag enkel vervangen worden door gekwalificeerde professionals Gelieve contact op te nemen met de dienst na verko...

Страница 77: ...aan te zetten De stekker zit niet of niet goed in het stopcontact Steek de stekker in De zekering is doorgebrand of defect Controleer de zekering vervang ze indien nodig Het stopcontact is kapot Stor...

Страница 78: ...kant van het toestel komt in contact met een ander deel van het toestel of met de muur Buig indien nodig dit onderdeel voorzichtig zodat het wat verder weg is Water op de vloer De waterafvoeropening i...

Страница 79: ...y r e c o m e n d a d o s p o r ELECTRO DEPOT los productos de la marca VALBERG son f ciles de usar fiables y de un acabado impecable Gracias a este electrodom stico puede estar seguro de que cada uso...

Страница 80: ...dom stico C Informaci n til B Uso del aparato Instalaci n Posibilidad de invertir la apertura de las puertas Interfaz del usuario Consejos y sugerencias tiles Limpieza y mantenimiento Soluci n de prob...

Страница 81: ...tato y luz 2 Estantes del frigor fico 3 Tapa del caj n para verduras 4 Caj n para verduras 5 Cajones del congelador 6 Patas niveladoras 7 Estantes de las puertas del frigor fico La imagen solo se ofre...

Страница 82: ...do para ser utilizado a temperaturas ambiente que oscilen entre 10 C y 32 C SN templado este aparato de refrigeraci n est dise ado para ser utilizado a temperaturas ambiente que oscilen entre 16 C y 3...

Страница 83: ...icas se correspondan con el suministro el ctrico de su hogar El electrodom stico debe estar conectado a tierra El enchufe del cable de alimentaci n est provisto de un contacto para ello Si la toma de...

Страница 84: ...o destornillador de estrella llave hexagonal y los componentes en la bolsa de pl stico Tapa de bisagra puerta izquierda x 1 Cierre izquierdo en puerta superior x 1 Cierre izquierdo en puerta inferior...

Страница 85: ...o de la bisagra central con el destornillador de estrella y extraiga la puerta inferior 4 Incline el electrodom stico hacia atr s y retire las patas tal y como se indica a continuaci n seguidamente re...

Страница 86: ...tales 7 Retire las juntas de la puerta del frigor fico y del congelador y luego f jelas despu s de girarlas 8 Retire los cierres originales de las puertas superior e inferior y proceda a instalar los...

Страница 87: ...s est n cerradas en todos los lados antes del apriete final Seguidamente inserte la bisagra superior y atorn llela a la unidad superior y fije la tapa de la bisagra en bolsa de accesorios con un torni...

Страница 88: ...Nivelaci n del electrodom stico Para ello ajuste las dos patas niveladoras en la parte delantera de la unidad Si el aparato no est nivelado las puertas y la alineaci n de la junta magn tica no encajar...

Страница 89: ...per se selecciona 2 Ajuste de los indicadores de temperatura del compartimento del frigor fico El indicador encendido significa que se ha seleccionado la temperatura relacionada Modo Super Activar mod...

Страница 90: ...tura en el congelador ser m s elevada Por el contrario la temperatura en el compartimento del congelador ser m s baja si el mando deslizante se mueve hacia Para un uso normal se recomienda la posici n...

Страница 91: ...st muy fr o solo debe utilizarse de manera puntual con determinadas operaciones como congelaci n r pida o fabricaci n de hielo y debe ajustarse en sus valores normales al terminar Primer uso Limpieza...

Страница 92: ...a carne de ave pescado Caj n estante central para patatas fritas verduras congeladas Caj n estante superior para helados frutas congeladas alimentos horneados congelados Congelaci n de alimentos fresc...

Страница 93: ...ente en funci n del tiempo del que se disponga para ello Algunos alimentos de peque o tama o pueden incluso cocinarse todav a congelados nada m s salir del congelador En este caso el tiempo de cocci n...

Страница 94: ...83 ES Utilizaci n del aparato B Desmonte el caj n inferior 1 Extraiga el caj n inferior hasta la posici n tope 2 Eleve el caj n frontal 3 Extraiga el caj n inferior...

Страница 95: ...e limpios Separe los alimentos en peque as porciones a fin de facilitar una congelaci n completa y r pida y para poder descongelar posteriormente solo la cantidad de alimento que precise Envuelva los...

Страница 96: ...las precauciones necesarias para mantener la cadena de fr o de los alimentos congelados Asegurarse de que el tiempo transcurrido entre la compra de los alimentos congelados y su introducci n en el co...

Страница 97: ...en cualquier estante Frutas y verduras estos deben lavarse bien y colocarse en el o los cajones especiales suministrados mantequilla y queso deben colocarse en recipientes herm ticos especiales o env...

Страница 98: ...n los componentes el ctricos y esto podr a provocar una descarga el ctrica Los vapores calientes pueden da ar las piezas de pl stico El electrodom stico debe estar seco antes de volver a ponerlo en fu...

Страница 99: ...te producto contiene una fuente de luz de clase de eficiencia energ tica G La fuente de luz de este producto solo puede ser reemplazada por profesionales calificados P ngase en contacto con el servici...

Страница 100: ...chufe de red no est enchufado o est suelto Introduzca el enchufe de red El fusible se ha fundido o est defectuoso Compruebe el fusible y c mbielo si es necesario El enchufe est defectuoso Las aver as...

Страница 101: ...de la parte trasera del electrodom stico toca otra parte del electrodom stico o la pared Si fuese necesario doble con cuidado el elemento para que no moleste Hay agua en el suelo El orificio de drenaj...

Страница 102: ...91 Notes Notities Notas...

Отзывы: