background image

12

13

EN

EN

Using the appliance

Using the appliance

C

C

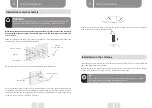
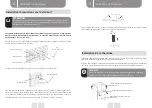
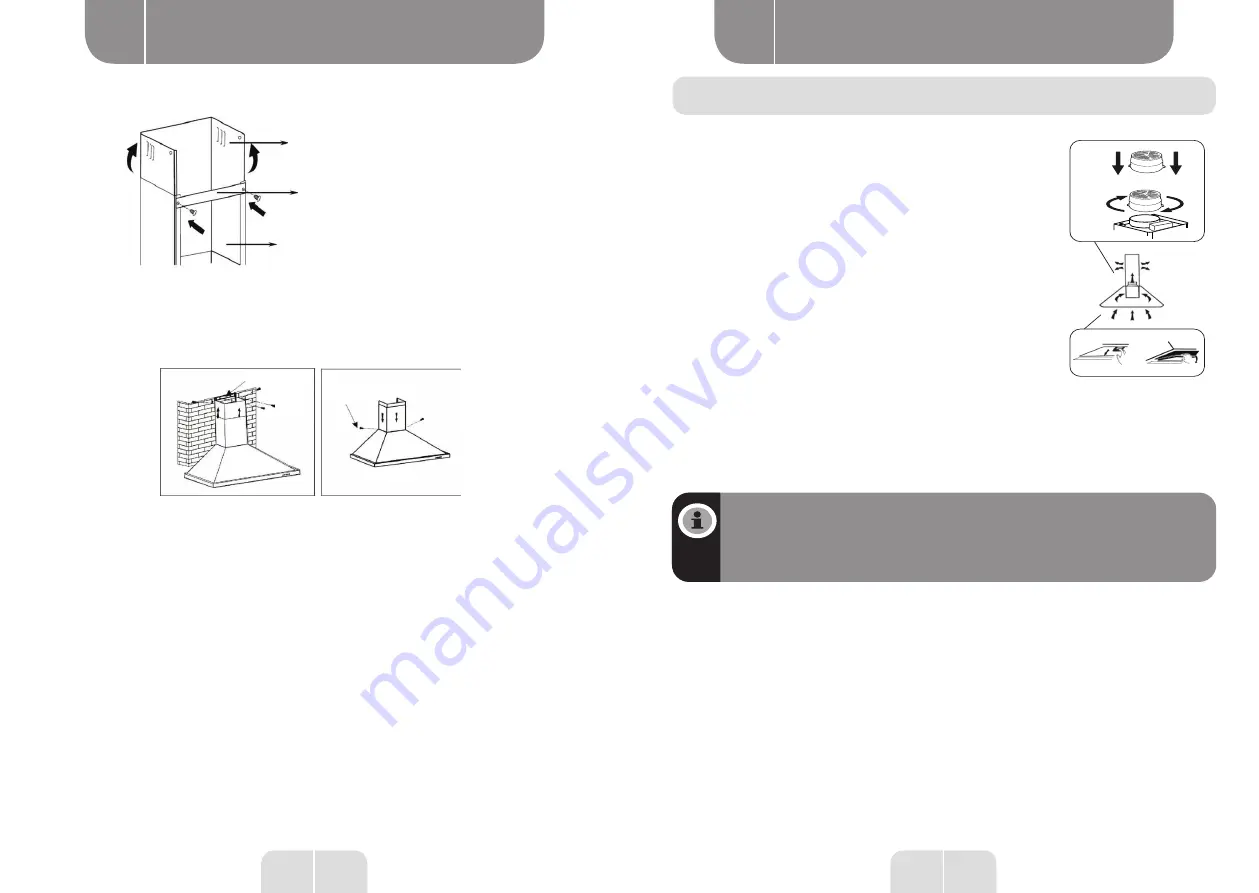
Cheminée décorative supérieure 

(intérieure)

Support de cheminée inférieure

Cheminée décorative inférieure 

(extérieure)

Decorative upper chimney (inside)

Lower chimney bracket

Decorative lower chimney (outside)

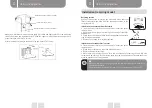
Make two 8 mm holes in which to house plate II. Screw in and tighten plate II to the wall using 

two of the screws and dowels provided. Slide the upper chimney upwards and attach it to 

plate II using two 8 mm ST4 screws.

Attach the lower chimney to the hood using two 8 mm ST4 screws.

Vis

Plaque II

4x8mm

4x30mm

Plate II

4x8mm

4x30mm

Screws

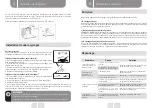
Recycling version 

Ask your salesperson to provide you with some active charcoal 

filters to transform the hood from the evacuation version to the 

recycling version. 

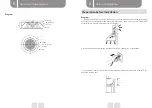
Install the active charcoal filter (cassette)

• The aluminium filter must be removed to install the active

charcoal filter.

• Open the grating, press the locking device and pull the filter

downwards.

• Place the active charcoal filter inside the appliance and attach

it by turning anticlockwise.

• Replace the grating in its original position.

Install the active carbon filter (cut out)

• The aluminium filter must be removed to install the active
charcoal filter.
• Place the precut filter on top of the aluminium filter.
• Replace the aluminium filter.
• We recommend running the hood for a few minutes before starting to cook. We also
recommend switching it off 15 minutes after cooking has finished to eliminate odours as
much as possible and remove bad air.

NB

Make sure that the filter is properly fixed in place 

Otherwise it could work loose 

and present a hazard .

The installation of a carbon filter reduces the extraction power of the hood.

Installation (recycling mode)

Содержание 970142

Страница 1: ...t sur présentation du ticket de caisse NL GARANTIEVOORWAARDEN Dit product wordt gegarandeerd voor een periode van 2 jaar vanaf de aankoopdatum voor elke storing die het gevolg is van een fabricagefout of het materiaal Gebreken of schade door slechte installatie onjuist gebruik of abnormale slijtage van het product worden niet gedekt door deze garantie op vertoon van kassabon ES CONDICIONES DE GARA...

Страница 2: ...1 2 3 4 5 ...
Страница 3: ...ll bring you satisfaction Welcome to ELECTRO DEPOT Visit our website www electrodepot fr A Before using the appliance C Using the appliance B Overview of the appliance Description of the appliance Technical Information Preparation before installation Installation external outlet Installation in the chimney Installation internal outlet Replacing the bulb Safety information D Practical information M...

Страница 4: ...avoid all risks The room must be well ventilated when using the extractor hood at the same time as appliances which run on the combustion of gas or other fuels Air must not be discharged in a conduit used for the extraction of vapour coming from appliances operating on the basis of the combustion of gas or other fuels You must respect the regulations relating to the evacuation of air WARNING Acces...

Страница 5: ...ximum speed during normal operation Qmax 467 2 Air flow in m3 h in intensive or boost mode if included Qboost 676 5 50 62 68 0 45 0 7 30 0 214 9 192 35 5 3 0 Acoustic air emissions weighted against value A in dB at minimum speed during normal operation Acoustic air emissions weighted against value A in dB at maximum speed during normal operation Lwa Acoustic air emissions weighted against value A ...

Страница 6: ...ration before installation Diagram If you have an external outlet you can connect your extractor hood as illustrated below using an extraction conduit flexible tube made from aluminium enamel or other non flammable material tube with an internal diameter of 150 mm Power down the appliance and disconnect from the mains prior to installation For optimum results the extractor hood should be installed...

Страница 7: ...t mural Extractor hood Wall bracket Once the extractor hood is suspended on the wall bracket remove the grease filters and draw 2 marker points inside the hood so that holes can be made for the safety screws Remove the hood make the two corresponding holes and insert 2 wall dowels Finally fix the safety screws in place using 2 screws ST4 x 30 mm Attach the check valve to the air outlet on the extr...

Страница 8: ...ersion Install the active charcoal filter cassette The aluminium filter must be removed to install the active charcoal filter Open the grating press the locking device and pull the filter downwards Place the active charcoal filter inside the appliance and attach it by turning anticlockwise Replace the grating in its original position Install the active carbon filter cut out The aluminium filter mu...

Страница 9: ...ww consignesdetri fr Problem Cause Solution The lights comes on but the fan is not working The fan blade is stuck Switch off the appliance and contact a qualified maintenance engineer to have it repaired The lights comes on but the fan is not working The light and the fan are not working The bulb has burned out Replace the bulb with a bulb with a suitable wattage The power cable is not property co...

Страница 10: ...priorité nous vous proposons de donner votre avis sur ce produit Il sera transmis et analysé par nos équipes afin d améliorer continuellement le produit Donnez votre avis sur http www electrodepot fr avis client A Avant d utiliser l appareil C Utilisation de l appareil B Aperçu de l appareil Les notices sont aussi disponibles sur le site http www electrodepot fr sav notices http www electrodepot b...

Страница 11: ...nger Il convient d aérer convenablement la pièce lorsque vous utilisez la hotte aspirante en même temps que des appareils dont le fonctionnement repose sur la combustion du gaz ou d autres combustibles L air ne doit pas être rejeté dans un conduit utilisé pour l extraction de fumées émanant d appareils dont le fonctionnement repose sur la combustion de gaz ou d autres combustibles Vous devez respe...

Страница 12: ...itesse maximale en fonctionnement normal Qmax 467 2 Débit d air en m3 h en mode intensif ou boost si inclus Qboost 676 5 Emissions acoustiques de l air pondérées de la valeur A en dB à la vitesse minimale en fonctionnement normal 50 Emissions acoustiques de l air pondérées de la valeur A en dB à la vitesse maximale en fonctionnement normal Lwa 62 Emissions acoustiques de l air pondérées de la vale...

Страница 13: ...héma d illustration Si vous disposez d une évacuation vers l extérieur vous pouvez raccorder votre hotte aspirante tel qu illustré ci dessous au moyen d un conduit d extraction tuyau flexible en aluminium émail ou autre matériau non inflammable d un diamètre intérieur de 150 mm Avant toute installation mettez l appareil hors tension et débranchez le de la prise de courant Pour de meilleurs résulta...

Страница 14: ...les filtres à graisses et tracez 2 points de repère à l intérieur de la hotte pour percer les trous qui accueilleront les vis de sécurité Retirez ensuite la hotte percez les deux trous correspondants et insérez 2 chevilles murales Enfin fixez les vis de sécurité à l aide de 2 vis ST4 x 30 mm Fixez le clapet anti retour sur la sortie d air de la hotte aspirante Ensuite raccordez le tuyau d évacuati...

Страница 15: ...entilateur est coincée Éteignez l appareil et faites le réparer par un personnel d entretien qualifié La lumière s éclaire mais le ventilateur ne fonctionne pas L éclairage et le ventilateur ne fonctionnent pas L ampoule a grillé Remplacez l ampoule par une ampoule de puissance adaptée Le cordon d alimentation n est pas correctement branché Rebranchez l e à l alimentation électrique L appareil éme...

Страница 16: ...EMENT DIRECTIVE 2012 19 EU Afin de préserver notre environnement et notre santé l élimination en fin de vie des appareils électriques et électroniques doit se faire selon des règles bien précises et nécessite l implication de chacun qu il soit fournisseur ou utilisateur C est pour cette raison que votre appareil tel que le signale le symbole apposé sur sa plaque signalétique ou sur l emballage ne ...

Страница 17: ...bleemoplossing Verpakking en milieu Afdanken van uw oude toestel 30 NL Bedankt Proficiat met uw keuze voor een product van VALBERG De selectie en de testen van de toestellen van VALBERG gebeuren volledig onder controle en supervisie van ELECTRO DEPOT We staan garant voor de kwaliteit van de toestellen van VALBERG die uitmunten in hun eenvoudig gebruik hun betrouwbare werking en hun onberispelijke ...

Страница 18: ...eflaag en makkelijke montage Laat kinderen nooit het toestel gebruiken De dampkap is uitsluitend bestemd voor huishoudelijk gebruik Het toestel is niet geschikt om gebruikt te worden met een barbecue in een professionele grill noch voor eender welk commercieel gebruik De dampkap en de filters dienen regelmatig schoongemaakt te worden om de goede werking te bewaren Reinig de dampkap zoals beschreve...

Страница 19: ... Verlichting die door de gebruiker vervangen kan worden Non Totaal toegewezen vermogen in W 88 Maximaal luchtdebiet in m3 u 513 6 Verlichting Code ILCOS D DSR 1 5 S 68 12 V Beschrijving van het toestel Aanraakbedieningen TO01 1 Aan Uit knop Deze wordt gebruikt om de ventilator aan en uit te zetten 2 Knop om de snelheid te verminderen Om de snelheid van de ventilator te verminderen 3 Digitaal weerg...

Страница 20: ...teit gelijktijdig werken mag de negatieve druk in de ruimte niet groter zijn dan 4 Pa 4 10 5 bar Boor 3 gaten van 8 mm om de steun te plaatsen Schroef de houder op de muur en zet vast Voorbeeldschema PC Cache PC Réflecteur Ressort Unité mm 68 5 20 5 ø68 5 ø40 8 PC VERRE Surface en Acier Inoxydable Unité mm Afdekplaat Reflector Veer Stuk mm GLAS Oppervlak in roestvrij staal Stuk mm Voorbeeldschema ...

Страница 21: ...oker vast te zetten dient u te kiezen waar u de steun van de onderste koker zult plaatsen door de gaten te maken die het bevestigen in de volgende stappen mogelijk maken OPMERKING Draai de schroeven niet te vast aan zorg ervoor dat u de bovenste koker telescopisch kunt aanpassen na de montage Installatie afvoer naar buiten toe OPGELET Gelieve kennis te nemen van de waarschuwingen op de instructief...

Страница 22: ...r terug in de oorspronkelijke positie Installeer de actieve koolstoffilter te knippen Om de actieve koolstoffilter te installeren dient u eerst de aluminiumfilter te verwijderen Plaats de vooraf uit te knippen filter op de aluminiumfilter Plaats de aluminiumfilter terug Wij raden u aan de dampkap enkele minuten voordat u begint te koken in werking te stellen We raden ook aan de dampkap pas 15 minu...

Страница 23: ... Wanneer u versleten huishoudtoestellen recycleert levert u een aanzienlijke bijdrage tot de bescherming van ons milieu BESCHERMING VAN HET MILIEU RICHTLIJN 2012 19 EU Wanneer u versleten elektrische en elektronische apparaten recycleert levert u een aanzienlijke bijdrage tot de bescherming van ons milieu en onze gezondheid Dit dient echter wel te gebeuren volgens bepaalde regels en vraagt de betr...

Страница 24: ...ación práctica Mantenimiento Solución de problemas Embalaje y medioambiente Cómo desechar su antiguo aparato 44 ES Muchas gracias Muchas gracias por haber elegido nuestro producto VALBERG Seleccionados testados y recomendados por ELECTRO DEPOT los productos de la marca VALBERG le aseguran una utilización sencilla un rendimiento fiable y una calidad incuestionable Con este dispositivo puede estar s...

Страница 25: ...mpana extractora conforme al manual de instrucciones evitando cualquier riesgo de quemaduras Cualquier tipo de limpieza del aparato que no cumpla con las ins trucciones supone un riesgo de incendio Está prohibida la cocción directa en una cocina de gas Asegúrese de que la cocina esté siempre ventilada Si el cable de alimentación está dañado debe ser remplazado por el fabricante uno de sus técnicos...

Страница 26: ... sistema de iluminación Wl 3 0 Iluminación media en lux del sistema de iluminación en la superficie de cocción Em 70 B Presentación del aparato Descripción del aparato Mandos táctiles TO01 Especificaciones técnicas Marca Valberg Código del producto 970142 Referencia del modelo DH 60 EX 756C v2 Consumo anual de energía en kWh a AECcampana Consumo anual de energía en kWh a AECcampana 10 4 Clase de e...

Страница 27: ...talarse a una distancia de entre 65 y 75 cm por encima de la superficie de cocción 65cm 75cm Características técnicas Corriente asignada tensión en V naturaleza de la corriente y fre cuencia en Hz 220 240 50 Clase de protección eléctrica Classe I Potencia del motor asignada en W 85 Número y tipo de bombilla 2 módulos LED Potencia de la iluminación en W por luz total 1 5 3 Iluminación sustituible p...

Страница 28: ...Lea las advertencias de la ficha de instrucciones relativas al funcionamiento del aparato cuando se evacúe el aire hacia el exterior de la habitación Cuando la campana extractora funcione al mismo tiempo que otros aparatos alimentados por una fuente de energía distinta de la electricidad la presión negativa en la habitación no debe superar los 4 Pa 4 x 10 5 bar Perfore 3 orificios de 8 mm para alo...

Страница 29: ...stalar el filtro de carbón activo debe retirar previamente el filtro de aluminio Abra la rejilla pulse el dispositivo de bloqueo y luego tire del filtro hacia abajo Coloque el filtro de carbón activo en el aparato y luego fíjelo girándolo en el sentido inverso a las agujas del reloj Vuelva a colocar la rejilla en su posición inicial Instale el filtro de carbón activo recortable Para instalar el fi...

Страница 30: ... localidad La valorización de los residuos permite contribuir a conservar nuestro medio ambiente PROTECCIÓN DEL MEDIO AMBIENTE DIRECTIVA 2012 19 EU Para preservar nuestro medio ambiente y nuestra salud la eliminación de los aparatos eléctricos y electrónicos al final de su vida útil debe hacerse según normas muy precisas y requiere la implicación de todos tanto del proveedor como del usuario Es po...

Отзывы: