Installation
We strongly recommend that you install the unit in an easily accessible location, so you can later upgrade
the unit or re-program it in case of incorrect programming.
IMPORTANT
i
8
IVIC-5D Programming (MODE 1)
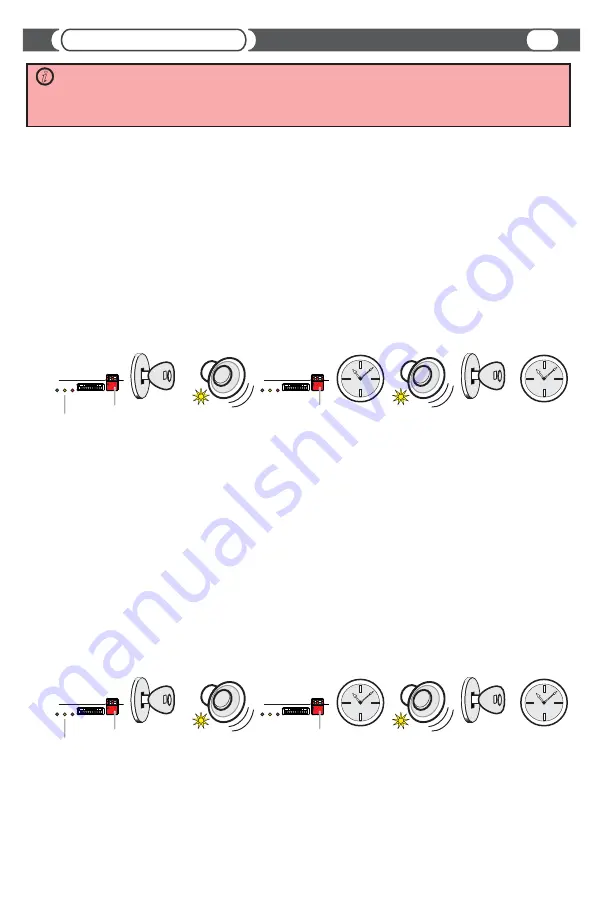
iVIC-5D programming steps:
@
Properly install iVIC-5D unit.
@
Put the “Left” programming switch in the “DOWN” position.
@
Put ignition switch into the “ACC” position.
@
Wait for a long beep followed by a few short beeps. This may take up to one minute.
@
Return programming switches to their default position (both switches “UP”).
Wait up to 30 seconds until confirmation beep.
@
Put ignition switch into the “OFF” position.
@
Wait at least 10 seconds.
@
Put ignition switch into “ACC” or “ON” position.
@
Check iVIC for functionality
iVIC-5D-PA Programming (MODE 3)
iVIC-5D-PA programming steps:
@
Properly install iVIC-5D-PA unit.
@
Put both programming switches in the “DOWN” position.
@
Put ignition switch into the “ACC” position.
@
Wait for a long beep followed by a few short beeps. This may take up to one minute.
@
Return programming switches to their default position (both switches “UP”).
Wait up to 30 seconds until confirmation beep.
@
Put ignition switch into the “OFF” position.
@
Wait at least 10 seconds.
@
Put ignition switch into “ACC” or “ON” position.
@
Check iVIC for functionality
1 2
ON
Left switch
“DOWN”
Ignition into
“ACC” or “ON”
position
Confirmation beep
(Yellow LED blinks)
Both switches
“UP”
ON
1 2
up to 30 sec
Confirmation beep
(Yellow LED blinks)
Ignition into
“OFF” position
up to 10 sec
Yellow LED
1 2
ON
Both switches
“DOWN”
Ignition into
“ACC” or “ON”
position
Confirmation beep
(Yellow LED blinks)
Both switches
“UP”
ON
1 2
up to 30 sec
Confirmation beep
(Yellow LED blinks)
Ignition into
“OFF” position
up to 10 sec
Yellow LED


