


23
Installation manual auroTHERM 0020057143_02
1
2
3
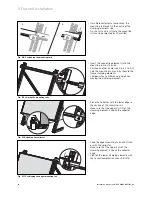
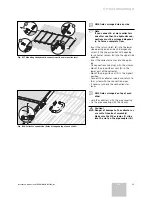
Fig. 6.11 Central mounting rail (field arrangement on top of each other)
u
With fields arranged on top of each
other
• Slide the central mounting rail until it
flushes with the lower collector (
1
).
• Make sure that the hook of the clamping
element is above the collector edge.
• Fix the mounting rail (
2
) for the upper col-
lector to the clamping element.
• Place the upper collector (
3
) in the central
mounting rail.
• Screw the clamping elements of the cen-
tral rail.
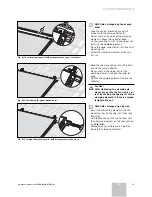
Fig. 6.12 Positioning the upper mounting rail
•
Slide the upper mounting rail until it flush-
es with the lower collector.
• Make sure that the upper part of the
clamping element is above the collector
edge.
• Tighten the clamping elements above the
collector.
a
Caution!
After tightening the clamping ele-
ments, make sure the tension is cor-
rect by shaking the upper part of the
clamping element. If it can be moved,
retighten the nut.
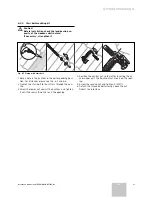
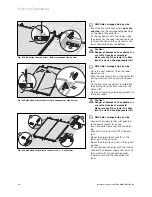
Fig. 6.13 Joining the mounting rails (field arrangement side by side)
n
With fields arranged side by side
• Insert the connecting elements into the
mounting rails by the side, until they lock
into place.
• Join the mounting rails and fix them with
the clamping elements on the roof anchors
(see
Fig. 6.8
).
• Compensate any difference in height by
moving the clamping elements.
On-roof mounting 6
GB