background image

VAG Operation and Maintenance Instructions • 9

Warning: 

Open the threaded plug part 11 only by 3 

turns maximum. The pressure is relieved via the drai-

nage groove in the thread. Maintenance work must not 

be performed before this has been done.

6.3  Maintenance work and replacement of 

 parts

Maintenance activities are:

• Cleaning

• Removing deposits

• Reapplying a coating of corrosion protection (when necessary)

• Gasket replacement (when necessary)

• Air release orifice replacement (when necessary)

Inspection should include examination of:

• Damage and corrosion

• Movability of the float in the shut-off device

• Tightness

• Function

• Nozzle bores free from obstruction

• Visible deposits on floats and guide components

For shaft installation the following additional inspections are 

required:

• Proper condition and cleanliness of the shaft structure
• Working order of the intake and outlet air of the shaft as well

as drain

• Condition of measures for thermal insulation
• Condition of additional protective measures against infiltration

of dirt, microbes and rain water in the shaft

6.3.1  Design

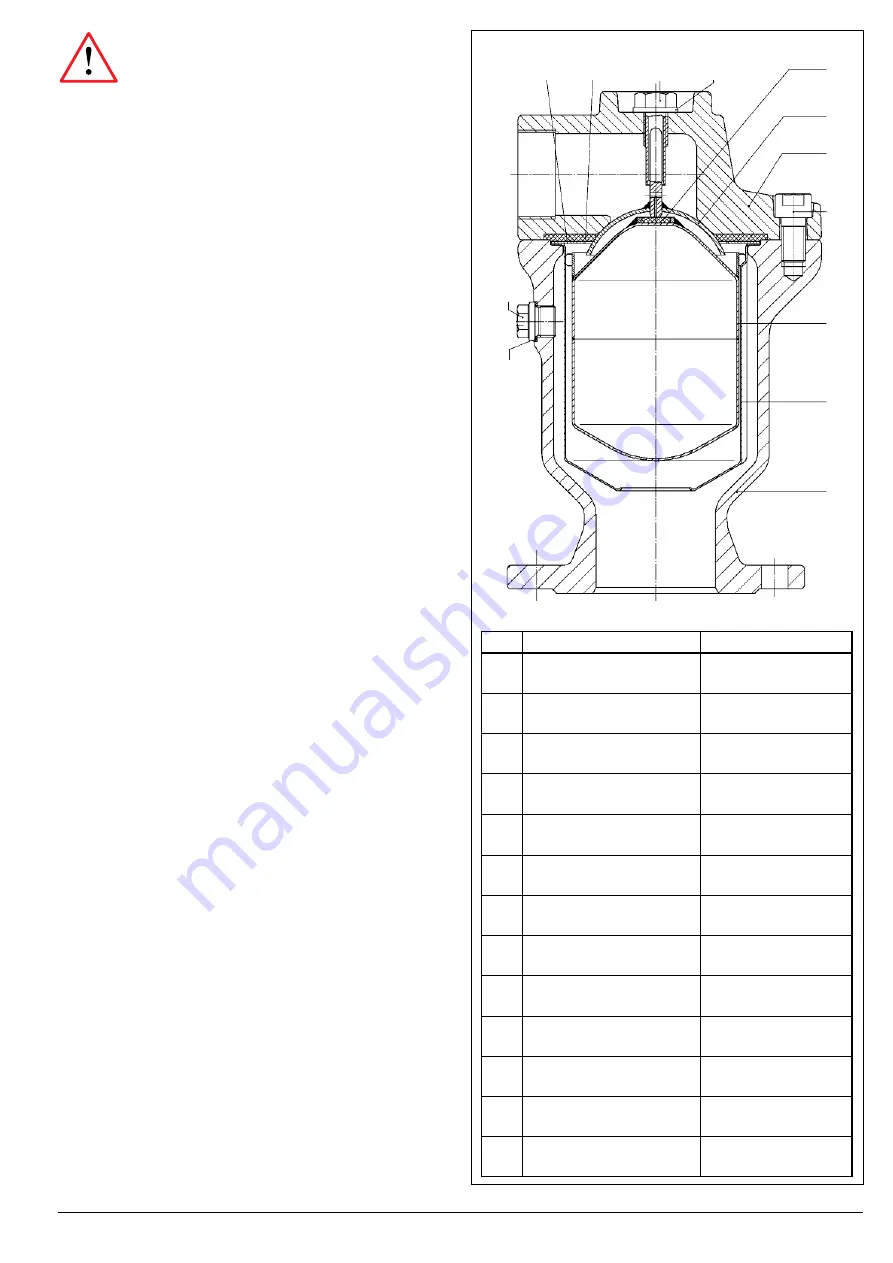
The design view in Picture 14 is a partial overview of the following 

descriptions of the work procedures. Spare parts with associated 

part numbers are available in our document VAG KAT-E 1912.

6.3.2  Recommendations for the replacement 

of parts

All parts should be changed as needed. The interval is oriented 

towards servicing requirements.

For the sealings (part 3.2 and 8) replacement is recommended 

every 5 years.

Replace the sealing ring (part 12) each time you open the threa-

ded plug.

Picture 14: Design

Item Name

Material

1

Body

EN-JS 1030

2

Cover

EN-JS 1030

3.1

Float

DN 50 / PN 16 plastic 

> DN 50 stainless steel 1.4571

3.2

Sealing

EPDM

4

Shell body

1.4541

5

Shut-off device

1.4541

6

Lead srew

1.4305

7

Supporting Disc

1.4541

8A

Flatsealing 

Gasket p=0,1 - 1 bar

EPDM

9

Cylinder Head Screw

A4-70

10

Disc

A4

11

Plug Screw

A4

12

Sealing ring

Centellen

7

11

2

1

8/8A

6

10

3.2

5

9

3.1

12

4

Содержание DUOJET Series

Страница 1: ...KAT B 1912 Edition2 01 18 Operation and Maintenance Instructions VAG DUOJET Automatic Air Valve...

Страница 2: ...nstallation note 6 4 4 1 Installation position downstream from pumps 7 4 4 2 Installation in standpipes 7 4 4 3 Discharging splashing or surge water 7 4 5 Assembly instructions and fittings 8 5 Set up...

Страница 3: ...ng pressure medium temperature please refer to the product rela ted documentation KAT 1912 A For any alternative operating conditions and applications the manufacturer s written approval must be obtai...

Страница 4: ...waste water For information about the corresponding temperature limits please refer to the product related technical documentati on KAT A 1912 In case of alternative operating conditions and applicat...

Страница 5: ...e performance data The small venting cross section is for venting small amounts of air during operation under full internal overpressure Picture 6 Air release small cross section Installation should t...

Страница 6: ...y 600 mm DN 600 1 2 3 4 1 Venting valve 2 Manually operated air inflow and release flush valve 3 Central stop valve 4 Additional flush and discharge valve 4 2 3 Water flow rate The water flow rate asc...

Страница 7: ...ities during the filling process If the VAG DUOJET Automatic Air Valve is installed directly on the standpipe there is a risk of the ball closing prematurely To prevent premature closing we recommend...

Страница 8: ...sidue or dirt particles are present in the pipeline they may clog the installation while the pipeline is being purged This may impair the function of the valve or even block it In particular after rep...

Страница 9: ...shaft as well as drain Condition of measures for thermal insulation Condition of additional protective measures against infiltration of dirt microbes and rain water in the shaft 6 3 1 Design The desig...

Страница 10: ...disassemble and remove foreign matter Internal pressure too low To achieve tightness internal pressure must be at least 3 m water column Replace gasket with a low pressure gasket 0 1 1 bar Deposits f...

Страница 11: ...Edition2 01 2018 VAG GmbH Carl Reuther Str 1 68305 Mannheim Germany Tel 49 621 749 0 Fax 49 6 21 749 2153 info vag group com www vag group com...

Отзывы: