Vaderstad Rapid RD 300-400S Скачать руководство пользователя страница 3

3

1.  Yellow circuit –   

The main circuit for lifting, lowering, bout marker arms 

and 

      operation 

of 

front 

tools. 

2.   Red circuit –  

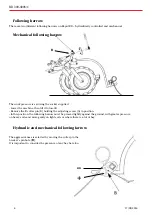
Circuit for hydraulic feed and hydraulic following harrow, if the 

ma 


chine is equipped with one.


See attachment 2 for tips on how to set the correct flow.
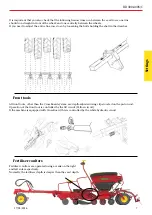
3.   White circuit – 

Operation of CrossBoard.

4.   Green circuit – 

If the machine is equipped with Autopilot (only ControlStation).

Circuit

Function

Require-

Approx. 30 l/

min

15–30 l/min 

with variable 

flow.

Approx. 10 l/

min

17/05/2016

RD 300-400S/C

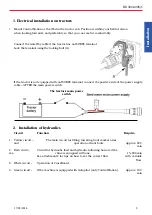
1. Electrical installation on tractors

2.  Installation of hydraulics

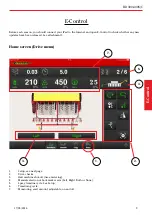
•  Mount ControlStation or the iPad in the tractor cab. Position it within your field of vision 

when looking forwards, and preferably so that you can reach it comfortably.
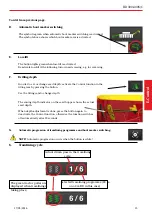
Tractor main 

switch

Connect the GateWay cable if the tractor has an ISOBUS terminal.
Lock the terminal using the locking bolt (A).

If the tractor is not equipped with an ISOBUS terminal, connect the positive side of the power supply 
cable – AFTER the main power switch.

The tractor’s main power 

switch

Installation

Содержание Rapid RD 300-400S

Страница 1: ...Quick Start 903134 en 17 05 2016 2 Rapid RD 300 400S RD 300 400C S N 16001...

Страница 2: ...przeczyta przed rozpocz ciem u ytkowania maszyny is trais m c bu materi ls neaizvieto lieto anas instrukciju is Quickstart vadovas nepakei ia instrukcijos See kiirjuhend Quickstart ei asenda kasutusj...

Страница 3: ...0 l min 15 30 l min with variable flow Approx 10 l min 17 05 2016 RD 300 400S C 1 Electrical installation on tractors 2 Installation of hydraulics Mount ControlStation or the iPad in the tractor cab P...

Страница 4: ...eper One tip could be to look at the frame plate or the bottom edge of the plastic cap in relation to the ground If the machine is equipped with towing eyelets the settings are changed with different...

Страница 5: ...not lift the machine more than necessary and so that the following harrow also works on headlands See the respective overviews for iPad and ControlStation on how to connect and disconnect the function...

Страница 6: ...et supplied Lower the machine then lift it to low lift Remove the R cotter pin B holding the adjusting screw A in position In this position the following harrow must be pressed lightly against the gro...

Страница 7: ...the shaft in the drawbar Front tools All front tools other than the CrossBoard system are depth adjusted using clips located on the piston rod Operation of the front tool is controlled by the lift cir...

Страница 8: ...the right height you should also tighten the screw union B to prevent play The spill prevention plates are also adjustable horizontally by moving the bolts on the top C C It is also possible to adjus...

Страница 9: ...4 Manual selection of bout marker arm Left Right Both or None 5 Spray tramline cycle See Setup 6 Tramlining cycle 7 Monitoring seed amount adjustable on and off 1 2 3 4 7 6 Before each season you shou...

Страница 10: ...ppear NOTE Feed output stops if you access any of these menus Select Yes Before calibration is performed the bottom flaps and sliding hatches must be correctly adjusted If small sized seed needs sowin...

Страница 11: ...tray with grain Pulses are now counted for as long as the button is pressed in 7 Pour the seed from the tray into the calibration bag and weigh the content 8 Enter the value 3 and the computer will ca...

Страница 12: ...he button again otherwise it will return to its switched off position after 30 seconds The button remains green as long as this is activated C Hydraulic following harrow Press the button to access an...

Страница 13: ...the lifting ram by pressing the button Use the lifting ram to change depth The sowing depth indicator on the seed hopper shows the actual seed depth When depth adjustment is done press the button agai...

Страница 14: ...side using the lever levers on the side of the seed hopper The rear lever is for seed and the front lever is for fertiliser In this case the left side of the machine 2 Select Left on the iPad ISOBUS i...

Страница 15: ...ton will then be greyed out and STOP will appear in the display Example Adjustment of the sown amount Select actual sown amount and a pop up will appear make changes using the drop down list dependin...

Страница 16: ...calibration is performed the bottom flaps and sliding hatches must be correctly adjusted If small sized seed needs sowing normal rollers must also be disengaged See attachment 1 Mount the calibration...

Страница 17: ...ote is on the left side of the seed hopper 6 Empty the trays and place them back in calibration position 7 Pour the seed from the tray into the calibra tion bag and weigh the content 8 Enter the value...

Страница 18: ...e plus button to proportionally in crease the seed rate and minus to reduce it Press the ear button to return to the preset value Adjustable fertiliser application rate Press the plus button to propor...

Страница 19: ...7 Half machine shut off Half machine shut off occurs in two stages 1 Go to the machine and close the selected side using the lever levers on the side of the seed hopper The rear lever is used for seed...

Страница 20: ...20 17 05 2016 RD 300 400S C Sowing table grain Position of sliding hatches Bottom flap position If relevant disengagement of normal roller Attachment 1...

Страница 21: ...21 17 05 2016 RD 300 400S C Sowing table fertiliser Position of sliding hatches Bottom flap position 6 Info menu and Basic settings Attachments...

Страница 22: ...You can stop movement of the above on the iPad ISOBUS or ControlStation using adjustment of sown amount re mote on the side of CS by holding in the manual output button instead of driving in the field...

Страница 23: ...able updates these will be downloaded Connect the iPad to Gateway to see the following question Select OK Updates will now be downloaded in Gateway which will re start when done DONE A message will ap...

Страница 24: ...V derstad AB SE 590 21 V DERSTAD Sweden Phone 46 142 820 00 www vaderstad com...

Отзывы: