background image

GroupSTATION 


Vaddio GroupSTATION - Document Number 342-0671 Rev A


           Page 13 of 40 


Installation Instructions: 

To install the GroupSTATION, follow the Step-by-Step Installation instructions. 
 

Step 1:  Position the GroupSTATION Camera/Sound Bar  

Position the Camera/Sound Bar at the front of the room over, 
or under, the main monitor located in the room.  If the 
system is to be wall mounted, please see the note below. 
 

The Premium Wall Mount Bracket for the Camera/Sound Bar is available as an 

Accessory Option and is also packaged with the GroupSTATION Deluxe and 
GroupSTATION Premier Systems.  It is highly recommended to purchase the Wall Mount 
or buy a package that includes the mount if the intent is to mount the Camera/Sound Bar 
to the wall above the monitor. 

 
If the system is to be shelf mounted, cabinet mounted or mounted to a portable stand with wheels, detailed 
drawings of the GroupSTATION elements are available at Vaddio.com.  General dimensions will also be available 
in the specification section of this here manual. 
 

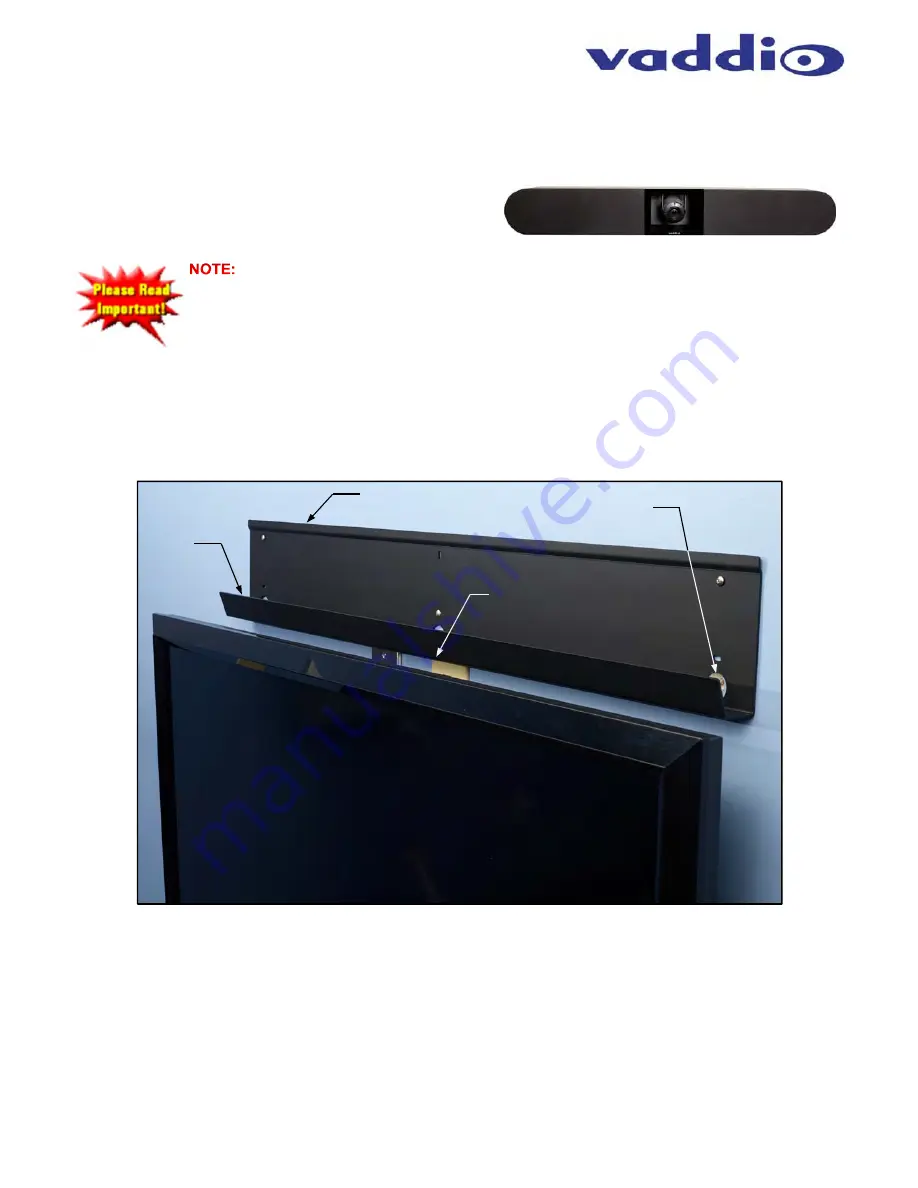
Image:  Mounting the Camera/Sound Bar using the Vaddio Premium Wall Mount 


Step 1:  (continued) 

a)  Determine optimum location of the GroupSTATION in respect to the room’s large LCD display.  

b)  Location of the GroupSTATION Camera/Sound Bar should be based upon a position that yields the best 

eye contact for the participants in the meeting.   

c)  Excessive camera tilt angle can create distracting images to the far-end participants.   

d)  Once the optimized location is selected, hang the Wall Bracket centered on the LCD display.   

e)  Attach the Wall Bracket with hardware provided in the kit.   


Z-Clip Top Channel  

1.125” cable cutouts 
for in-wall cabling X 3 

Cable 

Tray  

2” x .75” Cutout - Bottom of Tray 
Cables can run straight down 
behind monitor  

Room Monitor  

  PC’s display is extended to the front monitor 


  Camera/Sound Bar will cover the cable tray and 

in this illustration the monitor will slide back to 
cover the bottom of the cable tray and hide all 
the cables 

Premium Wall Mount  

Содержание GroupSTATION 999-8900-000

Страница 1: ...N Deluxe System with Premium Wall Mount North America 999 8904 001 GroupSTATION Deluxe System with Premium Wall Mount International 999 8905 000 GroupSTATION Premier System Premium Wall Mount and PC t...

Страница 2: ...GroupSTATION Vaddio GroupSTATION Document Number 342 0671 Rev A Page 2 of 40 Inside Front Cover Blank...

Страница 3: ...t Time Set up with the GroupSTATION 12 Diagram Basic GroupSTATION System Connectivity 12 Installation Instructions 13 Step 1 Position the GroupSTATION Camera Sound Bar 13 Image Mounting the Camera Sou...

Страница 4: ...Firmware Update in Progress 26 Screen Shot System Utilities 27 Screen Shot Help Menu 27 Updating the GroupSTATION 28 Updating Instructions 28 GroupSTATION User Operations 29 Making a VoIP Call 30 Acce...

Страница 5: ...h the MicPOD Dock carrying power video audio and network making installation a pure breeze A Premium Wall Mount with integrated cable tray and a 4x4 PC Interface Cable are both sold separately as acce...

Страница 6: ...n Power Cable One 1 Installation and User Guide GroupSTATION Base System 999 8900 001 International One 1 GroupSTATION Camera Sound Bar One 1 GroupSTATION MicPOD Dock Controller and Dialer One 1 Group...

Страница 7: ...h American Power Cable One 1 Installation and User Guide One 1 Premium Wall Mount with Integrated Cable Tray One 1 Pair Z clips for the back of the Camera Sound Bar Four 4 8 32 x 5 16 Phillips pan hea...

Страница 8: ...Controller and Dialer One 1 GroupSTATION 25 7 62m Cat 6 SSTP Shielded Link Cable One 1 24 VDC 3 0 Amp Power Supply One 1 Euro Power Cable One 1 UK Power Cable One 1 Installation and User Guide One 1...

Страница 9: ...l state Push and hold the Power button for 3 01928 seconds and the system will enter Standby Mode In the off position USB audio video ins and outs as well as VoIP functions are disabled and unit is in...

Страница 10: ...ntrol It also supplies power from Camera Sound Bar to the MicPOD Dock Uses 25 Cat 6 SSTP cable with individually shielded pairs included to connect Link ports The LINK port is marked in red on both si...

Страница 11: ...00 jack with Green and Yellow LEDs verifying connection and activity The GroupSTATION has two IP addresses one address is dedicated to the VoIP User Agent and the second IP address is for the embedded...

Страница 12: ...etes the physical installation of the GroupSTATION The final step is to log on to the GroupSTATION web pages to complete the VoIP configuration of the device A diagram of the system connection is depi...

Страница 13: ...lements are available at Vaddio com General dimensions will also be available in the specification section of this here manual Image Mounting the Camera Sound Bar using the Vaddio Premium Wall Mount S...

Страница 14: ...located Image Side View of Wall Mount and Cable Tray Pull enough cable through the cable tray about 6 to 8 to allow easy connections to the left side connector panel once the Camera Sound Bar is moun...

Страница 15: ...Diagrams Mounting the Z Clips on the Z Channel Mount the Z Clips on the Camera Sound Bar onto the Z Channel of the Wall Mount Z Clips mounted to back of the Camera Sound Bar Remove the End caps REAR...

Страница 16: ...the end cap and peel off the protective film covering the acrylic frame Do not plug the power supply s AC power cord into the AC wall outlet yet Please wait until the LINK Cat 6 SSTP cable is plugged...

Страница 17: ...AC power cord into the wall outlet Make this connection first The LINK cable provides power to the MicPOD and automatically establishes video audio and control between the two devices 2 All of the res...

Страница 18: ...facing with any LAN WAN The network professionals will know how to set up the IP addresses in Static or DHCP modes as well as the VoIP functionality Reinvention of the wheel is not required Image Pres...

Страница 19: ...nd Static configurations are provided below DHCP IP Set up Dynamic Host Configuration Protocol Skip this section if Static IP is used If the LAN is using DHCP dynamic host configuration protocol serve...

Страница 20: ...ances the bass response of the GroupSTATION speakers b VoIP TX Boost Adds a 3dB gain to the transmitted audio channel for the VoIP function c USB TX Boost Adds a 3dB gain to the USB Record Microphone...

Страница 21: ...nt network from the Web Server with unique Mac and IP addresses This allows GroupSTATION VoIP functions to be operated on complete different network segment than the embedded web server Screen Shot Vo...

Страница 22: ...he list will be the preferred codec to be used during the call negotiation The codec types will change position with the up or down arrows that are next to each setting Audio Processing Various audio...

Страница 23: ...hone numbers are displayed Screen Shot DHCP Network The Networking page is used to configure the GroupSTATION IP addressing non VoIP It supports DHCP or Static IP addresses and a Host Name It also inc...

Страница 24: ...s the subnet mask and the gateway and click on save Double check the data prior to clicking save Screen Shot Security The administrator account has a password for login security The admin account will...

Страница 25: ...ated internal storage capabilities for up to one week The administrator has the ability to clear the log or download the log to a local PC Screen Shot System Menu The System menu is intended to displa...

Страница 26: ...ation pop up menu appears to allow the admin a chance to cancel and provide instructions on how to proceed Always read and follow the instructions and warnings for all pop up confirmation menus Screen...

Страница 27: ...d the system will have to be re configured from the start All the settings will be overwritten and there isn t any go back key so please be real sure Screen Shot Help Menu The Help menu provides gener...

Страница 28: ...within the web pages Press the Choose File button and navigate to the GroupSTATION firmware image stored in step 1 Once selected choose Begin Firmware Update 4 After clicking on Begin Firmware Update...

Страница 29: ...s LCD Camera Zoom IN or OUT The Zoom IN and Zoom OUT buttons control the camera s 19X optical zoom lens This button does allow Press and Hold capabilities for zooming to the desired field of view PIP...

Страница 30: ...ect pressing the Hang up Button will clear the number allowing re entry Step 2 Once the desired number is entered Press the Send button The OSD will indicate that a call is trying to be established to...

Страница 31: ...as the default Playback device Image Screen Shot Vaddio STATION Selected for Playback The GroupSTATION also supports HDMI audio and can be alternatively selected as the default audio playback source T...

Страница 32: ...as PC Camera The GroupSTATION emulates a USB Web Camera to the PC and must be selected as the source with any software application using this function Once the GroupSTATION is connected to the PC via...

Страница 33: ...ding PC media players Quick Time 10 2 VLC Media Player 2 1 0 Real Player 16 0 Compatibility Operating Systems Apple OS X 10 7 and above 10 8 in process Windows XP w Service Pack 3 with known issues an...

Страница 34: ...address shipping address product serial numbers and original purchase order number Describe the reason for repairs or returns as well as the date of purchase See the General RMA Terms and Procedures s...

Страница 35: ...ty to operate this equipment ICES 003 Compliance This digital apparatus does not exceed the Class A limits for radio noise emissions from digital apparatus set out in the Radio Interference Regulation...

Страница 36: ...rs with overall shield gold contacts and metal shielded RJ 45 Printed on Jacket Cat 6 26 AWGx4pr SSTP IEC 60332 1 Conforms to ISO IEC 11801 EN 50288 ANSI TIA EIA 568 C 2 3P ETL Verified CMX UL C UL CM...

Страница 37: ...ION IP Address VoIP The GroupSTATION IP address information for VoIP is entered under the VoIP Menu tab The following items will need to be entered 1 Hostname _________________________________________...

Страница 38: ...DTMF in band Click to Enable DTMF ON Time Default 150ms 0 Sets DTMF timing DTMF OFF Time Default 50ms Sets DTMF timing VAD Enabled Check to Enable Voice Activity Detection Used for bandwidth managemen...

Страница 39: ...GroupSTATION Vaddio GroupSTATION Document Number 342 0671 Rev A Page 39 of 40 Inside Rear Cover Blank...

Страница 40: ...2013 Vaddio All Rights Reserved Reproduction in whole or in part without written permission is prohibited Specifications and pricing are subject to change without notice or obligation Vaddio GroupSTA...

Отзывы: