


CeilingVIEW SD CCU
Vaddio CeilingVIEW SD CCU Installation and User Guide - Document 341-769 Rev. A
Page 8 of 16
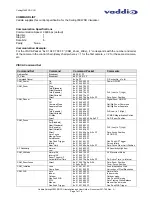
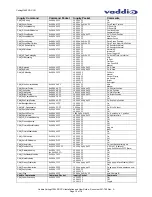
CAM_Rgain Reset
Up
Down
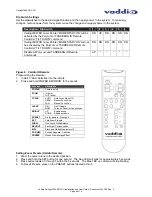
Direct
8x 01 04 03 00 FF
8x 01 04 03 02 FF
8x 01 04 03 03 FF
8x 01 04 43 00 00 0p 0q FF
Manual Control of R Gain
Pq: R Gain
CAM_Bgain Reset
Up
Down
Direct
8x 01 04 04 00 FF
8x 01 04 04 02 FF
8x 01 04 04 03 FF
8x 01 04 44 00 00 0p 0q FF
Manual Control of B Gain
Pq: B Gain
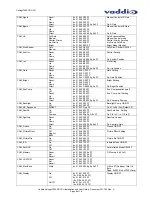
CAM_AE Full
Auto
Manual
Shutter Priority
Iris Priority
Bright
8x 01 04 39 00 FF
8x 01 04 39 03 FF
8x 01 04 39 0A FF
8x 01 04 39 0B FF
8x 01 04 39 0D FF
Auto Exposure Mode
Manual Control mode
Shutter Priority Auto Exp
Iris Priority Auto Exp
Bright Mode (Manual)
CAM_SlowShutter Auto
Manual
8x 01 04 5A 02 FF
8x 01 04 5A 03 FF
Auto Slow Shutter ON/OFF
CAM_Shutter Reset
Up
Down
Direct
8x 01 04 0A 00 FF
8x 01 04 0A 02 FF
8x 01 04 0A 03 FF
8x 01 04 4A 00 00 0p 0q FF
Shutter Setting
Pq: Shutter Position
CAM_Iris Reset
Up
Down
Direct
8x 01 04 0B 00 FF
8x 01 04 0B 02 FF
8x 01 04 0B 03 FF
8x 01 04 4B 00 00 0p 0q FF
Iris Setting
Pq: Iris Position
CAM_Gain Reset
Up
Down
Direct
8x 01 04 0C 00 FF
8x 01 04 0C 02 FF
8x 01 04 0C 03 FF
8x 01 04 4C 00 00 0p 0q FF
Gain Setting
Pq: Gain Position
CAM_Bright Reset
Up
Down
Direct
8x 01 04 0D 00 FF
8x 01 04 0D 02 FF
8x 01 04 0D 03 FF
8x 01 04 4D 00 00 0p 0q FF
Bright Setting
Pq: Bright Position
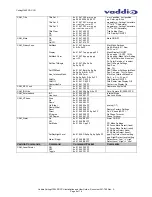
CAM_ExpComp On
Off
Reset
Up
Down
Direct
8x 01 04 3E 02 FF
8x 01 04 3E 03 FF
8x 01 04 0E 00 FF
8x 01 04 0E 02 FF
8x 01 04 0E 03 FF
8x 01 04 4E 00 00 0p 0q FF
Exp. Compensation on/off
Exp. Comp. Amt Setting
Pq: ExpComp Position
CAM_Backlight On
Off
8x 01 04 33 02 FF
8x 01 04 33 03 FF
Backlight Comp. ON/OFF
CAM_AE_Response
DIRECT
8x 01 04 SD pp FF
Pp: 01 to 20 (hex) Default: 01
CAM_SpotAE On
Off
Position
8x 01 04 59 02 FF
8x 01 04 59 03 FF
8x 01 04 29 0p 0q 0r 0s FF
Spot Auto Exp. Setting
Pq: X(0 to F), rs: Y(0 to F)
CAM_Aperture Reset
Up
Down
Direct
8x 01 04 02 00 FF
8x 01 04 02 02 FF
8x 01 04 02 03 FF
8x 01 04 42 00 00 0p 0q FF
Aperture Control
Pq: Aperture Gain
CAM_Freeze On
Off
8x 01 04 62 02 FF
8x 01 04 62 03 FF
Freeze ON/OFF
CAM_PictureEffect Off
Neg.Art
B&W
8x 01 04 63 00 FF
8x 01 04 63 02 FF
8x 01 04 63 04 FF
Picture Effect Setting
CAM_PictureFlip On
Off
8x 01 04 66 02 FF
8x 01 04 66 03 FF
Picture flip ON/OFF
CAM_ICR On
Off
8x 01 04 01 02 FF
8x 01 04 01 03 FF
Infrared Mode ON/OFF
CAM_AutoICR On
Off
8x 01 04 51 02 FF
8x 01 04 51 03 FF
Auto Infrared Mode ON/OFF
CAM_Memory Reset
Set
Recall
8x 01 04 3F 00 0p FF
8x 01 04 3F 01 0p FF
8x 01 04 3F 02 0p FF
P: Memory # (=0 to 5)
CAM_CUSTOM Reset
Set
Recall
8x 01 04 3F 00 7F FF
8x 01 04 3F 01 7F FF
8x 01 04 3F 02 7F FF
CAM_MemSave
Write
8x 01 04 23 0X 0p 0q 0q FF
X:00 to 07 (Address) Total 16
Byte
Ppqq: 0x0000 to 0xFFFF (Data)
CAM_Display On
Off
On/Off
8x 01 04 15 02 FF
(8x 01 06 06 02 FF)
8x 01 04 15 10 FF
(8x 01 06 06 03 FF)
8x 01 04 15 10 FF
(8x 01 06 06 10 FF)
Display ON/OFF