background image

Auto Presenter 


AutoPresenter Manual 342-0029 Rev D 


               Page 8 of 28 

Operating the PIP: 

The PIP (picture-in-picture) can be accessed via RS-232 
or with the IR Remote control.  For RS-232, see the 
attached API in Appendix 1. 
 
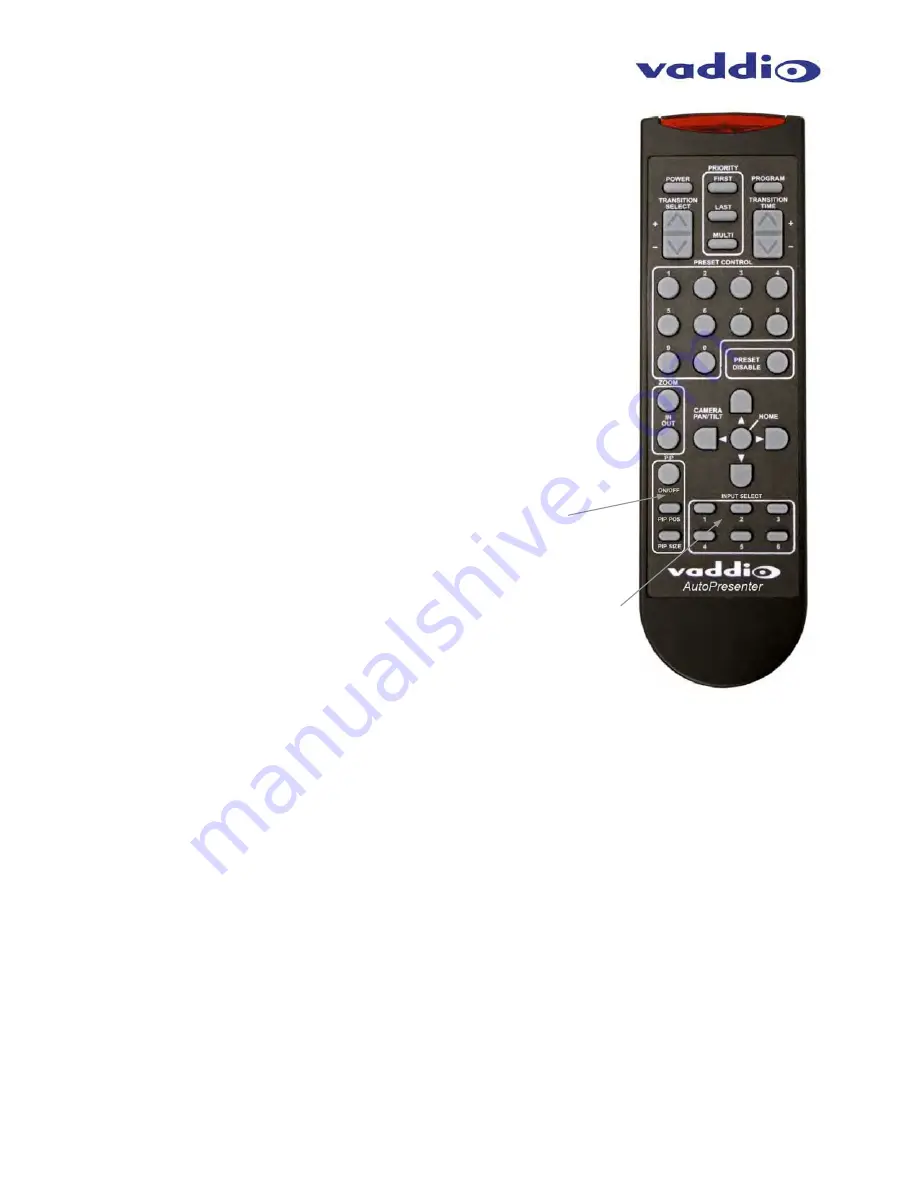
To operate the PIP with the IR remote control, perform 
the following steps: 
 
1)  Chose a background input by selecting 1 through 6 

on the INPUT SELECT buttons. 

 
2)  Press the PIP ON/OFF Button and then press an 

INPUT SELECT button other than the input selected 
as the background.  The PIP will appear in the 
foreground layer as a PIP.    

 
3)  To change the size of the PIP, press the PIP SIZE 

button and the PIP size will cycle through three (3) 
PIP sizes (small, medium & large). 

 
4)  To change the position of the PIP, press the PIP 

POS button and the PIP will cycle through the 
available positions clockwise. 

 
5)  To turn off the PIP press the PIP ON/OFF button 

and the PIP will close.   


AutoPresenter “Content Plus” 
PIP Trigger Feature: 

The Content Plus feature is a unique feature that allows the presenter to select background shots while 
retaining the original PIP window.  This works by selecting a background (like a PC input or Video White 
Board) selecting a PIP input.  The next input selected will momentarily move the PIP to full screen, switch 
the background and then restore the PIP to the previous size and position with a different background.


AutoPresenter with Built-in PresenterPOD Support 

The Vaddio Presenter Pod System (consisting of the PresenterPOD and Pod Interface) is a unique 
presenter control device that employs three trigger outputs and an ultrasonic presenter sensor that allows 
any presenter to easily control the content in the meeting as well as turn On/Off the PIP video within any  
AutoPresenter preset. 


To assign a PIP Trigger number: 

1)  From the main menu scroll down until the PIP Trigger Menu is shown, touch the Select key. 
2)  The PIP trigger can be assigned to Triggers 1 through 24.  Scroll to the number you have 

selected for the PIP trigger for PIP On/Off and touch Select. 


  The type or mode of the trigger can also be selected in order to work with momentary or latching 

trigger products.  


After selecting a PIP Trigger number: 
1)  From the main menu scroll to the PIP Trigger Mode and touch select. 
2)  Choose between the two (2) options, Momentary of Latched, and touch select. 

 
The AutoPresenter is now configured for PIP On/Off with the trigger number assigned and the trigger type 
assigned.  Please see the PresenterPod and other Vaddio triggering products for additional information. 

Input Select 
Buttons 

PIP 
Controls 

Figure 5:  
I

R Remote


Содержание AutoPresenter 999-5675-000

Страница 1: ... ER R Automated Content Presentation System HD SD Seamless Video Switching System with Video Transitions Switchable PIP Integration with the Vaddio AutoTrak and PresenterPOD Systems Up Down Converting of Inputs and Outputs and Preset PTZ Camera Control Model Number 999 5675 000 NTSC Model Number 999 5675 001 PAL Camera and Electronic Products for Integrators ...

Страница 2: ...Auto Presenter AutoPresenter Manual 342 0029 Rev D Page 2 of 28 Inside Front Cover Blank ...

Страница 3: ...camera control system and is at the core of Vaddio s Automated Content Presentation System technology Applications for the AutoPresenter include videoconferencing distance education houses of worship local government meetings and live event production Key Technical Features Seamless Video Switcher When one of the six 6 input buttons is pressed the seamless video switcher transitions from the curre...

Страница 4: ...t before operating To reduce the risk of electric shock do not immerse in water or other liquids and avoid extremely humid conditions Care and Cleaning Do not attempt to take this product apart at any time There are no user serviceable components inside Do not spill liquids in the AutoPresenter Keep this device away from food and liquid For smears or smudges on the console wipe with a clean soft c...

Страница 5: ...ecifications at the end of the manual for all input and output resolutions supported 7 Power Pressing the Power button turns AutoPresenter on or off If the system is on press and hold the Power button for three seconds to power the unit off All compatible PTZ cameras connected to the system will go into stand by mode when AutoPresenter is powered off 8 Transition Selection Choose from Cut Fade or ...

Страница 6: ... such as third party control systems available on a future release of firmware and allows the AutoPresenter to supply the AutoTrak IR Tracking System with up to six 6 total presets 16 RS 232 The RS 232 input allows the AutoPresenter to receive commands from third party hardware This port is also used as a connection for updating firmware on the system 17 Program Outputs Delivers the same SD compos...

Страница 7: ...OFF PIP Position and PIP Size are adjusted with these controls 6 Priority Pressing First Last or Multi buttons will choose the Step function for the input triggers on the system Inputs 1 12 are multi step triggers All other triggers in Multi Sep mode will act as Last Step 7 Program Pressing the Program button initiates the program feature of the system allowing the PTZ camera positions and inputs ...

Страница 8: ...selected will momentarily move the PIP to full screen switch the background and then restore the PIP to the previous size and position with a different background AutoPresenter with Built in PresenterPOD Support The Vaddio Presenter Pod System consisting of the PresenterPOD and Pod Interface is a unique presenter control device that employs three trigger outputs and an ultrasonic presenter sensor ...

Страница 9: ...m Vaddio Presence Sensing Trigger Devices Part Number Description Picture 999 1511 000 StepVIEW Mat 44 x 27 5 with 75 attached cable 999 1512 000 StepVIEW Mat 57 x 27 5 with 75 attached cable 999 1701 100 AutoVIEW IR Sensor interface controller cable and power supply 999 1111 000 North America 999 1111 001 International PresenterPOD Automatic Ultrasonic Presenter Sensor and Manual Preset Trigger D...

Страница 10: ...Down Button adjacent to the LCD screen until the chevron is next to VIDEO OUTPUT MENU and then press the SELECT button Arrow down to the appropriate resolution that is compatible with your video monitor then press the SELECT button Then press the CANCEL button to exit to the previous menu NOTE For additional information on the menu structure see pages 17 through 20 Configuring Input Resolutions Fr...

Страница 11: ... 1280x768 60Hz Preset Triggers Near End HD Video T C60 Codec PresenterPOD Interface 2 Pods Supported RGBHV Trigger Data Trigger Data HD Video Power and Control HD Video Power and Control HD Video Power and Control HD Video 1080P 60 Control CAT 5e CAT 5e CAT 5e CAT 5e Audio Far End HD Video LAN WallVIEW HD 18W WallVIEW HD 18W CeilingVIEW HD Over Lectern Electronic WhiteBoard MicVIEW Mic Switcher Mi...

Страница 12: ...ller via the Vaddio Link control bus and used as a Professional operator controlled system AutoPresenter RS 232 Control Simulated Video Feeds Video Outs HD Same Resolution Video Inputs HD SD RGBHV Video Power and Control on CAT 5e Up to 500 154 2m Video Power And Control Video Power And Control Video Power And Control Vaddio WallVIEW CCU H700 Camera Systems x 4 ...

Страница 13: ... are assigned to which triggering device There are two ways to program presets into the AutoPresenter either by activating each trigger installed in the system or through the AutoPresenter IR remote control Knowing the preset associated with each trigger will allow all programming to happen through the remote control For this manual all preset programming described will be handled through the IR r...

Страница 14: ... the multi step preset 4 Using the IR remote enter the two preset trigger devices From the example above preset triggers 1 and 12 enter 001 and 012 using the remote control The LCD screen on the front of AutoPresenter will display Preset XX Stored with XX being the designated stored preset The other option for storing the preset camera position would be to manually trigger the devices that will mo...

Страница 15: ...he Rescan Video function in the Main Menu to reset the video input priorities Notes If new triggers are added or not connected at initial power up you must perform an INIT TRIGGERS in the system menu Using AutoPresenter with Precision Camera Controller AutoPresenter can also be used as a stand alone switcher with or without triggers connected to Precision Camera Controller as a low cost 6x1 seamle...

Страница 16: ...640 x 480 60 Hz HV 800 x 600 60 Hz HV 1024 x 768 60 Hz HV 1280 x 768 60 Hz HV 1280 x 1024 60 Hz HV 1366 x 768 60 Hz HV 1400 x 1050 60 Hz HV 1600 x 1200 60 Hz HV 1920 x 1200 60 Hz SD NTSC 480i 29 97Hz Composite CVBS and Y C dual out with adapter cable 440 5600 000 SD PAL 576i 25Hz Composite CVBS and Y C dual out with adapter cable 440 5600 000 SD NTSC 4801i 29 97 YPbPr SD PAL 576i 25 YPbPr HV is an...

Страница 17: ...to Sony Canon Panasonic No Camera Input Port 01 select search method Auto Sony Canon Panasonic No Camera Input Port 02 select search method Auto Sony Canon Panasonic No Camera Input Port 03 select search method Auto Sony Canon Panasonic No Camera Input Port 04 select search method Auto Sony Canon Panasonic No Camera Input Port 05 select search method Auto Sony Canon Panasonic No Camera Input Port ...

Страница 18: ...allows the user to set up the time delay between switching from one input to another With a lower settle time there is a greater chance that video will glitch on the Preview outputs when the video is switched very quickly and repeatedly in such a way and speed that is not really practical In most applications this is not an issue TIP To avoid the dastardly video glitch or transient hiccup use the ...

Страница 19: ... device PIP Trigger Mode Select MOMENTARY LATCHED Allows user to select momentary unlatched trigger inputs or latched trigger inputs trigger device dependent Figure 9 AutoPresenter Back Panel with I O Information AutoPresenter I O Connectors Power 12 VDC 3A 5 5mm OD x 2 5mm ID Video In 1 6 HD Component Y Pb Pr RGBHV S Video Y C or Composite DE 15 female x 6 Control In 1 6 RS 232C RJ 45 F x 6 Video...

Страница 20: ...s B limits for radio noise emissions from digital apparatus set out in the Radio Interference Regulations of the Canadian Department of Communications Le présent appareil numérique n emet pas de bruits radioélectriques dépassant les limites applicables aux appareils numeriques de la classe B préscrites dans le Règlement sur le brouillage radioélectrique édicte par le ministère des Communications d...

Страница 21: ...ollowing resources e mail support at support vaddio com or online at www vaddio com Return Material Authorization RMA number Before returning a product for repair or replacement request an RMA from Vaddio s technical support Provide a technician with a return phone number e mail address shipping address and product serial numbers and describe the reason for repairs or returns as well as the date o...

Страница 22: ...olutions listed and therefore may not function properly If a certain resolution does not seem to work appropriately please make sure that the displaying device or PC is properly configured is capable of the resolution that is chosen and is cabled correctly Often times a laptop PC will not output the same resolution that it displays on a its own LED and on top of that the resolution between the lap...

Страница 23: ...DB 9F Connector PIN Signal 2 TXD 3 RXD 5 GND All other pins Unused AutoPresenter Part Numbers 999 5675 000 North America 999 5675 001 International Compatible Cameras Vaddio Panasonic Sony Canon see page 2 for specific models Video Formats Supported HD YPbPr Video 16 9 RGBHV from PC and Standard Definition NTSC and PAL NTSC or PAL will require an adapter cable 440 5600 000 Video Switcher 6 x 1 Vid...

Страница 24: ...cation 1 5 PSize x Pip Size S M L 1 UR 2 LR 3 LM 4 LL 5 UL PInput Display Pip Input Source PipBG Pip BG Input Source Preset Pan Tilt Zoom PanSpeed x Preset Pan Speed 1 24 TiltSpeed x Preset Tilt Spd 1 20 ZoomSpeed x Preset Zoom Spd 1 7 Home Home Camera Camera Move x x Up Down Stop Left Right Value Zoom x x In Out Stop Value System Setup and Utilties SetDefault x Set Default Preset 1 72 Tally Idle ...

Страница 25: ...tion 1 5 Power Power On Off cr Power system On Off Preset Preset 9 cr Select indicated preset 1 138 PSize PSize S M L cr PIP Size selection Rescan Rescan cr Initiate Camera scan Reset Reset cr Soft System reset ResetVideo ResetVideo cr Re Load Video Configuration Save Config SaveConfig cr Saves configuration of all console settings SerialEcho SerialEcho On Off cr Serial Echo On Off SerialInfo Seri...

Страница 26: ... RJ 45 Connectors PIN Signal 1 Unused 2 Unused 3 Unused 4 Unused 5 Unused 6 GND 7 TXD to RXD of camera 8 RXD from TXD of camera Control Ports 25 48 and 49 72 on DB 25 Connectors Pin RGBHV YPbPr Y C Composite Adapter Cable PN 440 5600 000 1 Red Pr 2 Green Y 3 Blue Pb 4 ID 5 N C 6 Red GND Pr GND 7 Green GND Y GND 8 Blue GND Pb GND 9 No Pin 10 GND GND GND 11 ID Y Luminance 12 ID C Chrominance 13 H Sy...

Страница 27: ...Auto Presenter AutoPresenter Manual 342 0029 Rev D Page 27 of 28 Inside Rear Cover Blank ...

Страница 28: ...e or in part without written permission is prohibited Specifications and pricing are subject to change without notice Vaddio ControlVIEW TouchVIEW Quick Connect StepVIEW PreVIEW AutoVIEW PresenterPOD AutoPresenter CeilingVIEW WallVIEW EZCamera MicVIEW and PowerRite are registered trademarks of Vaddio All other trademarks are property of their respective owners Document Number 342 0029 Rev D ...

Отзывы: