

System Interface and Operation
3G Setting *Optional
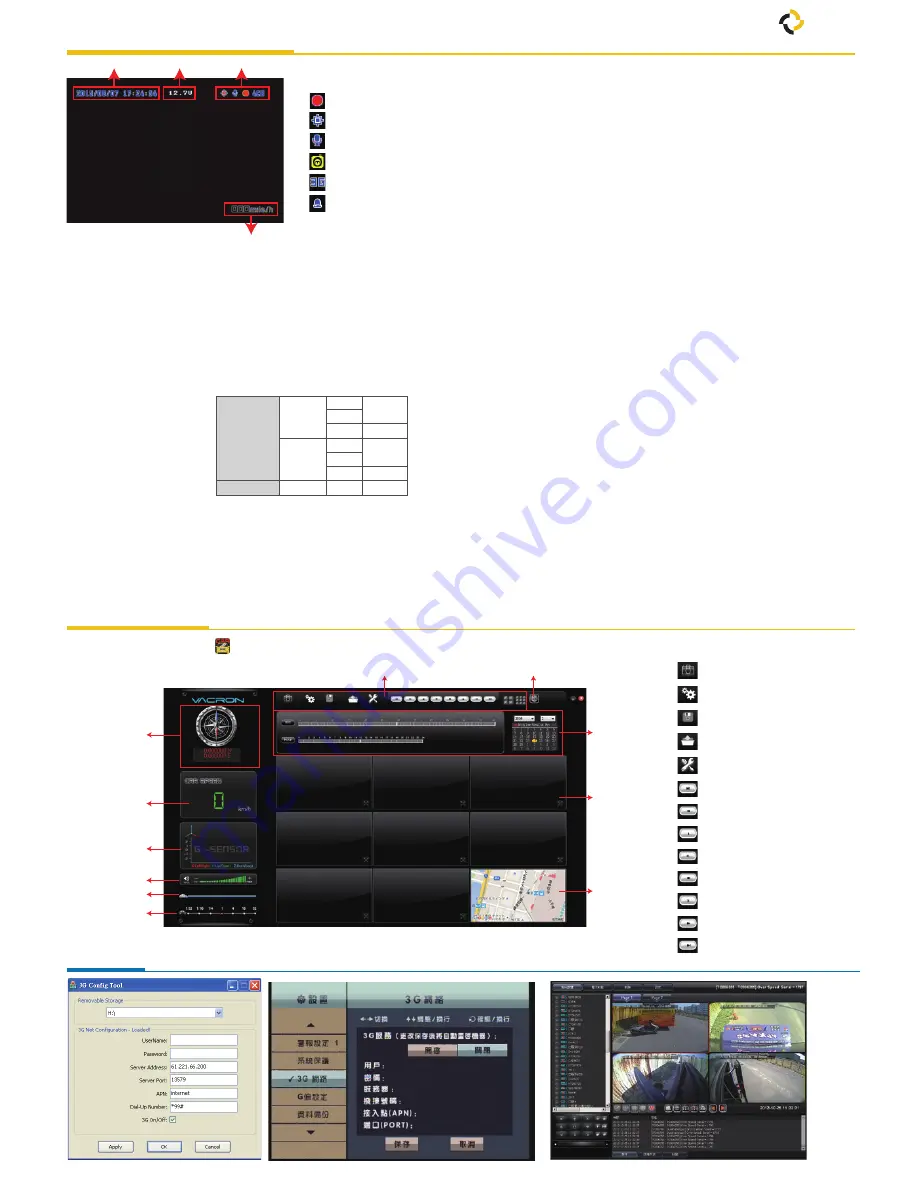
Playback on PC site
B. Display Description
C. OSD Menu Operation and Parameters Setup Description
•
Recording Setting
5-20fps
30fps
5-20fps
25fps
High
960H
D1
CIF
960H
D1
CIF
Better
NTSC
PAL
Normal
Recording
Frame
Resolution
8ch Split Display (1~8ch)
• P
ress Ch1~Ch8 button or select on menu for single display.
• P
ress quad split screen button for 4Ch display
• P
ress quad split screen button repeatedly to show CH1~4 display
or CH5~8 display
• P
ress menu button to enter menu option.
• P
ress play button to enter playback mode.
: Snapshot
: Configuration
: Disk Backup
: Playback
: HDD format, language setting
: Previous File
: Previous Frame
: Video backwind play
: Pause
: Stop
: Play
: Next Frame
: Next file
Control Interface Description
3G Client Remote Monitoring
3G Setting on DVR OSD
G-Network Setting on pc
Function Icon
Speed
Version
Date/Time
A. Icon Description
• : Recording
• : GPS Connecting
• :
V
oice Recording On
• : Event Recording On
• : 3G Connection On
• :
Alarm T
rigged
• Video Setting
Select 1~4CH to adjust Bright, Contrast and Color.
• Time Setting
The time setting will be automatically calibrated by GPS signal.
If no GPS signal, time and date can be set manually.
Select to show speed and speed unit setting on live view display or Not.
• GPS Setting
• Pla
te Number Setting
Input range
:
A~Z and 0~9.
•
Working Mode
1. Setup channel mode when system starts.
2. Select DVR run time after ACC Off.
3. Sound recording ON/OFF.
• Ala
rm Setting
Setup the mode of operation when an after alarm is trigged.
•
System Protection
1. Low voltage protection (trigged at ACC mode) .
2. HDD error warning.
• 3G Net
work
(Optional)
3G function ON/OFF
,
show setting information at present (optional).
• G-Sensor Setting
Once the function is activated, if a collision happenes,
[Force Recording]mode will be automatically triggered, to prevent
overwriting of the recorded event.
• Data Backup
Allows selection of video files to backup/export.
•
Restore Default
• Fo
rmat HDD
• Fi
rmware Update
Restore default settings - the DVR will be restarted and
restored to factory settings.
Full format of the HDD - All data on HDD will be deleted.
Save the firmware update program onto a USB device and use the USB
device to update firmware. When firmware update is in progress
DO NOT SWITCH OFF THE POWER TO THE DVR.
DVR will restart automatically after finishing update.
1.
Execute the CarBox2.exe from CD-ROM, the display will be as shown below
.
GPS
Coordinate
G-Sensor
Volume
Play BAR
Play speed
Speed
Google Map
Control Interface
Google Map
Playback
date selection
1~8 CH
ì
GPS Coordinate, Speed and Google Map (select models with 3G modules)
TS
TRANSPORT SUPPORT


