background image

4 Operating the appliance

▸ Touch the   button again to resume cooking.

The cooking zones resume operation using the previous settings.

4.16 

Wipe protection

This function prevents the power level from being changed accidentally, for instance
when wiping the control panel with a cloth. 
▸ Touch the 

 button.

The indicator light for the 

 button illuminates.

▸ Wipe protection is switched off by touching the 

 button again or automatically after

30 seconds.

Press the   button to switch the appliance off at any time.

4.17 

Acoustic signal

Changes can only be made when the timer is not running.

The following tones will still be emitted when the button tone is switched off:

Acoustic signal when the appliance is switched on

Acoustic signal when the appliance is switched off

End of operating time

End of timer (egg timer)

Error tones (e.g. button continuously held down)

Acoustic signals whenever the childproof lock is switched on, overridden or switched
off.

The setting is saved even after a power failure.

Switching the acoustic signal on

▸ Switch the appliance on with  .
▸ Touch the   and 

 buttons at the same time.

An acoustic signal is emitted.

▸ Touch the 

 slider within 3 seconds.

An acoustic signal is emitted.

 appears in the display.

▸ Touch the right-hand side of the 

 slider 1×.

An acoustic signal is emitted.

 appears in the display.

Incomplete entries are cancelled with no effect.
Simply repeat the steps above to turn the acoustic signal on.
The setting is saved on exiting the menu.

The menu can be exited in the following ways:
▸ The setting is saved 10 seconds after last pressing a button.
▸ Switch the appliance off with the   button.
▸ Touch the   and 

 buttons at the same time.

If a hotplate is touched while setting the acoustic signal, the settings will be lost.
To change the acoustic signal, the appliance has to be switched off and then back
on again.

16

Содержание GK47TIMS

Страница 1: ...Operating instructions GK47TIMS GK47TIMXS Induction hob...

Страница 2: ...pond to the technical standard of the appliance at the time these operating instructions went to press The right to make technical modifications for the purpose of the further development of the appli...

Страница 3: ...nd off 9 4 2 Selecting a cooking zone 9 4 3 Switching a cooking zone off 10 4 4 Residual heat indicator 10 4 5 Overview of power levels 10 4 6 Melting function 10 4 7 Keep warm function 11 4 8 Simmer...

Страница 4: ...e of the appliance and have understood the haz ards involved Children shall not play with the appliance Cleaning and user mainten ance shall not be undertaken by children without supervi sion If an ap...

Страница 5: ...h the separate installa tion instructions Have a qualified fitter electrician carry out the necessary work Correct use The appliance is designed for use in the home for preparing food No liability is...

Страница 6: ...iance Do not put hot cookware on the hob frame in order not to damage the silic one joints Do not cut or prepare food on the sur face and avoid impact with hard ob jects Do not drag cookware across th...

Страница 7: ...unpleasant smell This is normal for brand new appliances Ensure that the room is well ventilated 3 Your appliance 3 1 Appliance overview GK47TIMSC GK47TIMSCO GK47TIMSZ GK47TIMSZO GK47TIMXSC GK47TIMXSZ...

Страница 8: ...cooking zone is equipped with pan detection This detects suitable induction com patible cookware with a magnetic base If the cookware is removed during operation or if unsuitable cookware is used the...

Страница 9: ...and more scratch resistant than non coated glass surfaces Under normal circumstances significantly fewer scratches should occur on the glass surface during cooking However even a sharp grain of sand...

Страница 10: ...Use Melting Butter chocolate gelatine sauces approx 40 C Keep warm Keeps food warm approx 65 C Simmering Water temperature stays below boiling point approx 94 C 1 Melting gentle warming Butter chocol...

Страница 11: ...be cooked in hot water just below boiling point Switching the simmer function on Hold the slider down between and for 4 seconds The symbol for the corresponding zone illuminates illuminates in the pow...

Страница 12: ...g the automatic boost Risk of boiling over burning on and igniting All the cooking zones are equipped with a selectable automatic boost With this function a cooking zone heats at power level for a cer...

Страница 13: ...the button is pressed for 1 second the duration is set to and an acoustic signal is emitted for as long as the button is pressed The operating time starts 10 seconds after last pressing a button Chang...

Страница 14: ...de of the slider is used as a minus button The right hand side of the slider is used as a plus button To quickly change the duration of the timer press and hold the or button When the button is presse...

Страница 15: ...zones are switched off Touch the and buttons at the same time An acoustic signal is emitted Touch the button again A double acoustic signal is emitted The childproof lock is now switched off flashes...

Страница 16: ...ones e g button continuously held down Acoustic signals whenever the childproof lock is switched on overridden or switched off The setting is saved even after a power failure Switching the acoustic si...

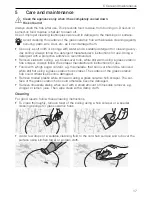
Страница 17: ...boiled over milk while still warm using a glass ceramic hob scraper Always follow the scraper manufacturer s instructions for use Foods with a high sugar content e g marmalade that boil over should be...

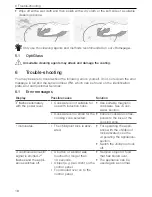
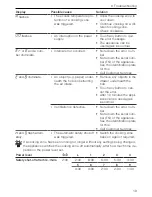
Страница 18: ...shes alternately with the power level Cookware is not suitable for use with induction hobs Use suitable magnetic cookware See Cook ware section Cookware is too small for the cooking zone selected Ensu...

Страница 19: ...eath the hob is obstructing the air intake Remove any objects in the drawer underneath the hob Touch any button to can cel the error After 10 minutes the appli ance can be used again as normal Ventila...

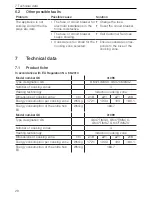
Страница 20: ...oduct fiche In accordance with EU Regulation No 66 2014 Model number GK 31098 Type designation GK GK47TIMXSC GK47TIMXSCZ Number of cooking zones 4 Heating technology Induction cooking zone Dimensions...

Страница 21: ...carried out by a qualified electrician Then cut the mains cable off flush with the appliance 8 3 Disposal The crossed out wheeled bin symbol requires the separate collection of waste electrical and e...

Страница 22: ...number 2 O Operating and display elements Buttons 7 Displays 8 Operating time 13 Changing 13 Elapsed 13 Setting 13 Several operating times 14 Switching off before time 13 OptiGlass 9 Cleaning 18 Illu...

Страница 23: ...the identification plate of your appliance My appliance information FN ___________________ Appliance _____________________ Please have this appliance information to hand when contacting V ZUG Thank y...

Страница 24: ...cooking zone The selection indicator for this cooking zone illuminates Touch or swipe the slider to set the power level Switching cooking zone off Touch the button for the required cooking zone Touch...

Отзывы: