manualshive.com logo in svg
background image

Operating instructions

CombiSteamer V6000

Steamer with fixed water connection

V-ZUG-Home 


Install the app, network your appliances and 
benefit from a wide range of useful functions.

Содержание CombiSteamer V6000 45F

Страница 1: ...Operating instructions CombiSteamer V6000 Steamer with fixed water connection V ZUG Home Install the app network your appliances and benefit from a wide range of useful functions...

Страница 2: ...recautions Modifications Text diagrams and data correspond to the technical standard of the appliance at the time these operating instructions went to press The right to make technical modifications f...

Страница 3: ...ation 28 4 17 Steam reduction 28 4 18 Display lock 29 4 19 Quiet mode 29 4 20 Time 29 4 21 Cancelling ending before time 30 4 22 End of operation 31 4 23 End of operation when AutoDoor is on depending...

Страница 4: ...ight bulb 58 8 9 Cleaning the accessories and shelf guides 58 8 10 Descaling 58 9 Trouble shooting 61 9 1 Error messages 61 9 2 Other possible problems 62 9 3 After a power failure 64 10 Accessories a...

Страница 5: ...safe use of the appliance and have understood the haz ards involved Children shall not play with the appliance Cleaning and user mainten ance shall not be undertaken by children without supervi sion...

Страница 6: ...d for use in vehicles or on board ships or aircraft or in rooms where there are spe cial conditions such as for in stance a corrosive or explos ive atmosphere dust steam or gas or condensing mois ture...

Страница 7: ...facility If the appliance is visibly damaged do not use it Contact our Customer Ser vices If the appliance is not functioning prop erly disconnect it from the power sup ply immediately Ensure there a...

Страница 8: ...ilm and poly styrene away from children Packaging material can be dangerous for children How to avoid damaging the appliance Close the appliance door carefully Do not place any protective insert or al...

Страница 9: ...If the rinsing is skipped it must be carried out manually Heat the empty cooking space to 100 C for 5 minutes using the Steam ap plication Wait 20 minutes until the appliance cools down and the water...

Страница 10: ...iance door 3 2 Operating and display elements App view 1 3 5 1 7 2 3 List view OK 1 4 5 1 7 2 6 Steam Here is where you can make all key settings and customize your appliance User settings Favourite f...

Страница 11: ...n water compartment flap App view Display lock AutoDoor depending on model Quiet mode Switch off Clock V ZUG Home Ready to start Start Rare Soft roasting seared 2h00 13 21 57 C 25 C Fillet of beef 1 2...

Страница 12: ...ion plate 13 Socket for food probe 6 Climate sensor 14 Water inlet 7 Hot air fan 15 Door mounted condensate trough 8 Cooking space ventilation 3 4 Accessories Incorrect handling can cause damage Do no...

Страница 13: ...nd biscuits on two levels using the Hot air application If not fully covered by the baking its shape can become distorted during baking This is normal As it cools down it will go back to its original...

Страница 14: ...king space of at least 5 cm The food probe has three measuring points for particularly precise temperature measure ment These also help to record the food probe temperature correctly even if the food...

Страница 15: ...ally at any time If you own an appliance without a door handle the appliance door can be opened and closed by touching the function button The function button together with the controller and the driv...

Страница 16: ...ed only until the display goes dark The change is then discarded When the display is called up again the view set in the user settings appears To permanently change the view go in the user settings to...

Страница 17: ...or function The colour of the selected range turns amber and can now be changed The temperature range is already activated and can be changed directly Place your finger on the CircleSlider 4 and move...

Страница 18: ...isplay 8LI JSSH MW KIRXP GSSOIH XLVSYKL MR ER IRIVK IJJMGMIRX E HIEP JSV KVEXMRW ERH FVEMWIH HMWLIW SX EMV IGS SX EMV LYQMH SX EMV 3 SX EMV MXL WXIEQMRK Selecting an application Select the desired app...

Страница 19: ...tart to start the application The pulsing circle 2 of the CircleSlider indicates that operation has started The progress bar 3 in the CircleSlider shows the countdown to the time remaining or the preh...

Страница 20: ...ds automatically when the set duration is up see page 31 If subsequent steps are available for an application these can be selected when the set duration is up If both Operating time and Preheat are s...

Страница 21: ...touch End The colour of the value range changes to amber Set the desired end time using the CircleSlider The desired duration and the set end time ap pear in the display 15min 13 21 Press Start to sta...

Страница 22: ...he desired temperature using the CircleSlider In the value range touch Food probe temperature The colour of the value range changes to amber Set the desired target temperature using the CircleSlider P...

Страница 23: ...ent pane of the display either turn on the option with the switch or touch the value range and set the desired value using the CircleSlider Each defined option is marked with a Confirm the setting wit...

Страница 24: ...is shown in the CircleSlider Introducing food As soon as the cooking space has preheated an acoustic signal is emitted and a message is displayed If set the operating time does not start to run until...

Страница 25: ...he particular applications are shown Hiding application tips To hide tips touch The ready to start screen or the running operation appears in the display 4 13 Favourites Creating a favourite Favourite...

Страница 26: ...tart screen appears as an app view Press and hold the favourite 1 Quick information appears above the app Touch Clear The following appears in the display Do you really want to clear or reset To keep...

Страница 27: ...setting Pinned values see page 52 4 15 Timer The timer functions like an egg timer It can be used independently of other functions and applications Setting and starting the timer Touch the Timer funct...

Страница 28: ...s to amber The cooking space illumination is switched on Switching the cooking space illumination off Touch the Illumination function button The colour of the function button changes to white The cook...

Страница 29: ...well as by using the quick access in the function bar Turning on the quiet mode Expand the function bar Touch the Quiet mode function button The quiet mode is shown in the display Touch the Quiet mode...

Страница 30: ...layed subsequent steps to continue operation with another application Select the function button to access the parent application menu Select the function button to access the start screen see page 18...

Страница 31: ...lays go out If at this point the food probe is still plugged in the displays only go out when the food probe is unplugged The cooling fan can continue to run After 3 minutes without interaction The di...

Страница 32: ...ep 1 the application just ended or cancelled is resumed The main value temperature or temperature setting is applied directly from the applica tion that has ended or been cancelled Confirm the selecti...

Страница 33: ...Favourites Pinning EasyCook Cleaning Preheating Calling up appliance tips In the start screen touch Appliance tips The appliance tips menu appears in the display Select the desired topic Information...

Страница 34: ...air with steaming Temperature range 80 230 C Recommended value 180 C Level 2 or 1 3 The cooking space is heated by hot air Bursts of steam ensure that the energy is trans ferred more efficiently to th...

Страница 35: ...ficient 5 5 Steam Temperature range 30 100 C Recommended value 100 C Level 1 to 4 The cooking space is heated simultaneously by steam and hot air The food is heated up or cooked by steaming Uses Steam...

Страница 36: ...ensures that the food is cooked to the same degree of doneness throughout Temperature range 30 95 C Recommended value 60 C Level 1 to 4 Recommended maximum cooking time 72 hours The cooking space is...

Страница 37: ...obe into the appliance Long touch the display The appliance starts and the start screen appears Select the Vacuisine application and confirm with OK if required see page 18 The settings for Vacuisine...

Страница 38: ...ash or another liquid The process pre vents the egg wash running and gives a shiny finish It is recommended that the appli ance be preheated before starting this application Classical Professional bak...

Страница 39: ...e type of meat the cooking time can be set between 1 and 4 hours Tips for best results Take the meat out of the refrigerator some 30 60 minutes before soft roasting Weight of meat 500 2000 g Meat thic...

Страница 40: ...robe into the meat so that the tip is in the centre of the thickest part For a correct food probe temperature reading the food probe must as far as pos sible be fully inserted into the centre of the f...

Страница 41: ...witch the appliance off see page 32 If you accidentally pressed Yes but still want to finish cooking the meat you must select another application Soft roasting is not suitable for pre cooked meat 5 11...

Страница 42: ...on Spread the prepared towels out across the perforated cooking tray Hot massage stones Before starting the application Put the clean smooth massage stones in a suitable container and place it directl...

Страница 43: ...The appliance door must not be opened whilst the duration is being determined Otherwise the optimum cooking time and temperature will not be calculated cor rectly Selecting and starting BakeOmatic A d...

Страница 44: ...th RegenerateOmatic crispy Long touch the display The start screen appears Select the Regeneration application and confirm with OK if required see page 18 Select the desired application and confirm wi...

Страница 45: ...confirm with OK That step is applied to the ready to start screen and the recipe can be started as usual by touching Start A recipe can be started from any step i e steps can be skipped If you want t...

Страница 46: ...od group and food the appliance suggests suitable applications including settings and accessories Overview of food groups Foodstuffs are grouped into different categories a foodstuff may be included i...

Страница 47: ...ic dishes along with their preparation methods can be activated as a package The following national cuisines are available Italian Australian French Ukrainian German Turkish Lebanese Belgian Chinese R...

Страница 48: ...of the active WLAN Wi Fi appears in the V ZUG App and then you are prompted to enter the WLAN Wi Fi password Enter the WLAN Wi Fi password The household appliance is connected to the active WLAN Wi F...

Страница 49: ...l tones are set at the lowest volume This setting is deactivated when the appliance goes into the EcoStandby mode The volume of the feedback tones and acoustic signals cannot be changed when in quiet...

Страница 50: ...f the water tank compartment opens automatically when the wa ter tank is empty and water is required for operation Illumination If set to On the cooking space illumination pulses when there is a new m...

Страница 51: ...ble to choose between mains synchronization and real time clock RTC 7 9 V ZUG Home Mode It is possible to choose between Off Display and Operate and display To connect the appliance to V ZUG Home Disp...

Страница 52: ...umption for the last month or since a reset in the last month the total energy con sumption for the last year or since a reset in the last year and the total energy con sumption Consumption indicator...

Страница 53: ...d warm Use a soft cloth dampened with water and a little washing up liquid Wipe dry with a soft cloth Dried on soiling can be removed more easily with the Steam cleaning application For stubborn soili...

Страница 54: ...on food debris efficiently Makes stainless steel shine The practical spray head reaches all surfaces of the cooking space good adhesion Environmentally friendly food friendly No unpleasant odours Long...

Страница 55: ...eaning programme guides you step by step through the steam cleaning process Fill the water tank with fresh water and slot into position in the water tank compart ment Long touch the display The start...

Страница 56: ...both hands Open the appliance door as far as it will go Fold the clips 2 on both door hinges 1 forward 2 1 Close the appliance door as far as its airing position about 30 Lift the appliance door out e...

Страница 57: ...up and away from the hinges 1 Remove the intermediate door glass seal 2 Gently push the middle door glass 3 and raise it slightly up and away from the hinges Clean the glass panels and dry well 2 3 Re...

Страница 58: ...her however this will affect its non stick properties Removing the shelf guides Unscrew the knurled nuts 1 in the front of the shelf guides in an anti clockwise direction Pull the shelf guides 2 to th...

Страница 59: ...e The descaler contains highly effective acid Immediately rinse away any splashes with water Follow the manufacturer s instructions See Accessories and spare parts for where to obtain this descaler du...

Страница 60: ...rresponding message appears in the display remove the water tank pour the rinsing solution away and fill it with 1 l warm water Put the water tank back The rinsing phase starts automatically The follo...

Страница 61: ...r supply off for about 1 minute Switch the power supply back on If the error appears again note down the error message in full along with the serial number SN of the appli ance see page 66 Disconnect...

Страница 62: ...in as usual E79 F27 The water system is not emptied due to a power failure during operation About 2 minutes after the display has illuminated acknowledge this by touching the button The appliance can...

Страница 63: ...residual water in the door mounted condensate trough 1 will collect in the condensate trough 2 when the appli ance door is closed Wipe out the door mounted condensate trough to prevent residual water...

Страница 64: ...witched on Process was cancelled due to a power failure Press OK to confirm the message The start screen appears Brief power failure during descaling The descaling process is interrupted The following...

Страница 65: ...he product family of the appliance and exact designation of the accessory or spare part when ordering parts 10 1 Accessories Stainless steel tray Perforated cooking tray Wire shelf Dual enamel baking...

Страница 66: ...accepted standard Own measurements can be im precise and are not suitable for checking the accuracy of the temperature 11 3 Product fiche In accordance with EU Regulation No 66 2014 Brand V ZUG Ltd T...

Страница 67: ...oughy or raw on the inside Next time set a lower temperature and lengthen the operat ing time The cake collapses Check that the settings used correspond to those recom mended in EasyCook Next time set...

Страница 68: ...ulses together with ve getables that have similar cooking times saving energy Cook grains e g rice and millet and pulses e g lentils adding an appropriate amount of liquid directly in suitable tablewa...

Страница 69: ...e carried out by a qualified electrician Then cut the mains cable off flush with the appliance 13 3 Disposal The crossed out wheeled bin symbol requires the separate collection of waste electrical and...

Страница 70: ...plication 30 Care and maintenance 52 CircleSlider Reaction 19 Using 17 Cleaning Accessories 58 Appliance door 56 Cooking space 53 Door glass 57 Door seal 58 Food probe 58 Shelf guides 58 Cleaning the...

Страница 71: ...eral tips 68 H Hot air 33 Hot air eco 34 Hot air humid 34 Hot air with steaming 34 Hot massage stones 42 Hot wraps 42 Hygiene 42 I Identification plate 66 Illumination 28 62 Switching off 28 Switching...

Страница 72: ...ing 58 Signals and tones Acoustic signals 49 Feedback tones 49 Quiet mode 49 Sound worlds 49 Smartphone System requirements 47 Socket 12 Soft roasting 39 67 Cancelling or switching off before time 41...

Страница 73: ...ing for the first time 9 V Vacuisine 36 Selecting and starting 37 Validity 2 Values Adjusting 19 Saving 19 V ZUG App 48 V ZUG Home 47 Displaying information 51 Mode 51 Resetting 51 Restarting interfac...

Страница 74: ...74 15 Notes...
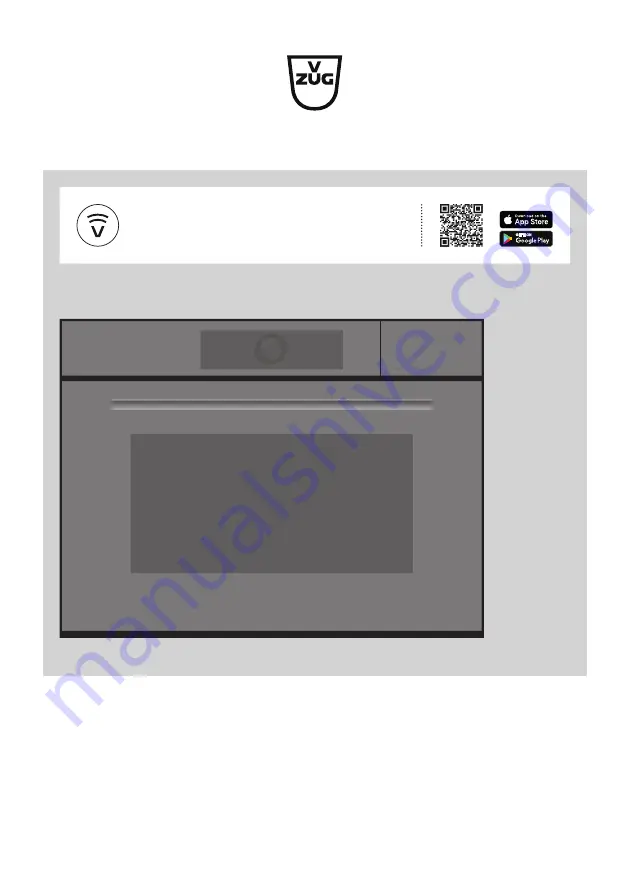
Страница 75: ...d appliance designation to register your appliance You will find them on the identification plate of your appliance My appliance information SN __________________________ Appliance ___________________...

Страница 76: ...CircleSlider Adjustable value On Off Touch the display to switch the appliance on Long press and hold the function button to switch the appliance off Operation The appliance is operated using the disp...

Отзывы: