background image

ColonyDoc-It Imaging Station 


33 

The colony circle (filled in or 

outlined) will now disappear. 

The 

Total colonies 

count will 

change to remove the colonies 

deleted. 


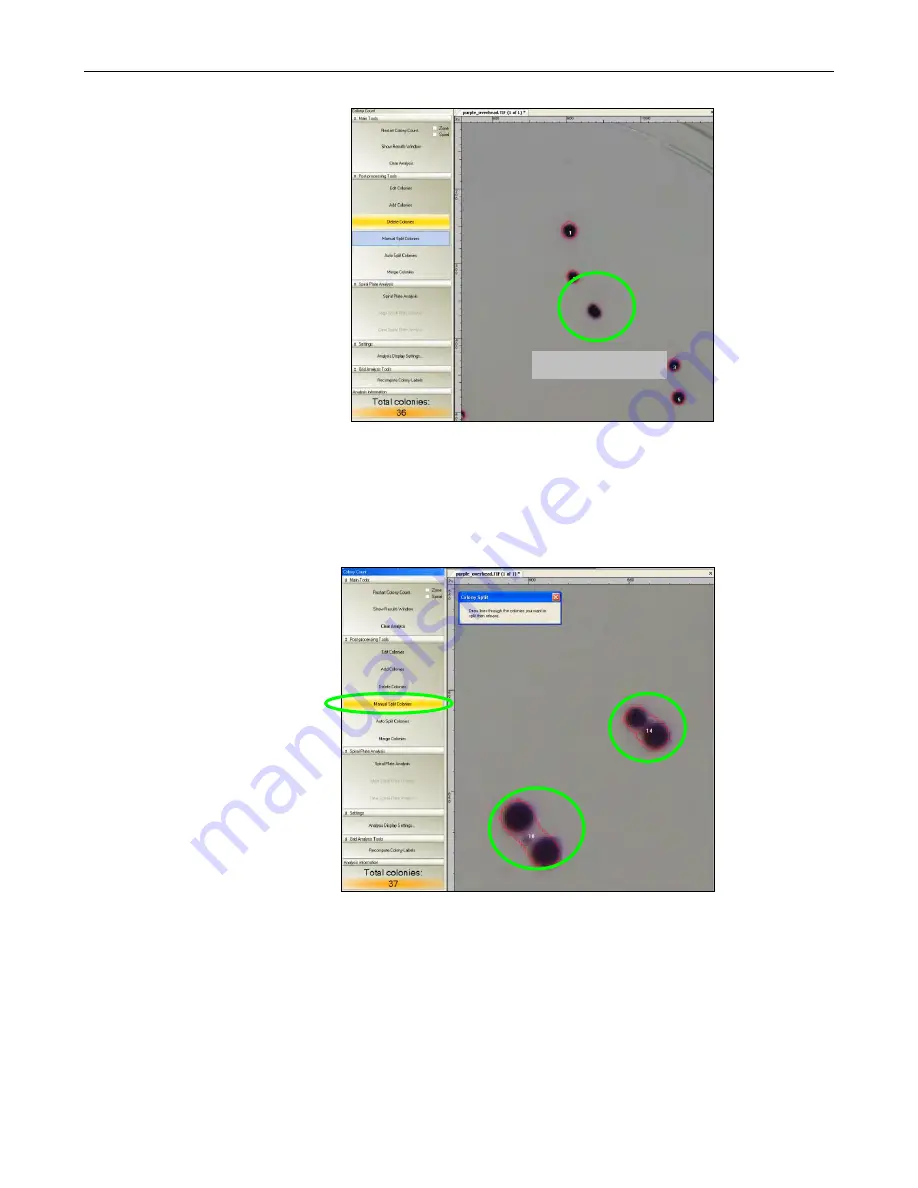
Manual Split Colonies 

Users may split colonies by performing the initial count (

Automated Count, Manual Count, 

or

 User Defined 

Template Count

), and splitting colonies manually.  Colonies should be split when two or more colonies are very 

close together and are counted as one colony by the software.       

To split colonies, ensure that 

the 

Manual Split Colonies

 tab 

is highlighted in yellow.   

A new window will ask the user 

to “Draw lines through the 

colonies you want to split then 

release.”  

If the colony is hard to see, 

zoom in on the colony.  In the 

Zoom/Pan

 module, move the 

slider button towards the + 

sign on the right to zoom in.  A 

rectangular object will appear 

in the 

Zoom/Pan 

module.  

Move it over the area of 

interest.  The central Petri dish 

image will appear larger in the 

area identified by the 

rectangular object.   


Deleted Colony 


Содержание ColonyDoc-It

Страница 1: ...ducts Ltd 2066 W 11th Street Upland CA 91786 Unit 1 Trinity Hall Farm Estate Tel 800 452 6788 909 946 3197 Nuffield Road Cambridge CB4 1TG UK Fax 909 946 3597 Tel 44 0 1223 420022 Fax 44 0 1223 420561 Email info uvp com Email uvp uvp co uk Web site uvp com 81 0294 01 Rev E ...

Страница 2: ...ColonyDoc It Imaging Station 2 ...

Страница 3: ...nks of any kind nor can you create derivative works or any other works that are based upon or derived from the Software in whole or in part You may not transfer the license rights to the Software to another party TERMINATION This License is effective until terminated by either party You may terminate this License at any time by returning the Software to Licensor or destroying any permanent form of...

Страница 4: ...wise exceed the amount paid by you for the software INTENDED USE If the equipment is used in a manner not specified by the manufacturer the protection provided by the equipment may be impaired GOVERNING LAW AND SEVERABILITY This License shall be governed by and construed in accordance with the laws of the State of California without giving effect to any principles of conflicts of law Any actions s...

Страница 5: ...ting Templates 20 User Defined Template Counting 21 Fluorescent Colony Counting 22 Zone Analysis 24 Renumbering Colony Zone Values 28 Spiral Plate Counting 29 Editing Colonies 31 Add Colonies 31 Delete Colonies 32 Manual Split Colonies 33 Auto Split Colonies 34 Merging Colonies 35 Using the Software 36 Changing Filter Settings 36 Preferences 37 Toolbars 39 Reporting Functions 40 Classes 40 Colonie...

Страница 6: ... 6 Usage 44 Servicing the ColonyDoc It 45 Cleaning and Care 45 Replacing Switches 46 Replacing Fuses 46 Ordering Replacement Parts and Accessories 46 Troubleshooting 46 Return Service Procedure 47 Technical Support 48 Warranty 48 ...

Страница 7: ...ection and analysis of media The software loads on the user s computer for camera control image capture and colony counting The software provides automatic and manual counting capabilities plus user defined templates for speeding up research experiments Users can define specific counting parameters including color differentiation and filter identification by group or size Once the colonies are cou...

Страница 8: ...GHz or higher 1GB 2GB recommended of RAM or greater 200 MB of available hard disk space for the program more for data To avail the functionality of 21 CFR Part 11 then the partition must be formatted with NTFS CD ROM drive System Specifications Electrical ratings Model Numbers 97 0539 01 97 0539 04 100 115V 60Hz 0 25 Amps Model Numbers 97 0539 02 97 0539 05 230V 50Hz 0 13 Amps Operational Ratings ...

Страница 9: ...to a power outlet To maintain safety at all times ensure that the unit is not hard to disconnect at the location chosen Turn on the ColonyDoc It by switching the I 0 switch to I located at the back of the station Plug one end of the USB cord to the back of the ColonyDoc It and the other end into a USB port in the computer Removing the Doors The ColonyDoc It doors can be removed by hand loosening t...

Страница 10: ...unit To access the trays Remove the four brass thumbnuts on the filter box and pull the filter box from the housing Remove the two thumbnuts that hold the filter frame to the filter box Place the filter over the opening Replace the filter frame and thumbnuts Reinstall the filter box into the unit NOTE It is possible to install a filter when the filter box is installed in the unit However care must...

Страница 11: ...Registering the Software in this manual to activate the software Registering the Software Opening the Software Double click the software icon on the desktop To activate the software registration is required To immediately activate the software through the internet choose On the fly activation If the computer is not connected to the internet please follow the instructions for Offline activation or ...

Страница 12: ...he Activation Number appears in the box Already have an activation ID is useful when reloading the software after receiving an initial activation code If the computer is not connected to the internet click Offline activation to register the software This allows the user to obtain the activation code and enter it at another time Click Next to continue Click the link provided and complete the form t...

Страница 13: ... is active See the image of the screen below noted by the green circle The text must be black as shown If the Camera Control is inactive with grey text proceed to the troubleshooting section Inactive Camera Window Select the Petri dish plate diameter from the Camera Control module The choices are 6cm 10cm and 15cm Select the smallest colony size for this plate The choices are 1mm and 1mm If 1mm is...

Страница 14: ...increments Brightness adjusts the brightness of the image Click the Capture button from the Camera Control module to take a picture Click Start Colony Count in the Colony Count module at the left of the screen to start the counting process Select Automated Count or Manual Count Go to the Automatic Count section in the manual to complete steps for automated count Go to the Manual Count section in t...

Страница 15: ...tickers then use Epi Lighting White or Base Lighting Darkfield Use Base Lighting Darkfield when counting a pour plate Using the black plate on top of the transillumination surface in combination with Epi Lighting sources provides contrast that improves colony counting results Preparing Samples When preparing samples write on the bottom edge away from the center of the Petri dish to increase counti...

Страница 16: ... colonies can be added deleted split or merged Refer to the respective sections of this manual for instructions on using these tools Manual Counting Before proceeding through the manual counting steps ensure that an image of the Petri dish has been captured and is ready for analysis See instructions on Quick Capture in this manual for more information on how to capture an image Select Start Colony...

Страница 17: ...he region of interest is identified by a green circle that should include all the colonies of interest in the Petri dish The software automatically defines the region of interest but by clicking the Define Counting Region button the user can increase or decrease the circle size as needed If a smaller or larger region of interest is desired click onto the Define Counting Region button and hold and ...

Страница 18: ...To count the desired colonies ensure that the Add Points button is highlighted in yellow and click on a colony to be counted in the original image of the Petri dish A smaller duplicate image of the original is present in the Step 1 of 2 Select classes tab but a colony cannot be selected from this image Classes are defined as different types of bacteria yeast or mold present on the sample The softw...

Страница 19: ...ect Remove Click the Count button to proceed to the next tab NOTE The Step 1 of 2 Select classes tab allows the settings created in this window to be saved in a user defined template If there are no templates created the drop down menu will list Default as the only template option Go to the Templates section of this manual for instructions on creating templates Step 2 Finish The software will auto...

Страница 20: ...can be saved during operation Step 1 of 2 Select classes or Step 2 of 2 Finish To save a template in Step 1 of 2 Select classes add the desired points and classes if not already selected and click the New button in the Template section of the window If additional information is needed refer to the Manual Count instructions in this manual A New Template pop up window will ask for a new Template nam...

Страница 21: ...Select classes and go directly to Step 2 of 2 Finish to create a template NOTE If a template has been saved previously the software will pull it in automatically to be used in any Manual Counting process User Defined Template Counting Before proceeding through the next steps a template must have been saved during the manual count process If there are no templates go to the Creating Templates secti...

Страница 22: ...s and ensure that the filter is positioned below the camera If the GFP filter is in filter position one the filter slider should be moved all the way to the right position Insert the fluorescently stained sample into the ColonyDoc It Select the appropriate Plate Diameter the Smallest Colony information and choose the Fluorescent lighting function of Colony Lighting in the Doc It Colony Counter sof...

Страница 23: ... Imaging Station 23 Finally choose to count the colonies automatically manually or with a template Refer to the Automatic Count Manual Count or Template Count instructions in this manual for additional information ...

Страница 24: ... Quick Capture in this manual for more information on how to capture an image To obtain zone analysis information for a plate click on the checkbox for Zone then select Start Colony Count Choose to count with the Manual or User Defined method Click OK If using the software for the first time no templates are created and the User Defined Template Count option appears grey To create a template first...

Страница 25: ...nside the Petri dish to be analyzed The region of interest is identified by a green circle that should include all the zones of interest in the Petri dish The software automatically defines the region of interest but by clicking the Define Counting Region button the user can increase or decrease the circle size as needed If a smaller or larger region of interest is desired click onto the Define Co...

Страница 26: ...e first zone is selected the new image in the Step 1 of 2 Select classes window will show a black background along with all of the zones that contain the same color as the point identified in the Analysis Details window Continue clicking on zones to add points as necessary until the black and white image shows all the zones of interest identified in white To remove points or classes from the Analy...

Страница 27: ...s manual for instructions on creating templates Click Finish to exit the manual count mode and view the results table The software will redirect to the initial screen and display the total number of zones identified To view the analysis data for the zones click onto Show Results Window from the Main Tools section of the Colony Count module A window appears that provides information relating to the...

Страница 28: ...d to each colony or zone click Recompute Colony Labels under the Grid Analysis Tools NOTE The plate must have already been counted The Recompute Colony Labels function will read the plate from left to right and from top to bottom So the colony or zone labeled 1 will be seated at the left and towards the top of the plate Before applying Recompute Colony Labels function After applying Recompute Colo...

Страница 29: ...e settings Additional instruction on performing an Automated Count Manual Count or Template Count is listed in detail in this manual After performing a count a Spiral Plate Analysis window will appear along with a green grid over the counted image To change the overlay grid size move the Overlay Size slider bar to the left to decrease the grid size or to the right to increase the grid size To calc...

Страница 30: ...e in the Spiral Plate Analysis window the user may choose to move the green overlay grid by using the Align Spiral Plate Overlay To move the grid click onto Align Spiral Plate Overlay click and drag the green grid until the center of the grid is aligned with the center of the captured image To clear the spiral plate analysis click onto the Clear Spiral Plate Analysis This action will remove the da...

Страница 31: ... colony is hard to see zoom in on the colony In the Zoom Pan module move the slider button towards the sign on the right to zoom in A rectangular object will appear in the Zoom Pan module Move it over the area of interest The central Petri dish image will appear larger in the area identified by the rectangular object Click on a colony to add The colony selected will now have a circle filled in or ...

Страница 32: ...tial count Automated Count Manual Count or User Defined Template Count and deleting colonies manually To delete colonies from the Total Colonies count ensure that the Delete Colonies tab is highlighted in yellow If the colony is hard to see zoom in on the colony In the Zoom Pan module move the slider button towards the sign on the right to zoom in A rectangular object will appear in the Zoom Pan m...

Страница 33: ...very close together and are counted as one colony by the software To split colonies ensure that the Manual Split Colonies tab is highlighted in yellow A new window will ask the user to Draw lines through the colonies you want to split then release If the colony is hard to see zoom in on the colony In the Zoom Pan module move the slider button towards the sign on the right to zoom in A rectangular ...

Страница 34: ...n two or more colonies are very close together and are counted as one colony by the software To split colonies ensure that the Auto Split Colonies tab is highlighted in yellow If the colony is hard to see zoom in on the colony In the Zoom Pan module move the slider button towards the sign on the right to zoom in A rectangular object will appear in the Zoom Pan module Move it over the area of inter...

Страница 35: ...e Colonies tab is highlighted in yellow A new window will ask the user to Select the desired colonies and then press Merge button to join them If the colony is hard to see zoom in on the colony In the Zoom Pan module move the slider button towards the sign on the right to zoom in A rectangular object will appear in the Zoom Pan module Move it over the area of interest The central Petri dish image ...

Страница 36: ...rameters click onto the Show Results Window Filter Filter class and drag the pointer to the filter class to change A new Filter Colonies window will appear with the following parameters Area Perimeter Avg Diameter and Circularity The predefined ranges are defined Each parameter can be changed to accommodate a wide variety of sample types The new range can either be inclusive or exclusive Click ont...

Страница 37: ... settings and miscellaneous functions such as annotation To change the Label Type from the Analysis Colony Count preferences window click the drop down arrow and select from None Class Number general Number in class To change the Colony Marking click the drop down arrow to select from None Outline Fill To change the Label Color click Auto or click the drop down arrow and select from the colors lis...

Страница 38: ...llows users to save modified template settings after disconnecting Choose from Ask Always Never To change the Text Annotation Behavior select from Synchronize size with image zoom which reduces increases the size of the annotations when the size of image is reduced increased Don t synchronize with image zoom which maintains the size of the annotations if the image is reduced or increased ...

Страница 39: ...ored Save Saves the current image Save As Saves the current image to a different name Close Closes the software program Print Prints the current image Copy Copies selected text selected portions of the current image or the entire image to the clipboard Paste Pastes the current clipboard item onto the screen Paste Special Pastes an overlay of the current item in the clipboard Cut Cut a specific are...

Страница 40: ...lready present on the current image Freeform ROI Changes the current mouse tool to select the Freeform Region of Interest and brings up one if already present on the current image Magic Wand ROI Lets users select a consistently colored area for example a red flower without having to trace its outline Reporting Functions The results of the colony count can be displayed in the results window To show...

Страница 41: ... reported category and associated values are listed below NOTE All dimensional information is reported in pixels unless the plate has been calibrated Class number Total area of that colony pixels Perimeter of the colony pixels Average diameter of the colony pixels Circularity of the colony numerically depicts roundness of the colony Statistics In the Statistics tab information is displayed which s...

Страница 42: ...umber of colonies Distribution In the Distribution tab colony area information is displayed graphically The drop down menu allows users to report graphical information about the average diameter area perimeter and circularity of the colonies counted in the Petri dish Users may also change the number of bins that display in the graph A bin number of 50 is represented here Exporting to Excel To expo...

Страница 43: ...ColonyDoc It Imaging Station 43 The second tab shows Colonies The third tab shows Statistics ...

Страница 44: ...ions of CFR regulations Section 11 10 e For electronic records this section requires the use of computer generated time stamped audit trails to track changes The software keeps track of all changes that affect image data Any action in the software that modifies the original data of an image open in the LS workspace is logged The log of such changes is individually maintained for each image and is ...

Страница 45: ...ngs or printer settings if necessary and print the trail Servicing the ColonyDoc It Cleaning and Care Use 70 Isopropanol Alcohol to clean the ColonyDoc It external surfaces base and doors Clean the ColonyDoc It twice a day before and after every use Cleaning the Diopter Weekly clean the diopter with a soft photographic lens cleaning cloth dampened with lens cleaning solution CAUTION Do not pour th...

Страница 46: ...nnect to the new switch Push the new switch into position Replacing Fuses Fuses are located in the back of the unit Remove the fuse by using a flathead screwdriver to turn the fuse counter clockwise Pull the fuse out Insert the new fuse Use a screwdriver to turn the fuse clockwise to lock Ordering Replacement Parts and Accessories Contact UVP or authorized distributor for replacement parts For rep...

Страница 47: ... the main power port Replace if necessary If the system continues to blow fuses call UVP Technical Support Department Return Service Procedure A Returned Goods Authorization RGA number must be obtained from UVP s Customer Service prior to returning any product All returns must be authorized by UVP whether for credit warranty replacement or repair Items returned for credit may be subject to a resto...

Страница 48: ... 91786 USA Write to Ultra Violet Products Ltd Unit 1 Trinity Hall Farm Estate Nuffield Road Cambridge CB4 1TG UK Warranty UVP LLC warrants all of its products except tubes grids and filters which is 90 days to be free from defects in material and workmanship for a period of one 1 year from the date of purchase All transilluminators carry a two 2 year warranty The foregoing warranty of UVP shall be...

Отзывы: