UTStarcom UT-300R2U Скачать руководство пользователя страница 1


UTStarcom

®

 UT-300R2U 

ADSL Router 

USER GUIDE 


UTStarcom, Inc. 


Содержание UT-300R2U

Страница 1: ...UTStarcom UT 300R2U ADSL Router USER GUIDE UTStarcom Inc ...

Страница 2: ...bject to the following United States Government Legend All technical data and computer software is commercial in nature and developed solely at private expense Software is delivered as Commercial Computer Software as defined in DFARS 252 227 7014 June 1995 or as a commercial item as defined in FAR 2 101 a and as such is provided with only such rights as are provided in UTStarcom s standard commerc...

Страница 3: ...2 CONFIGURE THE ROUTER 8 3 1 3 CHANGE SYSTEM PASSWORD 9 3 2 SETUP WIZARD 10 3 2 1 SETUP WIZARD OPENING WINDOW 11 3 2 2 SETUP WIZARD CHOOSE TIME ZONE 12 3 2 3 SETUP WIZARD SELECT ISP CONNECTION TYPE 13 3 2 4 SETUP WIZARD FOR DYNAMIC IP ADDRESS CONNECTIONS 14 3 2 5 SETUP WIZARD FOR STATIC IP ADDRESS CONNECTIONS 15 3 2 6 SETUP WIZARD FOR PPPOE PPPOA CONNECTIONS 16 3 2 7 SETUP WIZARD FOR BRIDGE MODE C...

Страница 4: ...RMATION 54 5 7 LOG INFORMATION 55 5 8 TRAFFIC STATISTICS 56 5 9 ADSL INFORMATION 57 5 10 HELP 58 6 TROUBLESHOOTING 59 6 1 CONFIGURING IP SETTINGS ON YOUR COMPUTER 59 6 1 1 CONFIGURE WINDOWS XP FOR DHCP 60 6 1 2 WINDOWS 2000 62 6 1 3 CONFIGURE WINDOWS 2000 FOR DHCP 62 6 1 4 WINDOWS 95 AND WINDOWS 98 63 6 1 5 CONFIGURE WINDOWS 95 AND WINDOWS 98 FOR DHCP 63 6 1 6 WINDOWS ME 63 6 1 7 CONFIGURE WINDOWS...

Страница 5: ...nternet it will be necessary to provide information to the Router that will be stored in its memory For some users only their account information User Name and Password is required For others various parameters that control and define the Internet connection will be required 1 4 1 ADSL ACCOUNT It is necessary to have an account set up with an ADSL broadband Internet service provider before the Rou...

Страница 6: ...ou must install an adapter follow the installation instructions that come with the Ethernet NIC adapter 1 4 6 ADDITIONAL SOFTWARE It may be necessary to install software on client computers that enables them to access the Internet Additional software must be installed if UT 300R2U is used as a simple bridge For a bridged connection the information needed to make and maintain the Internet connectio...

Страница 7: ...good Ethernet link Blinking green indicates an active connection Indicator USB Link Act Solid green indicates a good USB link Blinking green indicates an active connection Line Connected with phone line or ADSL port of the splitter Ethernet To be connected to a PC network card by a straight through network cable also can use a crossover cable to connect to Hub Switch or Router USB To connect to a ...

Страница 8: ...cedures The Router can be placed on a shelf or desktop ideally you should be able to see the LED indicators on the front if you need to view them for troubleshooting 2 2 1 CONNECT ROUTER TO ETHERNET The Router may be connected to a single computer or Ethernet device through the 10 100 BASE TX Ethernet port on the rear panel Any connection to an Ethernet concentrating device such as a switch or hub...

Страница 9: ... and double click the setup application file autorun exe or find the file Setup exe in the folder labeled USBDRIVER and double click it to launch the installation software The auto run USB driver setup must be completed before connecting the router to your PC with the USB cable To install the driver follow these instructions 1 Click the Install UT 300R2U link in the to launch the USB driver instal...

Страница 10: ...properly configured this should light up after several seconds If this is the first time installing the device some settings may need to be changed before the Router can establish a connection 2 2 5 FACTORY RESET BUTTON The Router may be reset to the original factory default settings by depressing the reset button for a few seconds while the device is powered on Use a ballpoint or paperclip to gen...

Страница 11: ...aving trouble connecting to the web interface of the Router configure the proxy settings to bypass the proxy server or disable use of proxy servers and try to connect again 3 1 1 LOGIN TO HOME PAGE To use the web based management software launch a suitable web browser and direct it to the IP address of the Router Type in http followed by the default IP address 192 168 1 1 in the address bar of the...

Страница 12: ...On All configuration and management of the Router is done using the web based management interface pictured in the above example To access the various configuration menus open the directories listed along the top of the menu Home Advanced Tools Status and Help The Setup Wizard allows you to configure the basic settings for the WAN Internet and Ethernet LAN including DHCP settings ...

Страница 13: ... password go to the User Configuration window located in the Tools directory Tools Admin User Configuration window To create a new password type the new password in the New Password field and then retype it in the Confirm Password field Note The Username admin used to access the Router s management software cannot be change by the user ...

Страница 14: ...ons in the pop up window that appears The initial window summarizes the setup process Click the Next button to proceed You may stop using the Setup Wizard at any time by clicking the Exit button If you exit the wizard you will return to the main Setup window without saving any of the settings changed during the process If you do not wish to use this Setup Wizard open the Interface Setup directory ...

Страница 15: ...ENING WINDOW Opening Setup Wizard window The first pop up window of the Setup Wizard lists the basic steps in the process These steps are as follows 1 Select the time zone 2 Configure the connection to the Internet 3 Reboot the ADSL router Click Next ...

Страница 16: ...TIME ZONE Choose the time zone you are in from the pull down menu and click Next This sets the system time used for the Router If you wish to return to the previous window during the setup process click the Back button Setup Wizard Choose Time Zone window ...

Страница 17: ...ailable are Dynamic IP Address Static IP Address PPPoE PPPoA and Bridge Mode Each connection type has different settings that are configured in the next Setup Wizard window Setup Wizard Set Internet Connection Type WAN window Select the Connection Type specific to your service and click Next to go to the next Setup Wizard window Follow the instructions below for the type of connection you have sel...

Страница 18: ...to change these settings The Internet connection cannot function if these values are incorrect 2 Select the specific Connection Type from the drop down menu The available Dynamic IP Address connection and encapsulation types are 1483 Routed VC Mux 1483 Routed LLC Mux IPoA VC Mux IPoA LLC and IPoA LLC 1577 Click Next to go to the next pop up window and complete the Setup Wizard Setup Wizard Set Dyn...

Страница 19: ...AN IP Address WAN Subnet Mask and WAN Gateway Address as instructed by your ISP 3 Enter a Primary DNS Server address Adding a Secondary DNS Server address is optional Please see your ISP for further instructions 4 Select the specific Connection Type from the drop down menu The available Static IP Address connection and encapsulation types are 1483 Routed VC Mux 1483 Routed LLC Mux IPoA VC Mux IPoA...

Страница 20: ...rect setting in the available entry fields Most users will not need to change these settings The Internet connection cannot function if these values are incorrect 3 Select the specific Connection Type from the drop down menu The available PPP connection and encapsulation types are PPPoA VC Mux PPPoA LLC PPPoE VC Mux and PPPoE LLC Click Next to go to the next window and complete the Setup Wizard Se...

Страница 21: ...t users will not need to change these settings The Internet connection cannot function if these values are incorrect 2 Select the specific Connection Type from the drop down menu The available Bridge Mode connection and encapsulation types are 1483 Bridged IP LLC and 1483 Bridged IP VC Mux Click Next to go to the next window and complete the Setup Wizard Setup Wizard Set Bridge Mode window ...

Страница 22: ... you have entered all the necessary information correctly click the Next button to save the new configuration settings If you need to change settings from a previous window click the Back button Setup Wizard Save Changes window Click the Exit button to complete the Setup Wizard procedure ...

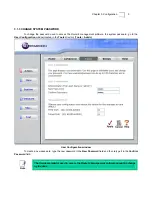
Страница 23: ...Chapter 3 Configuration 19 3 2 9 SETUP WIZARD CONFIRMATION Setup Wizard Save Changes Confirmation window ...

Страница 24: ...tled Multiple PVCs later in this manual for further information Opening WAN window Use the Virtual Circuit drop down menu to display up to eight configurable profiles for the Internet interface If you do not intend to use more than a single virtual connection most users you can use the default setting PVC 0 If you are using multiple connections use the Virtual Circuit drop down menu to access the ...

Страница 25: ... to the service provider Typically the IP address assigned has a long lease time so it will likely be the same address each time the Router requests an IP address To configure a Dynamic IP Address connection perform the steps listed below Some of the settings do not need to be changed the first time the device is set up but can be changed later if you choose See the table below for a description o...

Страница 26: ... available options are 1483 Routed VC Mux 1483 Routed LLC Mux IPoA VC Mux IPoA LLC and IPoA LLC 1577 If you have not been provided specific information for this section leave the default setting 4 Turn on the Default Route feature if you want to use the Router as the default route to the Internet for your LAN Whenever a computer on the LAN attempts to access the Internet the Router becomes the Int...

Страница 27: ...e WAN connection Follow the instruction below to configure the Router to use Static IP Address assignment for the WAN connection To configure a Static IP Address connection perform the steps listed below Some of the settings do not need to be changed the first time the device is set up but can be changed later if you choose See the table below for a description of all the settings available in thi...

Страница 28: ...ult setting 4 Change the IP Address Subnet Mask and ISP Gateway Address as instructed by your ISP These are the global IP settings for the Internet WAN interface This is the visible IP address of your account Your ISP should have provided these IP settings to you 5 Enter a Primary DNS Server address and a Secondary DNS Server address as instructed by your ISP 6 Turn on the Default Route feature if...

Страница 29: ...ructions below to configure the Router to use a PPPoA or PPPoE for the Internet connection Make sure you have all the necessary information before you configure the Internet WAN connection WAN window for PPPoA PPPoE Address To set up a PPPoE or PPPoA connection ...

Страница 30: ...y 8 Turn on the Default Route feature if you want to use the Router as the default route to the Internet for your LAN Whenever a computer on the LAN attempts to access the Internet the Router becomes the Internet gateway to the computer If you have an alternative route for Internet traffic you may turn this off without effecting the Router s connection 9 NAT should remain Enabled If you disable NA...

Страница 31: ...change them However if you are instructed to change the VPI or VCI values type in the values assigned for your account Leave the ATM Interface and Virtual Circuit settings at the defaults PVC 0 and Enabled values for now This can be used later if you are configuring multiple virtual circuits for your ADSL service 3 In the Bridge Mode section choose the Connection Type from the pull down menu This ...

Страница 32: ... to install additional software on any computer that will the Router for Internet access The additional software is used for the purpose of identifying and verifying your account and then granting Internet access to the computer requesting the connection The connection software requires the user to enter the User Name and Password for the ISP account This information is stored on the computer not ...

Страница 33: ...ype in the desired values and click the Apply button Your web browser should automatically be redirected to the new IP address You will be asked to login to the Router s web manager again 4 1 DHCP CONFIGURATION The DHCP server is enabled by default for the Router s Ethernet LAN interface DHCP service will supply IP settings to workstations configured to automatically obtain IP settings that are co...

Страница 34: ...mount of time in seconds that a workstation is allowed to reserve an IP address in the pool if the workstation is disconnected from the network or powered off DHCP window with DHCP Server selected To disable DHCP select the No DHCP radio button and click on the Apply button Choosing this option requires that workstations on the local network must be configured manually or use another DHCP server t...

Страница 35: ...P RELAY CONFIGURATION To use DHCP service from your ISP or another DHCP server select the DHCP Relay option and type the DHCP Server Address in the space provided Click Apply to begin DHCP Relay from the ISP DHCP window with DHCP Relay selected ...

Страница 36: ...orkstation The example here also uses manually configured DNS settings 4 2 DNS CONFIGURATION You may also configure DNS settings for the LAN when using the Router in DHCP mode Toggle the DNS Relay Selection setting to Enabled and enter the IP addresses for the Preferred DNS Server and Alternate DNS Server in the field provided The manually configured DNS settings will be supplied to clients that a...

Страница 37: ...d LAN operations employing multiple virtual connections require ADSL routers or modems at the remote site for a successful connection Contact your ISP or telecommunications service provider if you are interested in setting up multiple virtual connections After the necessary arrangements have been made to use the Router with multiple virtual connections follow the instructions below to set up the R...

Страница 38: ...s desired To save the new settings click the Apply button The new connection will activate upon restarting 4 4 UPNP CONFIGURATION Universal Plug and Play supports zero configuration networking and automatic discovery for many types of networked devices When enabled it allows other devices that support UPnP to dynamically join a network obtain an IP address convey its capabilities and learn about t...

Страница 39: ... possible to map all ports to a specified LAN IP address You will use this same window if you are using NAT for a multiple number of IPs To specify NAT mapping type in the port or range of ports used for mapping in the Destination Port From fields and enter the LAN Private IP address of the server or system used for the selected ports Use the pull down Protocol menu to select ANY TCP UDP or ICMP T...

Страница 40: ...ATION Simple Network Management Protocol is a standard for internetwork and intranetwork management SNMP window Enter the desired information in the Community and Host fields and then click the Apply button when you are finished with your SNMP settings ...

Страница 41: ... or Deny traffic for Inbound WAN to LAN or Outbound LAN to WAN routed data The rules are based on IP address and TCP UDP port Configure the filter rules as desired and click the Apply button to create the rule The newly created rule appears listed in the Outbound Filter List at the bottom of the window The table below describes the various parameters that are configured for the filter rules IP Fil...

Страница 42: ...r which you are creating the filter rule For an Inbound Filter this is the IP address or IP addresses for which you are creating the filter rule You can opt to indicate a Single IP an IP Range or Any IP from the pull down menu Choosing Any IP will apply the rule to all WAN or all LAN IP addresses depending on which type of rule Inbound or Outbound is being configured Dest IP Address Where the Dest...

Страница 43: ... use a predetermined gateway To add a static route to a specific destination IP on the local network click the Routing button on the left side of the main window IP Route Table window To add a static route to a specific destination IP on the local network enter a Destination IP address select a suitable Netmask and type in the NextHop Click Apply to enter the new static route in the table below Th...

Страница 44: ... to agents on the Internet with the right type of software Keep in mind that any client PC in the DMZ will be exposed to various types of security risks If you use the DMZ take measures such as client based virus protection to protect the remaining client PCs on your LAN from possible contamination through the DMZ DMZ window To designate a DMZ IP address type in the DMZ Host IP Address of the serv...

Страница 45: ...of attacks There are two general types of protection DoS Attack that can be enabled on the Router as well as filtering for specific packet types sometimes used by hackers You can choose to enable or disable protection against a pre selected basket of attack and scan types To use DoS Protection or Attack Protection select the Enabled pull down menu for the protection type Firewall Configuration win...

Страница 46: ...can otherwise known at attack protection is designed to block attempts to discover vulnerable ports or services that might be exploited in an attack from the WAN The Service Filtering options allow you to block FTP Telnet response Pings etc from the external network Check the category you want to block to enable filtering of that type of packet When you have selected the desired Firewall policies ...

Страница 47: ...Chapter 4 Other Configuration 43 4 12 PPP CONFIGURATION Point to Point Protocol PPP Configuration window ...

Страница 48: ...tocols For most ADSL accounts the default settings will work This configuration works with all ADSL implementations If you have been given instructions to change the Modulation Type select the desired option from the drop down menu ADSL2 ADSL2 Multi ADSL G DMT and T1 413 and click the Apply button ADSL Configuration window ...

Страница 49: ...ou are using multiple PVCs you can change the configuration of any PVC in this window To create new or additional PVCs read the section on Multiple PVCs earlier in this manual This window can be used as an alternative to configure the same settings found on the WAN Settings window in the Home directory ATM VCC window ...

Страница 50: ... password in the New Password field and then retype it in the Confirm Password field In addition this window allows you to change the HTTP Port or the Telnet Port if the default port values are unacceptable Click Apply to let your changes take effect Note The Username admin used to access the Router s management software cannot be change by the user ...

Страница 51: ...o configure system time on the Router select the method used to maintain time If you wish to use a network time server select the method used from the Synchronize the modem s clock with radio buttons and type in the IP address of the NTP Server Address Use the pull down menus to select Time Zone and Daylight Saving Time settings where appropriate ...

Страница 52: ...selected Alternatively you can manually configure the system time by clicking Manual Enter your own settings in the Synchronize the modem s clock with section and then type in the Date and Time in the spaces provided Click the Apply button to set the system time ...

Страница 53: ...ick the Save button to Save Settings to Local Hard Drive You will be prompted to select a location on your computer to put the file The file type is xml HTML and may be named anything you wish To load a previously saved configuration file click the Browse button and locate the file on your computer Click the Upload button to Load Settings From Local Hard Drive Confirm that you want to load the fil...

Страница 54: ...rmware Upgrade window To upgrade firmware type in the name and path of the file or click on the Browse button to search for the file Once you have located the file click the Apply button to begin copying the file The file will load and restart the Router automatically ...

Страница 55: ...eous Configuration window The Ping test functions on the WAN and LAN interfaces Type the IP address you want to check in the space provided and click the Ping button Read the Ping test result in the space immediately below To enable or disable IGMP over Ethernet use the pull down menu in the Connections section To save the current settings to Flash and reboot the device click the Save Reboot butto...

Страница 56: ...r 5 Tools and Miscellaneous 52 Click OK to proceed The Router will reset with the factory default settings including IP settings and administrator password When it is finished the following prompt will appear ...

Страница 57: ...of the Router The diagnostic features execute a series of tests of your system software and hardware connections Use these when working with your ISP to troubleshoot problems Diagnostics window You may reset the Router to its factory default settings in the Misc Configuration window in the Tools folder ...

Страница 58: ...Chapter 5 Tools and Miscellaneous 54 5 6 DEVICE INFORMATION The Device Information window is used to view Device LAN WAN and ADSL information Device Information window ...

Страница 59: ...This window displays chronological event log data Use the navigation buttons to view or scroll log pages Alarm window You may also save a simple text file containing the log to your computer Click the Save Alarm button and follow the prompts to save the file ...

Страница 60: ... Use this window to monitor traffic on the Ethernet or ADSL connection Select the interface for which you want to view packet statistics and the information will appear below Traffic Statistics window Click the Refresh button to view current traffic information ...

Страница 61: ...Chapter 5 Tools and Miscellaneous 57 5 9 ADSL INFORMATION Use this window for troubleshooting the ADSL connection ADSL Status window ...

Страница 62: ...Chapter 5 Tools and Miscellaneous 58 5 10 HELP Help window Click the desired link to access help files ...

Страница 63: ... procedures used on the other Windows operating systems to first check if the TCP IP protocol has been installed if it is not instructions are provided for installing it Once the protocol has been installed you can configure the system to receive IP settings from the Router For computers running non Windows operating systems follow the instructions for your OS that configure the system to receive ...

Страница 64: ... the following steps to configure a computer running Windows XP to be a DHCP client 1 From the Start menu on your desktop go to Settings then click on Network Connections 2 In the Network Connections window right click on LAN Local Area Connection then click Properties ...

Страница 65: ...enu highlight Internet Protocol TCP IP under This connection uses the following items by clicking on it once Click on the Properties button 4 Select Obtain an IP address automatically by clicking once in the circle Click the OK button Your computer is now ready to use the Router s DHCP server ...

Страница 66: ...nent Type dialog box select Protocol and then click Add 7 Select Internet Protocol TCP IP in the Network Protocols list and then click OK 8 You may be prompted to install files from your Windows 2000 installation CD or other media Follow the instructions to install the files 9 If prompted click OK to restart your computer with the new settings 6 1 3 CONFIGURE WINDOWS 2000 FOR DHCP 1 In the Control...

Страница 67: ...ocol and if necessary install it 1 In the Windows task bar click the Start button point to Settings and then click Control Panel 2 Double click the Network and Dial up Connections icon 3 In the Network and Dial up Connections window right click the Network icon and then select Properties 4 The Network Properties dialog box displays with a list of currently installed network components If the list ...

Страница 68: ...ter all files are installed a window displays to inform you that a TCP IP service called DHCP can be set up to dynamically assign IP information 8 Click Yes to continue and then click OK if prompted to restart your computer 6 1 9 CONFIGURE WINDOWS NT 4 0 FOR DHCP 1 Open the Control Panel window and then double click the Network icon 2 In the Network dialog box click the Protocols tab 3 In the Prot...

Страница 69: ...e are two basic styles of low pass filters commonly used 6 2 1 IN LINE FILTER In line low pass filters are used for each telephone or telephone device answering machines Faxes etc that shares the line with the ADSL service These devices are attached to the telephone cable between the telephone and wall jack Filters that install behind the wall plate hidden from view are also available A typical in...

Страница 70: ...his port connects to the wall jack ADSL This port connects to the Router Phone This port connects to a telephone or other telephone device The diagram below illustrates the proper use of this style of filter Make certain the lines are properly connected If you are unable to hear a dial tone with the telephone check the connections to make sure they are securely attached and connected to the correc...

Страница 71: ...Chapter ANNEX Shipping List 67 ANNEX SHIPPING LIST ADSL ROUTER 1 Splitter 1 User Manual 1 Power Supply 1 Cable Cat5 RJ45 1 USB Cable 1 Telephone Line 2 Warranty Certificate 1 ...

Отзывы: