background image


© 2008 UTC RETAIL. 

11 

11501021 Rev C 

All rights reserved. 


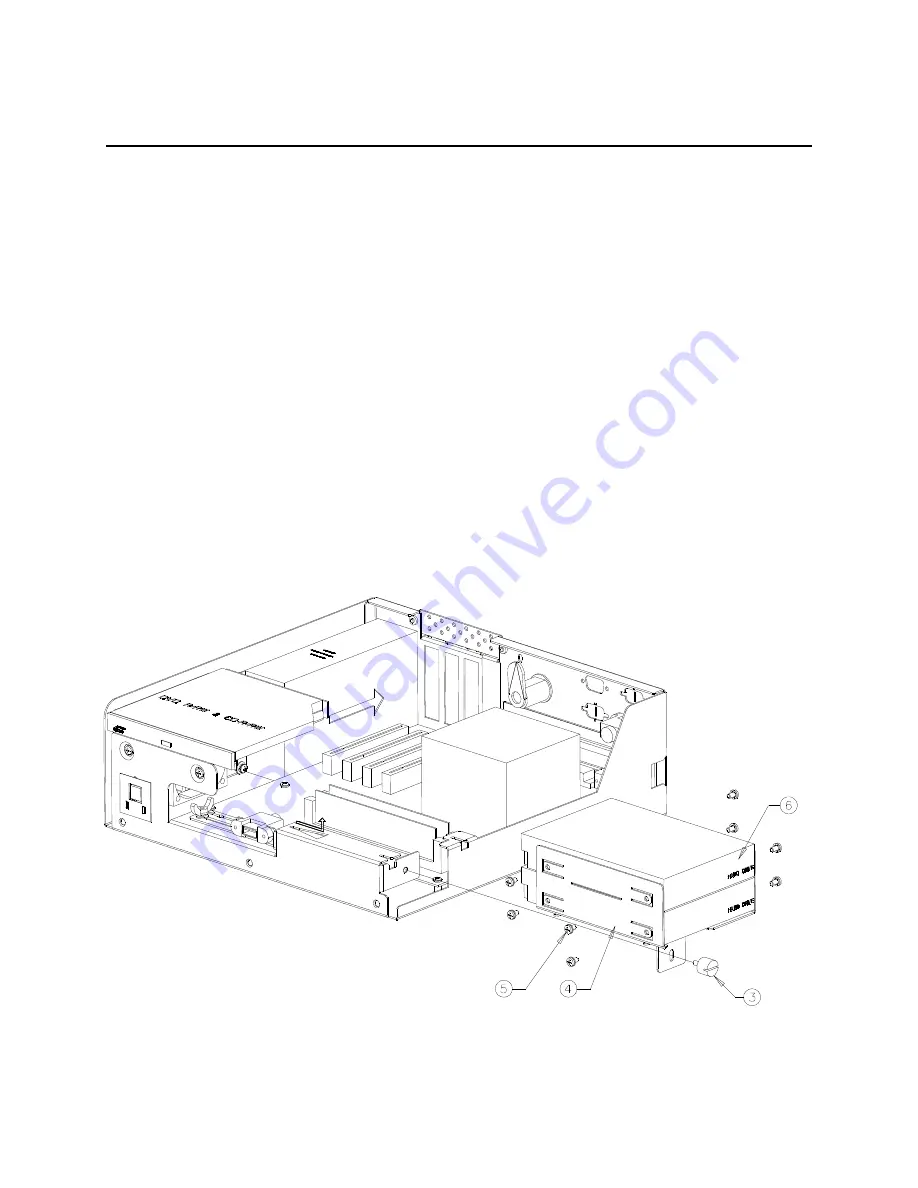
Hard Drive Removal 

The 2200 Series POS System is equipped with one or two easily accessible hard drives. 

Note: Prior to installing a replacement hard drive in this unit, ensure that the proper jumper 
settings have been made. These must be set to MASTER drive. 

To remove a hard drive, follow these steps: 

1.  Shut off all power to the system by unplugging the power cord from the AC outlet. 

2.  Remove cover as outlined in the system access section.  

3.  Disconnect the cabling. 

4.  Remove the hard-drive thumbscrew. 

5.  Remove hard-drive bracket from the unit. 

6.  Remove the hard drive mounting screws. 

7.  Replace hard-drive. 

8.  Reconnect the cabling. 


Содержание 2250

Страница 1: ...Rev C 2200 Series POS System 2250 2270 User Guide Thank you for selecting UTC RETAIL s innovative 2200 Series Point of Sale solution This guide is designed to acquaint you with the features and functionality of the 2200 Series Point of Sale System ...

Страница 2: ... pursuant to Part 15 of the FCC Rules These limits are designed to provide reasonable protection against harmful interference when the equipment is operated in a commercial environment This equipment generates uses and can radiate radio frequency energy and if not installed and used in accordance with the instruction manual may cause harmful interference to radio communications Operation of this e...

Страница 3: ... Rev C All rights reserved Table of Contents 2200 Series POS System User Guide 2 Table of Contents 3 Product Information 4 System Access 10 Hard Drive Removal 11 Integration Tray Installation Guide 12 System Installation Guide 12 ...

Страница 4: ... Support The 2200 Series POS System keyboard options are the UTC RETAIL Model M700 or a standard PC type keyboard The M700 keyboard is designed for POS environments it has a built in 3 track reader and key switch and comes in QWERTY layouts The 2200 Series POS System is designed to coordinate with the UTC RETAIL Pole Display options The 2200 Series POS System supports many different printers such ...

Страница 5: ... Yes Mouse Port Yes Yes Audio Port Yes Yes Network Port 10 100 LAN 10 100 LAN Printer Port Yes Yes Customer Display 2 line x 20 character VFD 2 line x 20 character VFD MSR 3 Track 3 Track Display 15 LCD touch or non touch 17 LCD touch or non touch 15 LCD touch or non touch 17 LCD touch or non touch Keyboard UTC RETAIL Programmable POS Standard PC UTC RETAIL Programmable POS Standard PC Cash Drawer...

Страница 6: ... The 2200 Series POS System ports are divided into three sections Standard ports on the motherboard PCI expansion slots The ports located on the motherboard are defined as follows o PS2 Keyboard o PS2 Mouse o DB9 serial COM1 o Audio o Parallel o SVGA o 10 100 LAN o USB ...

Страница 7: ... System has both USB and Serial ports located at the rear of the unit An additional configurable USB port is located at the front of the unit The front USB port maybe be configured to be exposed or not An optional DVD is located at the front of the unit Back Panel View 2250 2270 Front Panel View ...

Страница 8: ...on jumpers located on the appropriate PCI cards The table below summarizes the RS232 DB9 pin definitions PIN NO 1 2 3 4 5 6 7 8 9 Signal CD RX TX DTR GND DSR RTS CTS RI or 5V 12V output JP1 Select RI VOLTAGE output for DB9 pin 9 of Port 1 JP2 Select RI VOLTAGE output for DB9 pin 9 of Port 2 JP3 Select 5V 12V when the setting is VOLTAGE output COM Port Jumper Settings COM3 through COM6 Voltages are...

Страница 9: ...M700 Standard PC keyboard Pole Display Options PD1200 Power Requirements The 2200 Series POS System has one power cord to the AC outlet A dedicated clean power source is recommended Voltage 110 VAC 10 Current 5 Amps maximum with all peripherals connected PCI Slot Support Options The PCI slots support three standard low profile PCI cards and one PCI express card Depending on the configuration purch...

Страница 10: ... to gain access to internal components The unit may ship with a thumb screw or thumb screw with lock option Option One Thumb Screw 1 Unscrew the thumb screw from the back panel of the unit 2 Slide off the cover Option Two Lock 1 Unlock the cover of the unit from the back panel 2 Remove the thumb screw 3 Slide off the cover ...

Страница 11: ...proper jumper settings have been made These must be set to MASTER drive To remove a hard drive follow these steps 1 Shut off all power to the system by unplugging the power cord from the AC outlet 2 Remove cover as outlined in the system access section 3 Disconnect the cabling 4 Remove the hard drive thumbscrew 5 Remove hard drive bracket from the unit 6 Remove the hard drive mounting screws 7 Rep...

Страница 12: ...tallation Guide All cable routing is described in the 2200 Series POS System Installation Guide which may be downloaded from the UTC RETAIL s website at www utcretail com Under Counter Mounting Bracket Installation Guide The Under Counter Mounting Bracket Installation Guide may be downloaded from the UTC RETAIL s website at www utcretail com Cable Cover Installation Guide The Cable Cover Installat...

Отзывы: