background image

5

4

3

2

1

20

21

22

23

24

25

26

27

28

6

7

8

9 10 11 12 13

14

15

16

17

18

19

29

30

31

32

33

34

35

36

FAX

COM

SCAN

COPY

PRINT

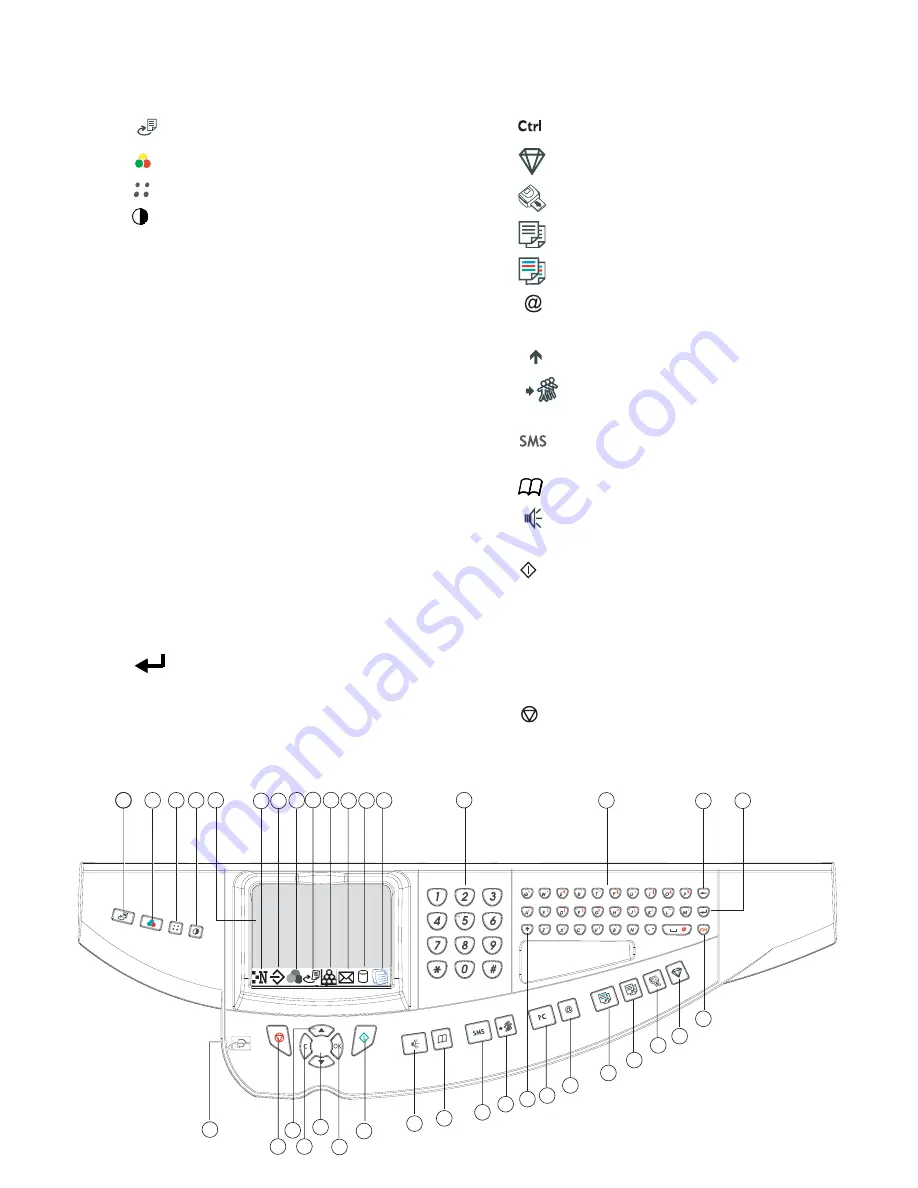
1.

 key: duplex (double-sided) scan/copy.

2.

 key: selection of colour mode.

3.

 key: scan resolution.

4.

 key: contrast setting.

5.

Graphical colour screen.

6.

Scan resolution indicator.

7.

"Line" icon: 


*On: communication in progress.


*Flashing : communication setting up.

8.

Colour mode icon:


*On: colour mode active.


*Off: colour mode not active.

9.

Duplex printing indicator in copy mode: 


*On: duplex mode activated.


*Out: duplex mode deactivated.

10.

Toner remaining indicator:


On: end of toner,


Flashing: near the end of toner.

11.

Message reception icon (SMS or attachment)

12.

Memory occupation indicator 

13.

Indicator of documents to be printed

14.

Digital keyboard.

15.

Alphabetical keyboard.

16.

Í

 key: deletes the character to the left of the cursor.

17.

 key: input or line feed.

18.

 key: access to special characters.

19.

 key: 'crystal' function for photo printing.

20.

 key: photo printing.

21.

 key: black and white copy.

22.

 key: colour copy.

23.


 key: scan to e-mail (sending of Internet fax).

24.

PC

 key: scan to PC / scan to FTP / scan to disk.

25.

 key: Shift.

26.

 key: multiple contact sending (fax, e-mail or 

SMS).

27.

 key: sending of an SMS (Short Message 

Service).

28.

 key: access to directory and quick dial numbers.

29.

 key: line manual connection, listen for tone 

during fax sending.

30.

 key: send fax.

31.

OK

 key: validates displayed selection.

32.

 key: access to menu and browsing in menus 

downwards.

33.

C

 key: return to previous menu and correction of text.

34.

 key: browsing in menus upwards.

35.

  key: stops current operation.

36.

USB connector.

S

CANNER


CONTROL


PANEL

Содержание CLP 3416

Страница 1: ...INSTRUCTION HANDBOOK DIGITAL MULTIFUNCTIONAL SYSTEM CLP 3416 3524 MFP ...

Страница 2: ......

Страница 3: ... its navigator its multitask access and its direct access directory Through its Internet access your terminal allows you to send and receive faxes to E mails thanks to the F x to E mail function send and receive E mails send SMS s You can also print using the PCL 6 and KPDL SGScript 3 emulation of the level 3 Postscript language formats both in black white and in colour List of accessories1 The fo...

Страница 4: ......

Страница 5: ...r of documents to be printed 14 Digital keyboard 15 Alphabetical keyboard 16 Í key deletes the character to the left of the cursor 17 key input or line feed 18 key access to special characters 19 key crystal function for photo printing 20 key photo printing 21 key black and white copy 22 key colour copy 23 key scan to e mail sending of Internet fax 24 PC key scan to PC scan to FTP scan to disk 25 ...

Страница 6: ...ogress 5 Key Used to navigate in the sub menus and to adjust certain settings 6 Key Used to navigate the menus and to increase numerical values 7 Key Used to navigate in the sub menus to adjust certain settings and to display help messages when certain errors occur 8 MENU Key Used to access or exit the printer s menu 9 CANCEL Key Used to cancel a print job 10 GO Key Used to switch the printer betw...

Страница 7: ... 13 Configuring the printer driver 1 16 2 GETTING STARTED 2 1 Navigation methods 2 1 Presentation 2 1 Access to functions 2 3 Guide to function list 2 5 Print console navigation basics 2 11 Navigating the menus 2 11 Access to functions 2 12 Guide to functions 2 13 3 SETTING YOUR MACHINE 3 1 Main settings 3 1 Before transmission 3 2 Before reception 3 5 Technical parameters 3 8 Local Area Network L...

Страница 8: ...porting a directory 4 7 The file structure 4 7 Procedure 4 9 Exporting a directory 4 10 LDAP server 4 10 Configuration 4 10 Accessing server contacts 4 11 Adding a server contact to the local directory 4 11 5 OPERATION 5 1 Sending 5 1 Document depositing 5 1 Selecting Colour Resolution Contrast 5 2 Dialling 5 3 Transmission over the Public Switched Telephone Network PSTN 5 5 Transmission over the ...

Страница 9: ...ysis of the memory device 5 26 Other functions 5 28 Logs 5 28 Printing the functions list 5 28 Printing the machine settings 5 28 Counters 5 29 Deposit and polling 5 29 Lock 5 30 Scan to PC depends on model 5 33 Mail box MBX FAX 5 34 MBX management 5 34 6 MAINTENANCE 6 1 Maintenance 6 1 General 6 1 Replacing the consumables toner and drum 6 2 Cleaning 6 16 Servicing 6 17 Scanner calibration 6 17 I...

Страница 10: ...roducts comply with the essential requirements of Directive R TTE 1999 05 EC For user safety in accordance with Directives 73 23 EC For electromagnetic interference in accordance with Directive 89 336 EC The manufacturer declares that the products are manufactured in accordance with ANNEX II of Directive R TTE 1999 5 EC The declaration of compliance can be requested at the following address UTAX G...

Страница 11: ...aracteristics Choose a location that is well ventilated Make sure you do not obstruct the ventilation grilles located on the left and right hand sides of the unit and at the rear of the Front Back module If there is a wall nearby when you install the unit make sure you install the terminal at the distances shown in the illustration below in order to make it easier to open the various covers 30 cm ...

Страница 12: ... to 32 5 C 50 F to 95 F with fluctuation of 10 C 18 F per hour Humidity 20 to 80 no condensation with fluctuation of 20 per hour Terminal The following describes precautions for using the terminal Never switch the power to the terminal off and never open the covers while the unit is printing Never place flammable gasses liquids or objects that generate magnetic forces near the terminal When unplug...

Страница 13: ...al accidently get inside the printer immediately turn it off unplug the power cord and contact your dealer Failure to take this immediate action creates the danger of fire or electrical shock Whenever the terminal emits unusually high amounts of heat smoke an unusual odor or noise immediately turn it off unplug it and contact your dealer Failure to take this imme diate action creates the danger of...

Страница 14: ...pping box and take out the parts the scanner the document feeder the equipped mechanical interface the base the leads and cables telephone lead mains lead mains extension lead Centronics cable the cable sleeve 3 guide clips the mounting screws the installation guide and the CD ROMs ...

Страница 15: ...ESCRIPTION OF THE MULTIFUNCTION TERMINAL Adjustable paper guide Scroll scanner ADF Scanner control panel Printer control panel Duplex unit depending on option or model Addional paper tray optional Base Document feed tray for scanning Original document output stacker Access handle flatbed scanner Memory card reader Printer output stacker Chip card reader Manual paper feed tray Printer paper feed tr...

Страница 16: ...eir respective openings Screw in and tighten the 8 mounting screws Take hold of the upper part of the interface and set the assembly upright Optional equipment Place the additional paper tray on the base positioning it on its locating pins You can install up to three additional paper trays Optional equipment Place the duplex unit on the additional paper tray positioning it on its locating pins ...

Страница 17: ... on the optional equipement positioning it on its locating pins Open the printer put the white wedge inside the lid into the second opening on the right side as shown on the illustration Put the black wedge inside the lid into the second opening on the left side of the printer in the same way as the righthand wedge Close the printer Unscrew the knurled nuts of the columns lower the mechanical inte...

Страница 18: ...ushing its two locking pins into the corresponding openings on the scanner Terminal connections Looking at the back of the terminal you will find the available connections as shown below Centronics parallel port LAN connector Host USB ports Memory card reader Phone line connector Mains socket for extension lead Mains socket On Off switch Host USB port ...

Страница 19: ...cting the leads and cables to the scanner Make sure that the mains on off switches of scanner and printer are set to O 1 Connect the Centronics cable to the scanner lock it with the two metal clips 2 Plug the LAN cable not supplied into the LAN network connector of the scanner 3 Plug the telephone cable into the telephone connector of the scanner 4 Connect the mains lead to the mains inlet of the ...

Страница 20: ...canner Connecting the leads and cables to the printer Open the duplex unit by lifting the lever at the back and move the movable part as far out of the way as possible 1 Connect the Centronics cable to the printer and lock it with the two metal clips 2 Plug the LAN cable not supplied into the LAN network connector of the printer 3 Connect the mains extension lead to the mains socket of the printer...

Страница 21: ...on Setting your machine Getting started Directory Maintenance Safety Contents Installation ADJUSTING THE ORIGINAL DOCUMENT OUTPUT TRAY Depending on the format of the document to be scanned A4 or LGAL LEGAL adjust the paper stop ...

Страница 22: ...connections on page 1 8 for the connections to the scanner Note The printer and the scanner have separate LAN connections If you dispose of only one connection you will need a concentrator or a switch POWER LINE CONNECTION AND SWITCH ON Caution Refer to safety procedures in the chapter Safety Connect the end of the scanner mains lead of the terminal to the mains wall socket First set the printer O...

Страница 23: ... visible offset relative to the others use this mode to correct the colour alignment from the printer control panel Press MENU Press or until Other is displayed Press Press or until Colour registration is displayed Press Press or until Print the test sheet is displayed Press ENTER A question mark is displayed Press ENTER The Processing state is displayed and a colour registration test sheet is pri...

Страница 24: ...yan is displayed Press ENTER 0 or 00 is displayed for each value and the cursor blinks under the left L value On the colour registration test sheet examine the left L graphic in the section to be used for the cyan Find the two lines that are most closely aligned so as to form a single straight line and note the corresponding value ...

Страница 25: ...ree values you have entered If the displayed values are correct press ENTER to confirm them Press The Adjust magenta option is displayed After defining the alignment values for this colour the Adjust yellow option is displayed in its turn Find the appropriate alignment values for the magenta and the yellow in the same manner as for the cyan and set these values on the control panel After defining ...

Страница 26: ... the printer driver is already installed you will need to configure the printer driver on your PC Click on the START button select CONTROL PANEL and then click on PRINTERS Right click on the Printer icon then choose Properties Click on the peripheral s PROPERTIES tab Tick the boxes corresponding to the installed options ...

Страница 27: ...Directory Maintenance Safety Contents Installation 2 GETTING STARTED NAVIGATION METHODS PRESENTATION The navigator gives you access to the menus visible on screen The navigator This navigator has 4 keys and allows you to move within the menus available on your machine ...

Страница 28: ...ry and go to the following menu OK Return to the previous menu C Confirm and exit from the current menu Exit without confirming from the current menu To Use key Symbol used Move to the right To move from a line to the next one while pressing the key of the alphanumeric keyboard at the same time L Move to the left To move from a line to the previous one while pressing the key of the alphanumeric ke...

Страница 29: ...ones ACCESS TO FUNCTIONS Access to functions may be achieved in two ways Menu driven access Direct function access Menu driven access You can print out the guide to find the number of a function by moving through the menus as shown below Confirm your entry OK Delete a character by moving the cursor to the left C Confirm your entry and return to the initial screen To Use key Symbol used 1 NEW CONTA...

Страница 30: ...e guide Therefore it can only be printed on one side Direct access by number You may print the functions list to find out the number of a function From the stand by mode Press the key Enter the number of the desired function on the numerical keyboard 1 DIRECTORY 1 DIRECTORY 2 SETUP 2 SETUP 3 FAX 3 FAX F FUNCTION 3 FAX 3 FAX 4 SMS SERVICE 4 SMS SERVICE 5 PRINT 5 PRINT F FUNCTION 1 FUNCTION LIST 1 F...

Страница 31: ...ETUP Functions Function description Page 21 OK DATE TIME Setting the date and time p 3 2 211 OK MODIFY Modifying the date and time p 3 2 212 OK AUTO ADJUST Automatic changeover between summer and winter time p 3 2 22 OK NUMBER NAME Enter your name and your number p 3 2 23 OK SEND Transmission settings p 3 4 231 OK SEND REPORT Choose to print the communication report p 3 4 232 OK MEMORY SEND Send f...

Страница 32: ...EN 271 OK LCD CONTRAST Adjusting the screen contrast p 3 8 29 OK TECHNICALS Technicals parameters p 3 9 20 OK GEOGRAPHICAL Geographical settings p 3 3 201 OK COUNTRY Choice of country and language p 3 3 202 OK NETWORK Choice of country p 3 3 203 OK LANGUAGE Choice of language p 3 3 MAIN MENU 2 SETUP Functions Function description Page MAIN MENU 3 FAX Functions Function description Page 31 OK TRANS...

Страница 33: ...28 4612 OK RECEIVE NO Reception number p 3 28 462 OK SMS CENTRE 2 Number of secondary SMS centre p 3 28 4621 OK RECEIVE NO Reception number p 3 28 MAIN MENU 5 PRINT Functions Function description Page 51 OK FUNCTIONS LIST Function list printing p 5 28 52 OK LOGS Print TX and RX logs p 5 28 53 OK DIRECTORY Print the directory p 4 7 54 OK SETUP User parameters printing p 5 28 55 OK COMMANDS Commands...

Страница 34: ...ED Assembled or not copy choice p 5 17 845 OK ORIGIN Origin setting p 5 17 846 OK CONTRAST Contrast setting p 5 17 847 OK LUMINOSITY Luminosity setting p 5 18 848 OK BINDING Binding type choice p 5 18 85 OK SCAN PRINT Réglages imprimante p 5 18 851 OK PAPER Type of paper choice p 5 18 852 OK PAPER TRAY Paper tray choice p 5 18 853 OK PAPER SAVE Paper save activation mode p 5 18 854 OK S F MARGINS ...

Страница 35: ...p 3 21 946 OK PRINT Print Internet settings p 3 21 95 OK E MAIL Send an E MailA p 5 8 96 OK MAILS SORT Select the reception typeA p 3 22 A These menus will appear only with valid ISPN setting MAIN MENU 9 INTERNET Functions Function description Page MAIN MENU 10 MEDIA Functions Function description Page 01 OK PRINT PHOTO Printing previewed photos p 5 22 02 OK PRINT DOCUMENT Printing documents p 5 2...

Страница 36: ...witch the printer between on line and off line mode Use it to perform the following operations Activate the on line or off line modes of the printer You can tempora rily halt a print job by switching the printer to off line Print and eject a page when the printer displays Waiting Restart printing after certain errors Exit the Auto idle mode This key lets you perform the following operations Cancel...

Страница 37: ...ey The MENU key lets you access the system menu in order to modify the configuration and the printing environment of the printer When you press this key when selecting a menu the latter is abando ned and the printer returns to normal operation Used to access a section or to enter numerical values The and keys are used to access or exit a subsection in some of the control procedures Used to access ...

Страница 38: ...are protocol TCP IP Turn this menu on if you are using the TCP IP protocol APPLE TALK Turn this menu on if you are networking with a Macintosh PRES STATUS PAGE When this menu is turned on the network configuration page is printed out at the same time as the printer status page EMULATION Select emulation type FONT FONT SELECT Select font CODE SET Select character encoding LIST OF INTERNAL FONTS Lis...

Страница 39: ...lack white or colour LIFE COUNTERS Number of pages printed counter OTHERS MSG LANGUAGE Choose the language in which messages will be displayed FORM FEED Set the time before printing out an incomplete page SLEEP TIMER Set the time before entering standby mode SLEEP MODE Switch the standby mode on PRINT PRINTER RESET Reinitialise the settings to their default values RESOURCE PROT Save downloaded PCL...

Страница 40: ...2 14 Getting started ...

Страница 41: ...1 3 SETTING YOUR MACHINE MAIN SETTINGS At machine powerup the screen displays You have to set the date and time telephone network language parameter and verify the other parameters listed below PLEASEWAIT ...

Страница 42: ...e OK key Your fax number your name You must obligatorily allocate an identifier to your terminal This identifier can be the name of the person or company using the terminal It will be shown on each page of the documents transmitted by the terminal If no identifier has been recorded your terminal will display an error code when sending a document by fax Your fax will print out your fax number on ea...

Страница 43: ... settings are different from the NETWORK TYPE p 3 2 which allows you to choose between public and private network To select the network 202 OK SETUP GEOGRAPHICAL NETWORK Select the required option and press the OK key to confirm Language This setting enables you to choose a language other than that imposed by the COUNTRY setting To select the language 203 OK SETUP GEOGRAPHICAL LANGUAGE Select the ...

Страница 44: ...Transmission report You may print a transmission report for all communications over the telephone network STN You may choose between more than one criteria for printing reports WITH a report is given when the transmission was properly performed or when it is completely abandoned but there is only one report per request WITHOUT no transmission report however your fax will note all transmissions tha...

Страница 45: ...default from 7 00 pm to 7 30 am Nevertheless you may change this time slot Modifying the economy period 233 OK SETUP SEND ECO PER Enter the hours of the new economy period and confirm your selection with the OK key Using the economy period 32 OK FAX ECO TRANS Enter the call number and confirm with OK BEFORE RECEPTION Fax answering machine The Fax answering machine allows you to keep confidential d...

Страница 46: ...eception if your printer is unavailable no paper If your fax printer is unavailable you may choose between two modes of reception reception mode WITHOUT PAPER your fax saves the incoming messages in the memory reception mode WITH PAPER your fax refuses all incoming subscribers To select the reception mode 241 OK SETUP RECEPTION REC PAPER Select the option WITH PAPER or WITHOUT PAPER and confirm yo...

Страница 47: ...ll relay to or choose your dialling mode please see the paragraph Dialling on page 5 3 and press OK Enter the relay list number used by the remote fax and press OK You may enter the time you wish to transmit the document next to the current time and press OK If you wish to modify the document feed type select one of the options FEEDER or MEMORY then press OK If you wish you may enter the number of...

Страница 48: ... allows you to print out documents automatically adjusting them to the page format To turn adjust to page mode on 245 OK SETUP RECEPTION ADJUST PAGE Select the WITH option and confirm your choice using the OK key Selecting the reception PC This menu lets you select a PC to which all the documents received by the terminal will be re routed 246 OK SETUP RECEPTION PC RECEPT By means of the or keys se...

Страница 49: ...2000 4 9600 5 7200 6 4800 7 2400 Transmission speed for outgoing documents For a quality telephone line compatible no echo communications occur at maximum speed However it may be necessary to restrict the transmission speed for some calls 4 ECHO PROTECT 1 WITH 2 WITHOUT If this parameter is on the on line echo will be reduced during long distance calls 6 EPT MODE 1 WITH 2 WITHOUT For some long dis...

Страница 50: ...cancelled and a report is printed to inform you of the error 70 NET VALID 06 01 TO 21 59 This parameter lets you modify the period when the fax connects automatically to the Internet This menu is available only if the connection type is set to PERIODIC 941 71 NET ACTIVE 7 DAYS WEEK MON TO FRI This parameter lets you select the days of the week when the fax connects automatically to the Internet Th...

Страница 51: ... an attachment and cannot open it it erases the message from the ISP MBX prints and transmits with a notice of uncomprehension to the message sender 2 WITHOUT When receiving an e mail the terminal does not delete the message from the mailbox it prints an uncomprehension message asking you to recover this message by means of your computer equipment This parameter only makes sense if you are using a...

Страница 52: ...ELF CONF has disappeared check for the IP Address Sub network mask and Gateway address If these are missing you should carry out a manual configuration see below Manual configuration To configure your terminal manually you should obtain the usual information used to set a peripheral device IP address sub network mask network and gateway address To configure the local network setting manually 2531 ...

Страница 53: ... function 2538 OK SETUP NETWORKS LOCAL NETWORK WINS 1 2539 OK SETUP NETWORKS LOCAL NETWORK WINS 2 Enter the IP address of each server then validate with OK Note If the terminal is set up in Automatic configuration mode 2531 these addresses can be filled in auto matically by certain DHCP servers Case of connection to a domain for instance with Windows NT 2000 or XP The terminal can identify itself ...

Страница 54: ...n the drop down menu then validate with OK Time zone 2554 OK SETUP NETWORKS SNTP SERVER TIME ZONE Select the time zone where the terminal is located from the drop down list then validate with OK If you have activated the automatic summer time management menu 212 the TIME ZONE setting is initialised automatically Summer time 2555 OK SETUP NETWORKS SNTP SERVER SUMMER TIME Select the appropriate time...

Страница 55: ...ess the keys or until OPTIONAL appears Press ENTER Press the key This example shows how to switch the TCP IP protocol on to connect the terminal to the network You can switch Netware or EtherTalk on in the same way If TCP IP is OFF Press ENTER a blinking appears Select ON using the or keys Press ENTER again Automatically configuring IP settings You can make these settings when the TCP IP protocol ...

Страница 56: ...he next segment Again press the key to increment the value and the key to decrement it Proceed in the same way for all of the segments Press ENTER once all the segments have been set up Press Enter the subnet mask address in the same way as for the IP address Press Enter the gateway s IP address in the same way as for the IP address Press the MENU key Switch your terminal off and then back on agai...

Страница 57: ...rver or computer system which allows you to connect to the Internet and your mailbox through your telephone line Before worldwide transmission you must take out an Internet subscription from an Internet Service Provider ISP check that all initialisation parameters correspond to those provided by your ISP perform the proper settings if needed for the Internet connection You may then connect yoursel...

Страница 58: ... NETWORK and press OK Choosing NO ACCESS disables access to Internet functions 92 OK INTERNET INIT PROVIDER 921 OK INTERNET INIT PROVIDER CONNECTION Enter the CALL NUMB press OK Enter connection IDENTIFIER1 press OK Enter connection PASSWORD press OK 922 OK INTERNET INIT PROVIDER MESS SERV Enter Email IDENTIFIER press OK Enter Email PASSWORD press OK Enter E MAIL ADR press OK Access to servers par...

Страница 59: ...date with OK key Sample Internet settings for the terminal 56 kbps modem Your access provider should give you the following information Non functional data given by way of example You should then complete the following MENUS on your fax machine CALL NUMBER 08 60 00 10 00 CONNECTION IDENTIFIER sg048944 wn net CONNECTION PASSWORD MESSAGE SERVICE IDENTIFER demo jt12 MESSAGE SERVICE PASSWORD E MAIL AD...

Страница 60: ...9231 SMTP mail gofornet com 9232 POP3 mail gofornet com 9233 DNS 1 103 195 014 001 9234 DNS 2 103 195 014 002 SMTP AUTHENT 9241 ACTIVATION With or Without SET TIMES an Internet connection is established every day at 9 00 am 12 30 am and 5 00 pmA A To avoid Internet access saturation the automatic connection will occur in reality 12 minutes give or take around the requested time PERIODIC an Interne...

Страница 61: ...s SET TIMES type 943 OK INTERNET SETTINGS TIME SETTINGS After selecting the SET TIMES mode use the and keys to place the cursor under the figure to be modified Enter the new connection time s by means of the numeric keypad value between 00 01 and 23 59 and validate with the OK key Selecting the print mode for the deposit notice 944 OK INTERNET SETTINGS DEPOSIT NOTI Select one of the deposit notice...

Страница 62: ...d nor printed and they may be used with a computer At each connection the number of E mails in your mailbox is displayed on the screen Share PC mode Select option SHARE PC and press OK to confirm You may choose to transfer your E mails to a PC or use the fax as an E mail printer To transfer the E Mails to a PC Select option WITH PC TRANS and press OK to confirm Enter the E Mail address of the comp...

Страница 63: ...E Mail Reception of all fax Internet and E Mails deposited in your personal Internet mailbox You may connect either immediately or automatically depending on the time periods defined The triggering of a programmed Internet connection depends on the standard settings of your machine Immediate connection to the Internet There are two methods to immediately connect to the Internet Access through the ...

Страница 64: ...3 24 Setting your machine DEACTIVATING THE INTERNET FUNCTION If you do not wish to use the Internet functions 91 OK INTERNET SUPPLIER Select NO ACCESS in the ISP list and confirm with OK ...

Страница 65: ... activated during SMS reception send your details activated the address of your terminal The address is only modified if several terminals are installed on your line It is used to differentiate between two machines during SMS reception When you want a contact to send SMSs to the terminal you choose you must send him your line number and the destination terminal address If your contact does not add...

Страница 66: ... device in one of the following ways Dial the number by means of the numerical keypad Enter the first letters of the recipient name Press the key until the required name appears names are classified in alphabetical order Press the key to send the SMS Your SMS may be sent to only one person or to several people To send an SMS To only one person press the key to confirm To several people Press the k...

Страница 67: ...SMS READ Select MESSAGES READ using keys and and validate with OK key Confirm with OK key Erase all messages from memory 433 OK SMS SERVICE DELETE SMS ALL Select ALL using keys and and validate with OK key Confirm with OK key SMS RECEPTION SMS messages received are automatically printed you can modify this setting with 451 OK Auto print If you disable automatic printing the messages are automatica...

Страница 68: ...s one main and one secondary The secondary centre may only be used for SMS reception Access to server mode 46 OK SMS SERVICE SERVER Define SMS centre numbers 1 461 OK SMS SERVICE SERVER SMS CENTRE 1 Define send number 4611 OK SMS SERVICE SERVER SMS CENTRE 1 SEND NO Enter the send number of your main SMS centre then validate with OK key Define reception number 4612 OK SMS SERVICE SERVER SMS CENTRE ...

Страница 69: ...p to 32 subscriber lists A subscriber list is made from the subscriber records already stored For all subscriber records or subscriber lists you may Create Consult Modify contents Delete Print the directory You may save and if needed load your directory This gives you access to functions 161 and 162 please see the paragraph Guide to function list on page 2 5 To proceed you need to contact your res...

Страница 70: ...the directory RATE send fax you can choose for each contact the minimum send rate for faxes you send to him Available rates are 2400 4800 7200 9600 12000 14400 and 33600 bits per second The maxi mum speed can be used if the telephone line is of good quality meaning appropriate without echo Note If a contact has the two fields TEL and E MAIL completed the validation key or will define whether the d...

Страница 71: ...umber allocated to your contact will be automatically displayed on the screen If you do not want to use this number it can be modified by entering another number then validating with OK key Select the option WITH the associated key if you want to associate a letter shortcut key with your contact The first letter free is displayed by default If you want to modify this scroll through the alphabet by...

Страница 72: ...swering machine LIST COMPOSITION its lists the ID numbers assigned to the subscribers records included in the list LIST NUMBER a number lets you identify the list filed under L A list may include both fax and internet subscribers The same subscriber may be included in different lists Caution It is impossible to add one subscriber list to another subscriber list ADDING A LIST To add a list 12 OK DI...

Страница 73: ...ll automatically appear on the screen If you wish to modify this number you may do so by choosing another free number and validate with OK Press to confirm your entry ADDING OR DELETING A NUMBER FROM THE LIST 13 OK DIRECTORY MODIFY Select the subscriber list L by means of the or keys and validate your choice with OK From Procedure subscriber s name With the alphanumeric keypad enter the first lett...

Страница 74: ...ct the subscriber list L you wish to modify and press OK to confirm Modify the line or lines in the subscriber record or subscriber list and confirm each modification with OK Note You may confirm your modification by pressing key but you will exit the menu and may not be able to modify the following lines To Procedure add Enter the subscriber ID number you wish to add and confirm with OK Repeat th...

Страница 75: ...isting directory of contacts into your fax machine as an electronic file This file must be in a specific format and must not comprise more than 500 entries The process of importing a directory uses electronic mail as the transfer mechanism The electronic file containing the directory is received and processed as an e mail attachment Caution Importing a new directory completely overwrites any exist...

Страница 76: ...acts fax number without spaces or dots can be up to 30 characters long including any and characters This field may be left empty for instance in the case of contacts to whom you only send e mails E mail address Your contacts e mail address Can be up to 80 characters long but must not comprise the field separator character Any other characters may be used in this field which can also be left blank ...

Страница 77: ...dressed to your fax E mail address attach the file to it and send your message via your mail server Your fax will receive the e mail containing the directory when it connects to the mail server and will automatically import the attached file into its directory Repeat the procedure as many times as required for instance to update all the LAN faxes on your network with the same directory Caution Imp...

Страница 78: ...AP server allows you to access a directory server for contacts or lists of contacts maximum 500 recipients The LDAP function can be switched on only once there are at least 50 free entries in the unit s local directory If this is not the case a message will ask you to delete the necessary number of entries CONFIGURATION 191 OK DIRECTORY LDAP SERVER ADDRESS Enter the IP address or the server name a...

Страница 79: ... server a message will ask you to enter more of the letters in the name to refine the search Note If a list contains too many recipients a message will inform you that the list cannot be used ADDING A SERVER CONTACT TO THE LOCAL DIRECTORY On the Change menu 13 OK DIRECTORY MODIFY Use the or arrows to select the server contact to add to the local directory and press the OK key to confirm Change the...

Страница 80: ...4 12 Directory ...

Страница 81: ...PEG format or PDF DOCUMENT DEPOSITING Scanner From the automatic feeder tray Caution If you put the documents to send upside down the contact will receive a blank page Note Since the addressee s number is generally on the document to be transmitted you may also dial before positio ning the document Place your original documents in the document feeder face printed on the top first page under the st...

Страница 82: ... include drawings or small characters Super Fine mode below the display screen is to be used for documents that include drawings with very thin lines or very small size characters on condition that the receiving fax can reproduce them Photo mode below the display screen is to be used for photographic documents except those in colour To select the resolution mode Press key as many times as necessar...

Страница 83: ...ypad then add the remaining letters until your subscriber s name is complete Assigned number dialling Press key Your fax displays the names of your correspondents and the lists of correspondents in the address book in increasing alphabetical order then Use the or keys of the browser to scroll through the correspondents and lists of correspondents and to select the correspondent or list of correspo...

Страница 84: ...sed by the browser to select another e mail address if required Once you have made your choice press the key to validate your selection To multiple numbers You may dial to send a document simultaneously to multiple call numbers Caution This may be achieved only if the machine is parametered to send from the memory please see the paragraph Document feed type on page 3 4 Enter the fax or E mail addr...

Страница 85: ...s To delay the transmission time of your document Position the document please see the paragraph Document depositing on page 5 1 Select 31 OK FAX TRANSMISSION Enter the subscriber number you wish to program at a different time or choose your dialling mode please see the paragraph Dialling on page 5 3 and confirm with OK Next to the current time enter the new time and confirm with OK Choose the req...

Страница 86: ... transmission Press to start the document transmission If your machine is set in order to print a transmission report please see the paragraph Main settings on page 3 1 the reduced copy of the document first page will not be printed and it notifies you that the communication is manual Rerouting This function is used to reroute faxes received to a directory contact To use this function you have to ...

Страница 87: ... document please see the paragraph Document depositing on page 5 1 Press the key and enter the recipient s E mail address or choose your dialling mode please see the paragraph Dialling on page 5 3 Adjust the contrast and the resolution if necessary please see the paragraph Selecting Colour Resolution Contrast on page 5 2 Press the key The document is scanned and memorised it will be sent at the ti...

Страница 88: ...the object for mail 80 characters max and press OK Enter the text with the alphabetical keypad 100 lines of 80 characters and confirm with OK To go to the next line use key To move from one line to another press the K or K Then you can choose between two options Send the typed mail directly Press OK the mail is memorised and will be sent at the next Internet connection validate by pressing the key...

Страница 89: ...e in an FTP server Put the document in one of the scanners please see the paragraph Document depositing on page 5 1 Press PC key A choice screen is displayed Select Scan to FTP with or keys then press OK key Enter the FTP address of the server or select it from the directory by pressing the key Enter the name of the FTP user operation prohibited when the address is in the directory Enter the passw...

Страница 90: ...ocument depositing on page 5 1 Press the PC key A selection screen is displayed Select SCAN TO DISK with the or key then press the OK key Enter the network sharing address i e the address of the terminal on which the directory is shared and the name of the shared directory for instance 134 1 22 10 DirectoryName or select an entry in the directory by pressing the key Enter the network login user na...

Страница 91: ...tc It allows you to consult or modify the waiting queue In this waiting queue the documents are coded the fol lowing way Order number in the queue document status subscriber s telephone number Documents may have the following status TX transmission REL relay DOC in deposit POL polling MBX send to mailbox PMB mailbox polling TR ongoing commands CNX Internet connection NET Internet transmission SMS ...

Страница 92: ... document and confirm your choice with OK You may now modify the parameters of the given document then confirm your modifications by pressing key Deleting a transmission on hold 63 OK COMMANDS CANCEL In the waiting queue select the desired document and confirm your choice with OK Printing a document in waiting or in deposit 64 OK COMMANDS PRINT In the waiting queue select the desired document and ...

Страница 93: ...ne is set to print a transmission report please see the paragraph Transmission report on page 3 4 it will print that the communication was cancelled by the user RECEPTION Reception of all documents over the telephone network is done one at a time at fax reception Document reception over the Internet is automatic at each Internet connection RECEPTION OVER THE PUBLIC SWITCHED TELEPHONE NETWORK PSTN ...

Страница 94: ... back mode LOCAL COLOUR OR BLACK AND WHITE COPY Standard copy Position the document please see the paragraph Document depositing on page 5 1 Press the key twice to make a colour copy or the key to make a black and white copy Duplex photocopies depending on model This function is available for photocopying if you have previously installed the duplex unit and an additional paper tray at the rear of ...

Страница 95: ...ct an option with the or keys or make an adjustment with the or keys Once the setting has been made press the OK key to validate The list of copy settings is described below Once all settings have been made press the key for a colour copy or the key for a black and white copy List of copy settings The NUMBER field allows you to enter the number of copies required The TYPE field allows you to selec...

Страница 96: ...allows you to select the way the output document is assembled COPIES ASSEMBLED or COPIES NOT ASSEMBLED The ORIGIN field allows you to adjust the desired origin values The PAPER field allows you to select the paper type NORMAL HEAVY TRANSPARENT COLOUR or RECYCLED The TRAY field allows you to select the paper tray AUTOMATIC UPPER or LOWER SPECIFIC COPY SETTINGS When the copy quality is no longer sat...

Страница 97: ...ue to apply to the document 25 to 400 Enter the zoom value required using the keys of the digital key pad Validate the choice with the OK key 844 OK ADVANCED FCT COPY ASSEMBLED The ASSEMBLED parameter is used to define the choice of your printer outputs either assembled or not assembled Validate the choice with the OK key 845 OK ADVANCED FCT COPY ORIGIN If you wish you can change the origin of the...

Страница 98: ...me default settings of the machine 85 OK ADVANCED FCT SCAN PRINT Use keys or of the browser to scroll the setting described below that you want to modify Validate your setting by pressing the OK key 851 OK ADVANCED FCT SCAN PRINT PAPER Select NORMAL or THICK paper using and keys Validate your setting by pressing the OK key Note 1 When THICK paper type is selected the print speed is slowed down 2 U...

Страница 99: ...d keys Validate by pressing the OK key 855 OK ADVANCED FCT SCAN PRINT FLATBED MARG If you want to offset the side margins of your document to the left or to the right when scanning with your flat scanner Adjust the offset of the left right margins in 0 5 mm steps mm using and keys Validate by pressing the OK key USING USB MEMORY KEYS AND MEMORY CARDS You can connect a USB memory key or memory card...

Страница 100: ...d documents are displayed in the form of a list without taking any kind of directory structure into account Use the file extensions to distinguish between the different file formats Compatible photo memory cards depending on the model Your multifunction terminal supports the following memory cards CompactFlash I II SmartMedia MultiMedia Card MMC Secure Digital Memory Stick Memory Stick Duo Pro Mem...

Страница 101: ...g a recording or era sing operation on a memory support this means that the latter is write protected Recording or erasing is possible only after this protection has been de activated A write protected file read only cannot be deleted from a memory support Note The Analyse Media function allows you at all times to consult the contents of the inserted memory card and this even if you have quit the ...

Страница 102: ...lts will be corrected for example under exposed photos swill be brightened or parts of a photo with high contrast will be compensated The red eye correction function corrects the red eye effect on pictures taken with flash These functions are activated by pressing the key The following table shows the number of times the key must be pressed to activate or de activate the various components of the ...

Страница 103: ...rinted in the the top right corner of the screen is automatically incremented Note To change the number of copies of the photo to be printed select another number on the numerical key board Use the or keys to move from one photo to the next To validate the selection and switch to the next menu press the Start or key To print the selected photos select SELECTION by means of the or keys then validat...

Страница 104: ... To exit completely from the menus use the Stop key PRINTING A DOCUMENT FROM A MEMORY DEVICE Supported document files You can use files that meet the following requirements Insert the memory device in the multifunction terminal 02 OK MEDIA PRINT DOCUMENT In the media menu that is displayed select PRINT DOC by means of the or keys then validate with the OK key or type 2 on the numerical keyboard 02...

Страница 105: ...pears RECORDING A DOCUMENT IN A MEMORY DEVICE This function allows you to digitise a document and to record it in a memory device Put the document in place please see the paragraph Document depositing on page 5 1 Insert the memory card in your multifunction terminal please see the paragraph Putting a memory device in place on page 5 22 04 OK MEDIA SCAN TO Note This function can also be accessed by...

Страница 106: ...e OK key or use the 8 key of the numerical keyboard The card is analysed and the lists of images and files are updated The total number of files on the card is displayed by increments of 5 At the end of the analysis of the device the screen again displays the media menu Deleting a document from the device 07 OK MEDIA DELETE In the media menu select DELETE by means of the or keys and the OK key or ...

Страница 107: ...ar at the left of their name Press the Start key to delete the files Note To de select a file move to the corresponding line and press the OK key The star to the left of the file name disappears Caution As soon as you press the Start key the selected files are deleted there is no request for confirmation Removing the memory device Never disconnect your memory device from the multifunction terminal...

Страница 108: ...duration incoming or outgoing results noted CORRECT if properly transmitted or information codes for special calls polling manual subscribers etc reason for call error example your subscriber does not answer To print the logs 52 OK PRINT LOGS The incoming and outgoing logs are printed on the same page PRINTING THE FUNCTIONS LIST You may print the functions list of your fax machine at any time To p...

Страница 109: ... COUNTERS PRINTED PG DEPOSIT AND POLLING You may deposit a document in your fax and keep it available to one or more subscribers who can obtain a fax of this document by calling your fax with the POLL function Setting the machine for document deposits you must define the type SIMPLE it may be polled only once from the memory or feeder MULTIPLE it may be polled as many times as necessary from the m...

Страница 110: ...ting of received documents please see the paragraph Fax answering machine on page 3 5 locking the keyboard locking the numbers locking the Internet settings locking the colour copy function locking the access to the SMS transmission function Menu Procedure SIMPLE Select FEEDER or MEMORY If necessary adjust the contrast and confirm with OK Enter the number of pages that you wish to deposit MULTIPLE...

Страница 111: ...ent access to non authorised persons An access code must be entered each time a person wants to use the machine To access the keypad unlocking menu 812 OK ADVANCED FCT LOCK LOCK KEYBD Enter the four digit interlock code Press key OK to confirm With keys or of the navigator select the option WITH Press key OK to confirm Note after each operation the machine interlocks automatically Locking the numb...

Страница 112: ... type of document being scanned the pages being printed will be in black white To access the colour lockout menu 815 OK ADVANCED FCT LOCK LOCK COLOUR Enter the four figure lockout code on the numerical keyboard Validate by pressing the OK key Confirm the lockout code by entering the code a second time Validate by pressing the OK key Note If a code is already recorded the terminal will ask you to f...

Страница 113: ... your machine is provided with a Scan to PC key This key activates first of all the SCAN TO PC func tion which associated with the Companion Suite Pro kit makes it possible to send an opening notice of a scan function of a PC connected to your machine For more information refer to the User Manual provi ded with your PC Kit Companion Suite Pro LH ...

Страница 114: ...ts of an MBX have been printed it becomes empty delete an MBX only if the MBX is initialised and empty print the list of your fax machine s MBX s You may receive and send through an MBX in complete confidentiality The deposit a document into your MBX the access code is not needed All documents deposited in a MBX are added to the ones already present In polling the MBX are only accessible with an M...

Страница 115: ...e last two steps for the other menu Printing the contents of a MBX 73 OK MAILBOXES PRINT MBX Select a free MBX out of the 31 MBX or enter the number of a free MBX directly 1 31 then confirm your choice with OK Enter the code of the MBX if there is one and confirm with OK All documents found in the MBX are printed and the MBX is emptied Deleting a MBX Before deleting an MBX you need to make sure it...

Страница 116: ...ions FEEDER or MEMORY and press OK If you wish you may enter the number of pages of your document before transmitting then confirm your choice with OK Confirm the transmission request to a remote MBX fax by pressing key In the case of an immediate transmission the document is sent immediately If the document is set for a postponed transmission the document will be stored in the memory and sent at ...

Страница 117: ...espect the following rules Never leave the cover open unless required Do not attempt to oil the machine Always gently close the cover and avoid vibrations Do not open the cover while printing Never try to dismantle the machine Do not use paper that has stayed in the paper tray for a long time Look at the safety rules in the Safety chapter at the end of this user manual ...

Страница 118: ... clips 1 to access more easily to the toner cartridges To check the remaining capacities of the consumables 86 OK ADVANCED FCT CONSUMABLES General Information This chapter describes basic maintenance tasks you can perform on the printer You can replace the following component according to the printer s display Toner Kits Waste Toner Box Also the following parts need periodic cleaning Paper Transfe...

Страница 119: ...he replacement is not always necessary at this stage If you ignore the above message and continue printing the printer displays the message Replace toner just before the toner is used up The toner container must be replaced immediately Clean the separate charger wires etc After the cleaning is finished however the message does not automatically change to Ready To restart printing you must press GO...

Страница 120: ... Open the top cover Pull the blue lock lever on the toner container forward towards the unlocked symbol Carefully remove the old toner container from the printer Top cover Black K Yellow Y Cyan C Magenta M Lock Lever ...

Страница 121: ...ained in the toner kit and discard it later according to the local code or regulations for waste disposal Take the new toner container out of the toner kit Shake the new toner container 5 or 6 times as shown in the figure in order to distribute the toner evenly inside the container Set the new toner container in the printer as shown in the figure below Plastic Bag ...

Страница 122: ...ked symbol as far as it will go Use the same procedure to replace the other color toner containers Close the top cover Replacing the Waste Toner Box Replace the waste toner box when the Check waste toner box message is displayed A new waste toner box is included with the toner kit The printer will not operate without replacing the waste toner box Lock Lever ...

Страница 123: ...te toner box press the lock lever and then gently remove the waste toner box Note Remove the waste toner box as gently as possible so as not to scatter the toner inside Do not let the ope ning of the waste toner box face downward Close the cap to the old waste toner box after removing the box from the printer Left Cover Lock Lever Cap Old Waste Toner Box ...

Страница 124: ... waste toner box I after its removal from the printer To prevent toner from spilling put the closed box in the plastic bag J delivered with the kit Put the old toner cartridge H in the delivered plastic bag Put the old cartridge and the old box in the carton of the new cartridge before sending it for recycling see instructions included Open the cap of the new waste toner box Plastic Bag H Cap New ...

Страница 125: ...own in the figure below When the box is set correctly it will snap into place Make sure that the waste toner box is correctly inserted and close the left cover After replacing the toner containers and the waste toner box clean the main charger units and the paper transfer unit For instructions see Cleaning the Printer on page 6 16 New Waste Toner Box ...

Страница 126: ...er unit that corresponds to color of the toner container that was replaced The following example explains the procedure to clean the main charger unit for the black toner container Open the left cover First clean the main charger wire Grasp the green wire cleaner knob Gently pull the wire cleaner knob out and push it back in Repeat this 2 to 3 times After cleaning make sure you restore the wire cl...

Страница 127: ... kit Take the grid cleaner out of the protective bag and remove the cap Note The pad of the grid cleaner contains water Clean the grid quickly so that the pad may not dry off Lift up slightly on the main charger unit and pull it out a short distance as shown in the figure below Attach the grid cleaner to the printer with the pad facing up Cap Grid Cleaner Main Charger Unit Grid Cleaner ...

Страница 128: ... discard it The grid cleaner cannot be reused Use the same procedure to clean the main charger units for the other toner containers Proceed to the next section and clean the advanced beam array lenses Cleaning the Advanced Beam Array Lenses If lines etc appear on printed copies the printouts appear dirty or faint or blurred printouts are produced clean the advanced beam array lenses There is 1 len...

Страница 129: ...times Push the lens cleaner knob back in completely After cleaning make sure you restore the lens cleaner knob to its home position If the lens cleaner knob is not restored to its home position the corresponding color will be printed over the whole page Use the same procedure to clean the lenses on the main charger unit of the other toner containers Once you are finished cleaning all 4 lenses clos...

Страница 130: ...the green paper transfer unit release lever pull out the paper transfer unit Wipe away the paper dust on the registration roller and the paper ramp using the wiper cloth included in the toner kit Note Be careful not to touch the black transfer roller during cleaning as this may adversely affect print quality Push the paper transfer unit back in completely Paper Transfer Unit Release Lever Green Pa...

Страница 131: ...e the printer can interfere with printer performance Clean the printer regularly Note If the message Clean Printer Press GO appears after replacing the toner cartridge Carry out the printer cleaning procedures corona grille etc described in the paragraph General Information on page 6 2 then press the GO button The message will disappear and the printer will be ready to print Open the scanner cover...

Страница 132: ...ing the fusing unit and the transfer roll has to be done on the printer Please contact your supplier for this operation SCANNER CALIBRATION You can perform this operation when the quality of photocopied documents is no longer satisfactory 80 OK ADVANCED FCT CALIBRATION Confirm your choice by pressing the OK key INCIDENTS COMMUNICATION ERRORS If the communication fails the fax advises you of an aut...

Страница 133: ... the memory and a transmission report is then printed together with an error code and the cause for transmission failure see the communication error codes Communication error codes The communication error codes appear in the logs and transmission reports General codes Code 01 Busy or no fax answer This code appears after 6 unsatisfactory attempts Call later Code 03 User break A communication has b...

Страница 134: ...tting faxes in colour Code 13 Memory full Your fax can no longer receive since its memory is full There are too many received unprinted documents or too many documents in the transmission line Print the received documents and delete or transmit immediately the documents in the transmission line Code 14 Memory full Received document memory full Code 15 Unknown mailbox number You wish to deposit a d...

Страница 135: ...k the Internet e mail and server parameters Code 45 Supplier disconnected The service is temporarily unavailable try again later Code 46 Xmission server disconnect The SMTP server for sending mail is disconnected The service is temporarily unavailable try again later Code 47 Reception server disconnect The POP3 server for mail reception is disconnected The service is temporarily unavailable try ag...

Страница 136: ...MENT If jams often occur in a specific part of the unit the latter needs to be checked cleaned or repaired Open the scanner cover Remove the jammed paper A without tearing it Then close the scanner cover MISCELLANEOUS INCIDENTS At switch on nothing appears on screen Check that the mains cable is plugged in and check the mains plug if necessary A ...

Страница 137: ...ent It was probably sent with the sheet inserted backwards You cannot send a fax Check that the telephone line cable is correctly plugged in Check the tone by pressing the key Check the prefix is correctly programmed and used You do not succeed to save a scan on a memory support the USB MEDIA MEMORY FULL message is displayed Check that there is still enough free memory space in the device Check th...

Страница 138: ...le may be located in Windows System Iosubsys or Arcada Sys tem folder For technical details visit Microsoft web site for the device driver Nothing lights on the operator panel even when power is turned on and the fan makes no noise Check that the power cord is properly plugged into the power outlet Turn off the printer s power plug in the power cord securely and try turning on the printer s power ...

Страница 139: ...ely blank printout Check the toner containers Open the printer top cover and check that the toner containers are correctly installed in the printer For more information on installing the toner containers see Toner Container Replacement on p 6 3 Check that the application software is correctly operated Full single color printout Check the charger unit Open the left cover and check that the charger ...

Страница 140: ...it on p 6 10 Clean the advanced beam array lenses Open the left cover Slowly pull the green lens cleaner knob in and out 2 times For full details see Cleaning the Advanced Beam Array Lenses on p 6 12 Refresh drum Perform the following procedures on the operator panel and try cleaning the drum surface using the printer s built in cleaning system Press MENU Press or repeatedly until Others appears P...

Страница 141: ...t color calibration either by switching the printer off then on or using the printer operator panel For full details see the Using the Operator Panel section in the Advanced Operation Guide Try adjusting the color control settings using the printer driver Check the operator panel If the Toner low C M Y K message is displayed with color description install a new toner kit for the color To replace t...

Страница 142: ...tor Panel section in the Advanced Operation Guide Dirt on the top edge or back of the paper Check the paper chute and the ramp Pull out the paper transfer unit and check for toner on the paper ramp Clean the paper ramp using a soft dry lint free cloth For details see Cleaning the Paper Transfer Unit on p 6 14 Clean the main charger units Open the left cover Slowly pull the green wire cleaner knob ...

Страница 143: ...ted Results Corrective Action Message Corrective Action Add paper MPTray The paper has run out in the paper source displayed Supply paper according to the paper source displayed paper cassettes MP tray optional paper feeders or optional envelope feeder This message is displayed alternately with messages indicating the printer status such as Ready Please wait Processing Waiting and Form Feed Time O...

Страница 144: ... printer is open Close the printer rear cover Close top cover The top cover of the printer is open Close the printer top cover Duplex disabled Press GO You attempted to print with a paper size and paper type that cannot be used for duplex printing Press GO to print onto one side of the paper only e MPS not stored Press GO The e MPS job cannot be stored because RAM disk is disabled RAM disk size is...

Страница 145: ... card err Insert again The memory card is accidentally removed from the printer s memory card slot during reading If you continue reading the memory card insert the same memory card into the slot again The printer again reads it from the beginning of the data Also see Insert the same memory card Memory overflow Press GO The total amount of data received by the printer exceeds the printer s interna...

Страница 146: ...M disk error press GO Replace toner C M Y K or Replace toner Clean printer Two message items are displayed alternately Toner has run out in the toner container s Replace the toner container using a new toner kit for the particular color The printer does not operate when this message is displayed For example if Replace toner C K is displayed replace the cyan and the black toner containers Set paper...

Страница 147: ...ect mode will be automatically turned on To maintain optimum use of memory during printing we recommend you manually turn off page protect mode See the Using the Operator Panel section of the Advanced Operation Guide Warning low memory The printer s internal memory is running low due to too many numbers of fonts and macros downloaded Try deleting unnecessary fonts and macros Message Corrective Act...

Страница 148: ... is not possible because host data is being spooled on the hard disk Wait until the hard disk is ready and then format 85 VMB Alias error The alias setting was lost or the virtual tray corresponding to the alias does not exist Set the alias again 97 The number of permanent code jobs that can be stored reached the limit value and no more can be saved Either delete some unnecessary jobs etc or incre...

Страница 149: ...layed Remove jammed paper After removing jammed paper the printer will re start printing 04 The memory card is full and cannot hold further data Purge unnecessary files or use a new memory card 05 Specified file is not on the memory card 06 Insufficient printer memory to support the memory card system Expand printer memory Code Meaning 01 Format error Try turning the power off and on again 02 RAM ...

Страница 150: ...or rotate the paper stack 180 degrees Selection of paper is fully discussed in the Handling Paper section in the Advanced Operation Guide The printer may have problems if paper jams recur after the paper was replaced Face up Tray PT 300 Duplex Unit DU 300 DU 301 Paper Feeder PF 60 Paper jam message Paper jam location Description Reference page Paper jam Printer A Paper is jammed at paper cassette ...

Страница 151: ...Utilizing Online Help Messages Online help messages are available in the printer s message display to provide simple instructions for clearing jams Press when the paper jam message has appeared Then a help message will appear to facilitate jam clearing in the location Paper jam Printer Paper is jammed at the paper cassette or inside the printer Remove the jammed paper using the procedure given bel...

Страница 152: ...onal face up tray is installed on the printer remove that tray first before attempting to remove the jam med paper Caution The fuser unit inside the printer is hot Do not touch it with your hands as it may result in burn injury Remove jammed paper carefully 5 Push the paper transfer unit back in and close the fuser cover and rear cover Registration Roller A B Registration Roller Paper transfer uni...

Страница 153: ... remove the jammed paper Paper jam EF Paper is jammed at the optional envelope feeder Remove the jammed paper using the same procedure as for a jam at the MP Tray Then open and close the paper transfer unit For details refer to the User s Manual for the envelope feeder Paper jam Duplexer Paper is jammed inside the rear cover of the optional duplexer or at the duplexer drawer Refer to the Operation...

Страница 154: ...tacles in their original plastic packaging and cardboard boxes put the original plastic packaging on the machine and place it in its original box with its components receptacles documentation etc Put all the documentation manual and printed documents in the box and close the box with adhesive tape Printer unit Make sure your terminal is fully switched off switch set to 0 Disconnect the terminal fr...

Страница 155: ...osition the packing piece 2 as shown in the illustration below then place the toner cartridges 3 in their own boxes 4 the waste toner box 5 Pack the other items in their original box with all the original packing pieces Put all the documentation printed documents and CD ROM depending on the model in the boxes Close the boxes with adhesive tape ...

Страница 156: ...missible ambient temperature when operating 10 C to 32 5 C 50 to 90 F with a maximum variation of 10 C per hour storage 0 C to 40 C 32 to 104 F with a maximum variation of 10 C per hour Admissible humidity rate When operating or in storage 20 to 80 HR without condensation with a maximum variation of 20 per hour Scanner communication Original document format A4 format Legal 60 to 90 g m paper Docum...

Страница 157: ...iginal and the resolution Without including the exchange initialisation procedure Internet general specifications TCP IP PPP protocols SMTP POP3 MIME protocols for electronic mail V90 modem up to 56 kbps s SDRAM memory 64 Mo Processor ARM 9 to 92 MHz Connectivity USB Ethernet 10 100 Base Tx File formats Image TIFF F for black white documents and JPEG for colour documents PDF black and white and co...

Страница 158: ...porated Macintosh is a registered trademark of Apple Computer Inc Microsoft Windows and Windows NT are registered trademarks of the Microsoft Corporation PowerPC and Microdrive are trademarks of the International Business Machines Corporation Compact Flash is a trademark of the ScanDisk Corporation Energy Star is a registered trademark in the USA All other trademarks and product names mentioned ar...

Страница 159: ... all whole or partial copies of it including modified copies or portions merged into other programs IBM retains title to the Programs IBM owns or has licensed from the owner copyrights in the Programs License Under this license you may use the Programs only with the device on which they are installed and transfer possession of the Programs and the device to another party If you transfer the Progra...

Страница 160: ...her party may bring an action regardless of form more than two years after the cause of action arose If you acquired the Program in the United States this license is governed by the laws of the State of New York If you acquired the Program in Canada this license is governed by the laws of the Province of Ontario Otherwise this license is governed by the laws of the country in which you acquired th...

Страница 161: ...rrant that the Software is free from all bugs errors and omissions The parties agree that all other warranties expressed or implied including warranties of fitness for a particular purpose and merchantability are excluded 8 Your exclusive remedy and the sole liability of Agfa Japan in connection with the Software and Typefaces is repair or replacement of defective parts upon their return to Agfa J...

Страница 162: ...6 46 Maintenance ...

Страница 163: ... a mains lead fitted with an earthed plug An earthed mains plug must be connected to a wall socket with an earth connected to the building s pro tective earthing system Warning disposing of toner cartridges Do not incinerate the toner or toner cartridges The sparks could cause burns Never open the cartridge or throw away the toner bin Do not inhale the toner do not rub your eyes or touch your mout...

Страница 164: ...ese must be disposed of at the appropriate collecting points THE PRODUCT The crossed out waste bin marking stuck on the product or on its accessoties means that they belong to the family of electrical and electronic equipment In this respect the European regulations ask you to dispose of it selectively At sales points in the event of the purchase of similar equipment At the collection points made ...

Страница 165: ...The declaration of compliance can be requested at the following address UTAX GmbH Ohechaussee 235 22848 Norderstedt Germany ...

Страница 166: ...Data subject to change without motice UTAX GmbH Ohechaussee 235 22848 Norderstedt Germany www utax com ...

Отзывы: