


7
4 Preparing for Installation
1. Please refer to the packing list above to check whether the components and parts are included. If there
are any missing parts, please contact us immediately.
2. Remove any residue on the glass parts before assembly and keep the glass flange surfaces clean; apply
vacuum grease to both sides of the seal ring gaskets, ground joints and PTFE gaskets before the
installation.
3. Tools that might be needed in the installation include: metric Allen wrenches and a screwdriver.
4. A professionally installed 5-15 receptacle. (115V 15A 50/60Hz)
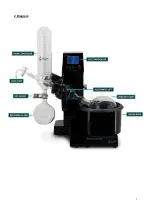
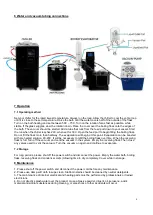
5 Installation
Precautions:
Apply vacuum grease to all seals and ground joints. A properly greased ground joint should
appear transparent. Refer to the diagram in section 2 for accurate installation.
•
Put the main body on a table.
•
Insert the vapor duct (glass cylinder) into the center of the motor.
•
Insert the glass condenser in left flange of motor head and tighten the collar. (Do not over tighten)
•
Put the feed valve into condenser after connecting the PTFE tube. (Heating may be required)
•
Put the receiving flask on to the bottom of the condenser using the S35 ground joint and clamp.
•
Add the boiling flask adapter to the right of motor using the collar to tighten it. (Do not over tighten)
•
Add boiling flask to the end of the 24/40 flask adapter. Put the metal clip against the lip of the boiling
flask and tighten the plastic screw on the adapter toward the motor.
•
Put the water bath under boiling flask, and fill with distilled water 2/3 of the total volume.
•
Add the vacuum hose to the vacuum port on the back of the condenser.
•
Add the water lines from your chiller to the condenser coil connections on the back of the condenser.
•
Connect the bath temperature probe and power cord to the back panel of the controller.
Содержание RE-200AA
Страница 1: ...Rotary Evaporator Manual Model RE 200AA 2L Rotary Evaporator Automatic Lift...
Страница 5: ...5 2 Diagram...


