background image

100

Nota: 

se il pulsante 

Avanzate

 non è disponibile, fare clic 

sul menu 

Opzioni

 e selezionare 

Controlli avanzati

.

2. Deselezionare la voce 

AGC

 e fare clic su 

Chiudi

.

È possibile sentire l'audio dall'interfono, ma si desidera 
poter ascoltare la musica dalle casse del computer.

Soluzione possibile:

Il computer utilizza probabilmente l'interfono come 
periferica audio primaria. 

1.

Utenti Windows XP: 

dal menu

 Start

 di 

Windows, selezionare 

Pannello di controllo

quindi 

Suoni e 

periferiche audio

.


Utenti Windows 2000:


dal menu 

Start

 di 

Windows, selezionare 

Impostazioni

Pannello di controllo

quindi 

Suoni e 

multimedia

.

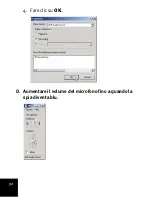
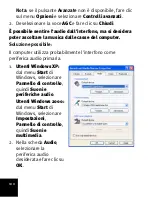
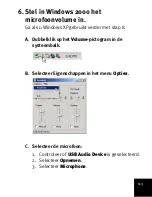
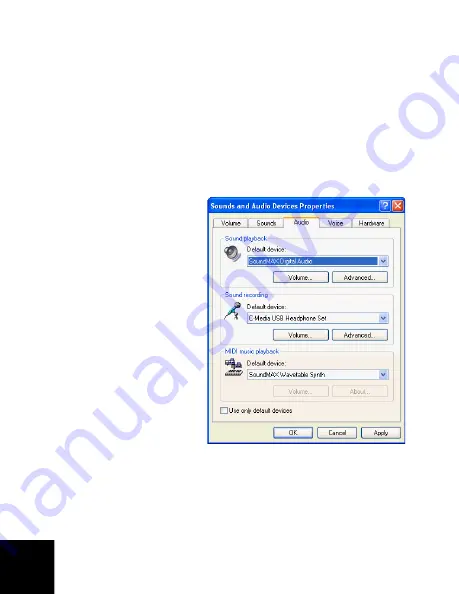
2. Nella scheda 

Audio

selezionare la 
periferica audio 
desiderata e fare clic su 

OK

.

Содержание 64-809610-00

Страница 1: ...hone Quick Installation Guide Guide d installation rapide Installationsanleitung Guida per l installazione rapida Beknopteinstallatiegids Gu a breve de instalaci n Instrukcja szybkiej instalacji R24 0...

Страница 2: ......

Страница 3: ...rnet Speakerphone Quick Installation Guide Guide d installation rapide Installationsanleitung Guida per l installazione rapida Beknopteinstallatiegids Gu a breve de instalaci n Instrukcja szybkiej ins...

Страница 4: ...Robotics and a copy will be provided to you UNITED STATES GOVERNMENT LEGEND If you are a United States govern ment agency then this documentation and the software described herein are provided to you...

Страница 5: ...allation 36 Modifications des param tres du t l phone haut parleur 46 D pannage 48 Assistance 55 9610 Installationsanleitung Packungsinhalt 59 Technische Merkmale 59 Installationsanleitung 60 ndern de...

Страница 6: ...reve de instalaci n 9610 Router Contenido de la caja 127 Caracter sticas f sicas 127 Instrucciones de instalaci n 128 Modificaci n de la configuraci n del tel fono con altavoces 138 Soluci n de proble...

Страница 7: ...tons control the Windows audio playback default device USB Internet Speakerphone Installation CD USB Cable Quick Installation Guide microphone mute volume decrease volume increase USB port headphone j...

Страница 8: ...Installation Instructions 1 Clear your screen Balloons such as the one shown below may interfere with those that show the progress of your speakerphone installation Close any balloon in your system tr...

Страница 9: ...11 2 Use the supplied USB cable to connect the speakerphone to your computer Wait for an indication that installation is complete...

Страница 10: ...12 3 Insert the USRobotics Installation CD ROM The CD didn t start automatically From the Start menu select My Computer and double click the CD drive...

Страница 11: ...l Skype If Skype is already installed on your computer go to step 5 A If prompted select your language and accept the End User License Agreement B Select Install Skype C Follow the instructions to ins...

Страница 12: ...14 5 Set Skype to use the USB Internet Speakerphone A From your Windows Start menu select Programs then select Skype and start the Skype program...

Страница 13: ...15 B Select Tools Options Then select Sound Devices...

Страница 14: ...16 C Select the speakerphone for all three settings Audio In Audio Out and Ringing Windows XP select C Media USB Headphone Set Windows 2000 select USB Audio Device D Then click Save...

Страница 15: ...k the Volume icon in the System Tray B From the Options menu select Properties C Select the playback microphone 1 Windows XP Ensure that C Media USB Head phone Set is selected Windows 2000 Ensure that...

Страница 16: ...18 3 Select Microphone and click OK D Select Mute in the Microphone Volume Control E From the Options menu select Properties again...

Страница 17: ...19 F Select the recording microphone 1 Select Recording 2 Select Microphone and click OK...

Страница 18: ...20 Windows 2000 users increase the microphone volume until the indicator light on the speaker phone turns blue G From the Options menu select Advanced Controls then click the Advanced button...

Страница 19: ...21 H Ensure that AGC or MIC Boost is off and click Close...

Страница 20: ...22 7 Verify the installation by making a test call In the Skype program click Make a test call to Skype answering machine and follow the on screen instruc tions...

Страница 21: ...leshooting section of this guide Changing Speakerphone Settings To change speaker and microphone settings use the but tons on the speakerphone as described on page 9 or follow the instructions below t...

Страница 22: ...C Media USB Headphone Set Windows 2000 select USB Audio Device 5 Depending on the controls that you want to change select either Playback or Recording and click OK The control panel is now set to adju...

Страница 23: ...the sound is played through the speakers of my computer Possible Solution You may not have Skype set to use the speakerphone Go back to step 5 in the Installation Instructions above and ver ify your s...

Страница 24: ...and start the Skype program as illustrated on page 14 3 If you still cannot hear sound restart your computer I hear the Skype greeting but not my recorded message microphone cannot be heard Possible...

Страница 25: ...l see Where is the Windows Volume Control Panel on page 29 2 From the Options menu select Properties 3 In the Mixer device list select the speakerphone 4 Windows XP select C Media USB Headphone Set 5...

Страница 26: ...through my computer speakers Possible Solution Your computer may be using the speakerphone as your default sound playback device 1 Windows XP From your Windows start menu select Control Panel then sel...

Страница 27: ...ible Solution 1 Double click the Volume icon in your system tray Possible Solution 2 If you do not have a Volume icon in your system tray use the following instructions to find your Volume Control pan...

Страница 28: ...indows XP select C Media USB Headphone Set Windows 2000 select USB Audio Device The person on the other end of the call hears loud back ground noise OR My microphone sometimes mutes itself during a ca...

Страница 29: ...r is 9610 You can find your serial number on the side of the package Write your serial number down 2 Go to the Support section of the USRobotics Web site at www usr com support Many of the most common...

Страница 30: ...com emailsupport fr 082 507 0693 Germany www usr com emailsupport de 01805671548 Hungary www usr com emailsupport hu 01805671548 Ireland www usr com emailsupport uk 1890 252 130 Italy www usr com ema...

Страница 31: ...For current support contact information go to the follow ing Web site http www usr com support For regulatory information and warranty information see the User Guide on the USRobotics installation CD...

Страница 32: ...34...

Страница 33: ...le p riph rique de lecture audio par d faut de Windows USB Internet Speakerphone CD d installation C ble USB Guide d installation rapide activation d sactivation du micro augmenter le volume baisser...

Страница 34: ...Les bulles telles que celle pr sent e ci dessous risquent de g ner l apparition des bulles affichant la progression de l installation de votre poste t l phonique haut parleur Dans votre barre syst me...

Страница 35: ...37 2 Reliez le t l phone haut parleur l ordinateur avec le c ble USB fourni Attendez l apparition du message de fin d installation...

Страница 36: ...38 3 Ins rez le CD ROM d installation USRobotics Le CD ne s est pas lanc automatiquement Dans le menu Start D marrer s lectionnez My Computer Poste de travail et double cliquez sur le lecteur CD...

Страница 37: ...st d j install sur votre ordinateur allez l tape 5 A Si le programme vous le demande s lectionnez votre langue et acceptez la licence utilisateur B S lectionnez Installer Skype C Suivez les instructio...

Страница 38: ...40 5 Param trez Skype pour l utilisation de l USB Internet Speakerphone A Dans le menu Start D marrer de Windows s lectionnez Programs Programmes puis Skype et lancez le programme Skype...

Страница 39: ...41 B S lectionnez Outils puis Options S lectionnez ensuite Audio...

Страница 40: ...ut parleur pour les trois param tres Entr e audio Sortie audio et Sonnerie Utilisateurs de Windows XP s lectionnez C Media USB Headphone Set Utilisateurs de Windows 2000 s lectionnez USB Audio Device...

Страница 41: ...XP allez l tape 8 A Double cliquez sur l ic ne Volume dans la barre syst me B Dans le menu Options s lectionnez Properties Propri t s C S lectionnez le micro 1 Assurez vous que USB Audio Device est s...

Страница 42: ...44 4 Cliquez sur OK D Augmentez le volume du micro jusqu ce que le voyant du t l phone haut parleur devienne bleu...

Страница 43: ...veuillez suivre les instructions concernant les r glages audio sur le site Skype www skype com intl fr help guides soundsetup html 8 V rifiez l installation en effectuant un appel Dans le programme Sk...

Страница 44: ...page 53 Modifications des param tres du t l phone haut parleur Pour changer les param tres du t l phone et du micro utilisez les boutons du t l phone haut parleur comme inciqu la page 35 ou suivez le...

Страница 45: ...rleur de la mani re suivante Utilisateurs de Windows XP s lectionnez C Media USB Headphone Set Utilisateurs de Windows 2000 s lectionnez USB Audio Device 5 Selon les commandes que vous souhaitez modif...

Страница 46: ...inateur ne d tecte pas le t l phone haut parleur Solution possible V rifiez que les deux extr mit s du c ble USB sont correctement connect es Au cours d un appel les sons sont mis par les haut parleur...

Страница 47: ...du t l phone 1 Reportez vous l tape 5 de l installation et v rifiez que le param tre Sortie audio est r gl sur le t l phone haut parleur 2 Si vous n entendez toujours pas le son quittez puis relancez...

Страница 48: ...dez toujours pas le son quittez puis relancez le programme Skype A Cliquez avec le bouton droit de la souris sur l ic ne Skype dans votre barre syst me puis s lectionnez Quitter Skype B Dans le menu S...

Страница 49: ...contr le du volume du micro faites glisser le curseur jusqu en haut afin d augmenter le volume du micro Si le volume est toujours trop bas v rifiez que la commande automatique de gain est activ e 1 Da...

Страница 50: ...lectionnez USB Audio Device 4 S lectionnez Recording Enregistrement v rifiez que Microphone est s lectionn puis cliquez sur OK 5 Dans la fen tre de contr le du volume du micro faites glisser le curse...

Страница 51: ...ecture des sons 1 Utilisateurs de Windows XP dans le menu Start D marrer s lectionnez Control Panel Panneau de configuration puis Sounds and Audio devices Sons et p riph riques audio Utilisateurs de W...

Страница 52: ...possible Double cliquez sur l ic ne Volume dans la barre syst me Deuxi me solution possible Si l ic ne Volume n appara t pas dans votre barre syst me utilisez les instructions suivantes pour trouver l...

Страница 53: ...one haut parleur Utilisateurs de Windows XP s lectionnez C Media USB Headphone Set Utilisateurs de Windows 2000 s lectionnez USB Audio Device Assistance Configuration syst me minimale Ce t l phone hau...

Страница 54: ...www usr com emailsupport bn 070 23 35 45 Belgique Fran ais www usr com emailsupport be 070 23 35 46 R publique tch que www usr com emailsupport cz Danemark www usr com emailsupport ea 38323011 Finland...

Страница 55: ...z vous au guide de l utilisateur figurant sur le CD ROM d installation USRobotics Russie www usr com emailsupport ru 8 800 200 20 01 Espagne www usr com emailsupport es 902 117964 Su de www usr com em...

Страница 56: ...58...

Страница 57: ...tst rke f r das Standard Wiedergabeger t von Windows gesteuert USB Internet Speakerphone Installations CD USB Kabel Installationsanleitung Mikrofon Stummschalttaste Lautst rke erh hen Lautst rke verri...

Страница 58: ...indows Sprechblasen Sprechblasen wie die unten dargestellte k nnten eventuell mit denen zur Anzeige des Fortschritts bei der Installation des USB Internet Speakerphone in Konflikt geraten Schlie en Si...

Страница 59: ...61 2 Anschlie en des Speakerphone an den Computer ber das im Lieferumfang enthaltene USB Kabel Warten Sie auf die Best tigung dass die Installation abgeschlossen ist...

Страница 60: ...D wird nicht automatisch gestartet W hlen Sie im Start Men den Eintrag My Computer Arbeitsplatz und doppelklicken Sie auf das CD Laufwerk 4 Installieren von Skype Wenn Skype auf Ihrem Computer bereits...

Страница 61: ...hlen Sie nach der entsprechenden Aufforderung Ihre Sprache und akzeptieren Sie die Endbenutzer Lizenzvereinbarung B Klicken Sie auf Skype installieren C Folgen Sie den Anweisungen zum Installieren von...

Страница 62: ...64 5 Konfigurieren von Skype f r die Verwendung des USB Internet Speakerphone A W hlen Sie ber das Windows Start Men den Eintrag Programs Programme Skype um die Skype Anwendung zu starten...

Страница 63: ...65 B W hlen Sie im Men Aktionen den Eintrag Optionen Klicken Sie links auf Audioger te...

Страница 64: ...len Sie das Speakerphone f r alle drei Einstellungen Aufnahme Wiedergabe und Klingeln Windows XP W hlen Sie C Media USB Headphone Set Windows 2000 W hlen Sie USB Audio Device D Klicken Sie dann auf Sp...

Страница 65: ...P einsetzen fahren Sie mit Schritt 8 fort A Doppelklicken Sie auf das Lautst rke Symbol in der Task Leiste B W hlen Sie im Men Options Optionen den Eintrag Properties Eigenschaften C W hlen Sie das Mi...

Страница 66: ...68 2 W hlen Sie Recording Aufnahme 3 W hlen Sie Microphone Mikrofon 4 Klicken Sie auf OK...

Страница 67: ...69 D Erh hen Sie die Mikrofon Lautst rke bis die LED am Speakerphone blau leuchtet...

Страница 68: ...Speakerphones finden Sie auf der Skype Website www skype com intl de help guides soundsetup html 8 berpr fen der Installation durch einen Testanruf Klicken Sie auf der Skype Benutzeroberfl che auf Tes...

Страница 69: ...nach ndern der Einstellungen des Speakerphones Um die Einstellungen des Speakerphones und des Mikrofons zu ndern verwenden Sie die Schaltfl chen am Speakerphone wie auf Seite 59 beschrieben oder folg...

Страница 70: ...rphone wie folgt Windows XP W hlen Sie C Media USB Headphone Set Windows 2000 W hlen Sie USB Audio Device USB Audioger t 5 Abh ngig von den Steuerungen die Sie ndern wollen w hlen Sie entweder Playbac...

Страница 71: ...aktiviert N here Informationen zur Verwendung der Steuerung der Medien finden Sie im Men Help Hilfe Fehlerbehebung Mein Computer erkennt das USB Internet Speakerphone nicht L sungsvorschlag Vergewiss...

Страница 72: ...ch h re ber das Speakerphone keinen Ton L sungsvorschlag 1 Dr cken Sie die Taste zum Erh hen der Lautst rke und halten Sie sie gedr ckt bis Sie etwas h ren L sungsvorschlag 2 Skype ist m glicherweise...

Страница 73: ...taste L sungsvorschlag 2 1 Kehren Sie zu Schritt 5 der Installationsanleitung zur ck und berpr fen Sie die Einstellung Aufnahme 2 Wenn Sie anschlie end noch immer keinen Ton h ren beenden Sie Skype un...

Страница 74: ...ng Aufnahme pr fen Sie dass Microphone Mikrofon gew hlt ist und klicken Sie auf OK 7 Ziehen Sie den Schieberegler f r das Mikrofon ans untere Skalenende um die Lautst rke zu verringern Ist die Lautst...

Страница 75: ...erphone Windows XP W hlen Sie C Media USB Headphone Set Windows 2000 W hlen Sie USB Audio Device USB Audioger t 4 W hlen Sie Recording Aufnahme pr fen Sie dass Microphone Mikrofon gew hlt ist und klic...

Страница 76: ...rphone als Standardger t f r die Soundwiedergabe 1 Windows XP W hlen Sie ber das Windows Start Men Control Panel Systemsteuerung Sounds and Audio Devices Sounds und Audioger te Windows 2000 W hlen Sie...

Страница 77: ...autst rkeregelung L sungsvorschlag 1 Doppelklicken Sie auf das Lautst rke Symbol in der Task Leiste L sungsvorschlag 2 Wenn Sie kein Lautst rke Symbol in der Task Leiste haben folgen Sie diesen Anweis...

Страница 78: ...is Wenn Sie die Lautst rkeregelung ffnen gelten die Einstellungen f r alle ausgew hlten Audioger te Um das Speakerphone einzustellen gehen Sie wie folgt vor 1 W hlen Sie im Men Options Optionen den Ei...

Страница 79: ...findet sich auf der Packungsseite Notieren Sie sich die Seriennummer 2 Rufen Sie den Support Bereich auf der Website von USRobotics unter www usr com support auf Viele der h ufigsten Probleme denen Be...

Страница 80: ...www usr com emailsupport de 0180 567 1548 Griechenland www usr com emailsupport gr Ungarn www usr com emailsupport hu 0180 567 1548 Irland www usr com emailsupport uk 1890 252 130 Italien www usr com...

Страница 81: ...83 Weitere Hinweise zu Vorschriften und Angaben zum Garantieumfang finden Sie in der Bedienungsanleitung auf der Installations CD ROM...

Страница 82: ...84...

Страница 83: ...lano il volume del dispositivo audio predefinito di Windows USB Internet Speakerphone CD di installazione Cavo USB Guida all installazione rapida tasto disattivazione microfono Abbassa il volume Alza...

Страница 84: ...dere le finestre visualizzate a schermo I messaggi come quello qui sotto potrebbero sovrapporsi alle finestre che mostrano il progresso dell installazione dell interfono Chiudere tutte le finestre dei...

Страница 85: ...85 2 Utilizzare il cavo USB in dotazione per collegare l interfono al computer Attendere la conferma di completamento dell installazione...

Страница 86: ...86 3 Inserire il CD ROM di installazione USRobotics Il CD non si avvia automaticamente Dal menu Start selezionare Risorse del computer e fare doppio clic sull unit CD ROM...

Страница 87: ...ato sul proprio computer passare alpunto 5 A Quando richiesto selezionare la lingua desiderata e accettare le condizioni del contratto di licenza per l utente finale B Selezionare Installa Skype C Seg...

Страница 88: ...88 5 Impostare Skype per utilizzare USB Internet Speakerphone A Dal menu Start di Windows selezionare Programmi quindi Skype e avviare il programma Skype...

Страница 89: ...89 B Selezionare Opzioni dal menu Strumenti Quindi scegliere Audio...

Страница 90: ...nare l interfono per le tre impostazioni audio Ingresso audio Uscita audio e Suoneria Utenti Windows XP selezionare C Media USB Headphone Set Utenti Windows 2000 selezionare USB Audio Device D Fare cl...

Страница 91: ...ows XP passare al punto 8 A Fare doppio clic sull icona del volume sulla barra delle applicazioni B Dal menu Opzioni selezionare Propriet C Selezionare il microfono 1 Assicurarsi che sia selezionata l...

Страница 92: ...92 4 Fare clic su OK D Aumentare il volume del microfono fino a quando la spia diventa blu...

Страница 93: ...t web di skype www skype com intl it help guides soundsetup html 8 Verificare la riuscita dell installazione effettuando una chiamata di prova Nel programma Skype fare clic su Fai una chiamata di veri...

Страница 94: ...nterfono Per modificare le impostazioni dell altoparlante e del microfono usare i pulsanti dell interfono come descritto a pagina 83 oppure seguire le istruzioni indicate di seguito per effettuare le...

Страница 95: ...e Set Utenti Windows 2000 selezionare USB Audio Device 5 In base ai comandi che si desidera modificare selezionare Riproduzione o Registrazione quindi fare clic su OK Da questo pannello di controllo o...

Страница 96: ...dio viene riprodotto dai diffusori del computer Soluzione possibile Skype potrebbe non essere impostato per essere utilizzato con l interfono Tornare al punto 5 nella sezione Istruzioni per l installa...

Страница 97: ...il programma Skype come indicato a pagina 88 3 Se anche questa soluzione non dovesse funzionare riavviare il computer possibile sentire il messaggio di Skype ma non i messaggi registrati impossibile...

Страница 98: ...ndows in questa sezione 2 Dal menu Opzioni selezionare Propriet 3 Dall elenco Periferica mixer selezionare l interfono 4 Utenti Windows XP selezionare C Media USB Headphone Set 5 Utenti Windows 2000 s...

Страница 99: ...i Windows in questa sezione 2 Dal menu Opzioni selezionare Propriet 3 Dall elenco Periferica mixer selezionare l interfono Utenti Windows XP selezionare C Media USB Headphone Set Utenti Windows 2000 s...

Страница 100: ...a dalle casse del computer Soluzione possibile Il computer utilizza probabilmente l interfono come periferica audio primaria 1 Utenti Windows XP dal menu Start di Windows selezionare Pannello di contr...

Страница 101: ...are doppio clic sull icona del volume sulla barra delle applicazioni Soluzione possibile 2 Se l icona del volume non disponibile sulla barra delle applicazioni seguire questa procedura Utenti Windows...

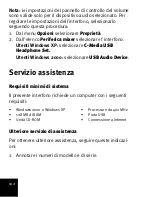
Страница 102: ...re l interfono Utenti Windows XP selezionare C Media USB Headphone Set Utenti Windows 2000 selezionare USB Audio Device Servizio assistenza Requisiti minimi di sistema Il presente interfono richiede u...

Страница 103: ...otics Numero di modello Numero di serie 9610 Stato Sito Web Telefono Austria www usr com emailsupport de 07110 900 116 Belgio area fiamminga www usr com emailsupport bn 070 23 35 45 Belgio area france...

Страница 104: ...orvegia www usr com emailsupport ea 23 16 22 37 Polonia www usr com emailsupport pl Portogallo www usr com emailsupport pt 21 415 4034 Russia www usr com emailsupport ru 8 800 200 20 01 Spagna www usr...

Страница 105: ...van het standaardapparaat voor het afspelen van geluid in Windows USB Internet Speakerphone Installatie cd USB kabel Beknopte installatiegids microfoon dempen volume verlagen volume verhogen USB poort...

Страница 106: ...1 Maak het scherm vrij Ballonen zoals in de onderstaande afbeelding kunnen de weergave van de ballonen die de voortgang van de installatie van de luidsprekertelefoon aangeven verhinderen Sluit alle b...

Страница 107: ...107 2 Gebruik de meegeleverde USB kabel om de luidsprekertelefoon op de computer aan te sluiten Wacht op het bericht dat de installatie is voltooid...

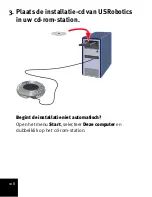
Страница 108: ...108 3 Plaats de installatie cd van USRobotics in uw cd rom station Begint de installatie niet automatisch Open het menu Start selecteer Deze computer en dubbelklik op het cd rom station...

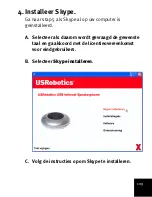
Страница 109: ...ls Skype al op uw computer is ge nstalleerd A Selecteer als daarom wordt gevraagd de gewenste taal en ga akkoord met de licentieovereenkomst voor eindgebruikers B Selecteer Skype installeren C Volg de...

Страница 110: ...110 5 Stel Skype in om gebruik te maken van de USB Internet Speakerphone A Open het menu Start van Windows selecteer Programma s selecteer Skype en start het programma Skype...

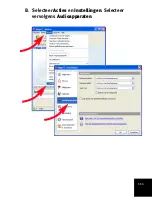
Страница 111: ...111 B Selecteer Acties en Instellingen Selecteer vervolgens Audioapparaten...

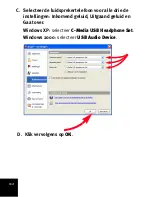
Страница 112: ...er de luidsprekertelefoon voor alle drie de instellingen Inkomend geluid Uitgaand geluid en Gaat over Windows XP selecteer C Media USB Headphone Set Windows 2000 selecteer USB Audio Device D Klik verv...

Страница 113: ...u Windows XP gebruikt verder met stap 8 A Dubbelklik op het Volume pictogram in de systeembalk B Selecteer Eigenschappen in het menu Opties C Selecteer de microfoon 1 Controleer of USB Audio Device is...

Страница 114: ...114 4 Klik op OK D Verhoog het microfoonvolume tot het indicatorlampje op de luidsprekertelefoon blauw oplicht...

Страница 115: ...e om uw speakerphone settings te optimaliseren www skype com intl nl help guides soundsetup html 8 Controleer de installatie met een testgesprek Klik in het programma Skype op Voer een testgesprek met...

Страница 116: ...e instellingen van de luidsprekertelefoon wijzigen U kunt de instellingen van de luidspreker en de microfoon veranderen met de knoppen op de luidsprekertelefoon zoals beschreven op pagina 105 of de on...

Страница 117: ...elefoon als volgt in de lijst Mixerapparaat Windows XP selecteer C Media USB Headphone Set Windows 2000 selecteer USB Audio Device 5 Selecteer afhankelijk van de instellingen die u wilt veranderen Afs...

Страница 118: ...detecteert de luidsprekertelefoon niet Mogelijke oplossing Controleer of de USB kabel aan beide uiteinden goed is aangesloten Tijdens een oproep wordt het geluid door de luidsprekers van mijn computer...

Страница 119: ...rtelefoon 2 Als u nog steeds geen geluid hoort dient u Skype af te sluiten en het programma opnieuw te starten A Klik met de rechtermuisknop op het Skype pictogram in de systeembalk en selecteer Afslu...

Страница 120: ...s aangegeven op pagina 110 3 Als u nog steeds geen geluid hoort dient u uw computer opnieuw op te starten Mogelijke oplossing 3 Het kan zijn dat u het microfoonvolume moet verhogen 1 Open het volumere...

Страница 121: ...selecteerd en klik op Sluiten Het volume van mijn microfoon staat te hoog Mogelijke oplossing Het kan zijn dat u het microfoonvolume moet verlagen 1 Open het volumeregelingspaneel van Windows Als u ni...

Страница 122: ...crofoon op Geavanceerd Opmerking klik als u de knop Geavanceerd niet ziet op het menu Opties en selecteer Geavanceerde volumeregelingen 2 Maak de selectie van de optie AGC ongedaan en klik op Sluiten...

Страница 123: ...n Multimedia 2 Open het tabblad Audio selecteer het standaardapparaat voor het afspelen van geluid en klik op OK Opmerking nu kunt u met de volume knoppen op de luidsprekertelefoon het volume van het...

Страница 124: ...n 2 Klik op het tabblad Volume op de knop Geavanceerd onder Volume Windows 2000 1 Open het menu Start van Windows selecteer Instellingen en Configuratiescherm en selecteer vervolgens Geluiden en Multi...

Страница 125: ...delnummer is 9610 U vindt uw serienummer op de zijkant van de verpakking Noteer uw serienummer 2 Ga naar het gedeelte Support van de website van USRobotics op www usr com support De meest voorkomende...

Страница 126: ...w usr com emailsupport fr 082 507 0693 09 00 17 00 maandag t m vrijdag Duitsland www usr com emailsupport de 01805671548 09 00 17 00 maandag t m vrijdag Hongarije www usr com emailsupport hu0180567154...

Страница 127: ...ispositivo de reproducci n de audio predeterminado de Windows USB Internet Speakerphone CD de instalaci n Cable USB Gu a breve de instalaci n micr fono silenciado bajar el volumen subir el volumen pue...

Страница 128: ...talaci n 1 Borre la pantalla Di logos como el que aparece en la imagen pueden interferir con los que indican la marcha de la instalaci n del tel fono equipado con altavoces Cierre todos los di logos e...

Страница 129: ...129 2 Utilice el cable USB que se suministra con el dispositivo para conectarlo al ordenador Espere hasta que aparezca la indicaci n de que la instalaci n ha terminado...

Страница 130: ...130 3 Introduzca el CD ROM de instalaci n de USRobotics Si el CD no se inicia autom ticamente En el men Inicio seleccione Mi PC y haga doble clic en la unidad de CD...

Страница 131: ...est instalado en el equipo vaya al paso 5 A Si se le pide que seleccione idioma elija el que prefiera y acepte el acuerdo de licencia de usuario final B Seleccione Instalar Skype C Siga las instrucci...

Страница 132: ...132 5 Configure Skype para el uso del USB Internet Speakerphone A En el men Inicio de Windows seleccione en primer lugar Programas y a continuaci n Skype para iniciar el programa...

Страница 133: ...133 B Seleccione Herramientas y vaya a Opciones A continuaci n seleccione Dispositivos de Sonido...

Страница 134: ...el tel fono con altavoces en los tres campos Entrada de audio Salida de audio y Sonando Windows XP seleccione C Media USB Headphone Set Windows 2000 seleccione USB Audio Device D A continuaci n haga...

Страница 135: ...Windows XP vaya al paso 8 A Haga doble clic en el icono Volumen de la bandeja del sistema B En el men Opciones elija Propiedades C Seleccione el micr fono 1 Compruebe que la opci n USB Audio Device e...

Страница 136: ...136 4 Haga clic en Aceptar D Aumente el volumen del micr fono hasta que la luz indicadora del tel fono con altavoces se ponga azul...

Страница 137: ...n de sonido y audio que encontrar en el sitio Web de Skype www skype com intl es help guides soundsetup html 8 Compruebe la instalaci n mediante una llamada de prueba En el programa Skype haga clic en...

Страница 138: ...de la configuraci n del tel fono con altavoces Para modificar la configuraci n del micr fono y de los altavoces utilice los botones del tel fono como se describe en la p gina 127 o siga las instruccio...

Страница 139: ...dphone Set Windows 2000 seleccione USB Audio Device 5 Dependiendo de los controles que desee modificar seleccione Reproducci n o Grabaci n y haga clic en Aceptar El panel de control ya est configurado...

Страница 140: ...o se reproduce a trav s de los altavoces del ordenador Soluci n posible Es posible que Skype no est configurado para utilizar el tel fono con altavoces Revise el paso 5 de las instrucciones de instala...

Страница 141: ...dows seleccione en primer lugar Programas y a continuaci n Skype para iniciar el programa tal como se muestra en la p gina 132 3 Si el problema persiste reinicie el equipo Puedo o r el saludo de Skype...

Страница 142: ...ea No encuentro el panel Control de volumen de Windows en esta misma secci n 2 En el men Opciones elija Propiedades 3 En la lista Dispositivo mezclador elija el tel fono con altavoces 4 Windows XP sel...

Страница 143: ...volumen de Windows en esta misma secci n 2 En el men Opciones elija Propiedades 3 En la lista Dispositivo mezclador elija el tel fono con altavoces Windows XP seleccione C Media USB Headphone Set Wind...

Страница 144: ...osible El ordenador debe de estar utilizando el tel fono con altavoces como dispositivo principal para la reproducci n de sonido 1 Windows XP En el men Inicio de Windows seleccione Panel de control y...

Страница 145: ...doble clic en el icono Volumen de la bandeja del sistema Soluci n posible n 2 Si no hay ning n icono Volumen en la bandeja del sistema utilice las siguientes instrucciones para abrir el panel Control...

Страница 146: ...C Media USB Headphone Set Windows 2000 seleccione USB Audio Device Asistencia t cnica Requisitos m nimos del sistema Los requerimientos m nimos para que el tel fono con altavoces funcione correctament...

Страница 147: ...itio Web Tel fono Austria www usr com emailsupport de 07110 900 116 B lgica flamenco www usr com emailsupport bn 070 23 35 45 B lgica franc s www usr com emailsupport be 070 23 35 46 Rep blica Checa w...

Страница 148: ...sector Noruega www usr com emailsupport ea 23 16 22 37 Polonia www usr com emailsupport pl Portugal www usr com emailsupport pt 21 415 4034 Rusia www usr com emailsupport ru 8 800 200 20 01 Espa a ww...

Страница 149: ...ego urz dzenia odtwarzania d wi ku w systemie Windows USB Internet Speakerphone Instalacyjna p yta CD Przew d USB Instrukcja szybkiej instalacji wyciszenie mikrofonu zmniejszenie g o no ci zwi kszenie...

Страница 150: ...lacji 1 Zamknij powiadomienia Niekt re dymki w obszarze powiadomie takie jak ten pokazany poni ej mog nak ada si na dymki przedstawiaj ce post p instalacji urz dzenia g o nom wi cego Zamknij wszystkie...

Страница 151: ...151 2 Za pomoc do czonego kabla USB pod cz urz dzenie g o nom wi ce do komputera Zaczekaj na informacj o zako czeniu instalacji...

Страница 152: ...152 3 W p yt instalacyjn CD ROM firmy USRobotics Je li p yta CD nie uruchomi a si automatycznie Z menu Start wybierz opcj My Computer M j komputer i kliknij dwukrotnie nap d CD...

Страница 153: ...est ju zainstalowany na komputerze przejd do kroku 5 A Po wy wietleniu monitu wybierz preferowany j zyk i zaakceptuj warunki Umowy licencyjnej u ytkownika ko cowego B Wybierz opcj Zainstaluj program S...

Страница 154: ...154 5 Skonfiguruj program Skype do pracy z urz dzeniem USB Internet Speakerphone A Z menu Start systemu Windows wybierz opcj All Programs Programy a nast pnie Skype...

Страница 155: ...155 i uruchom program Skype...

Страница 156: ...156 B Wybierz z menu Narz dzia pozycj Opcje a nast pnie Audio...

Страница 157: ...urz dzenie g o nom wi ce dla wszystkich trzech ustawie Audio We Audio Wy i Dzwonek Windows XP wybierz opcj C Media USB Headphone Set Windows 2000 wybierz opcj USB Audio Device D Nast pnie kliknij prz...

Страница 158: ...rzejd do kroku 8 A Kliknij dwukrotnie ikon Volume G o no na pasku zada B Z menu Options Opcje wybierz polecenie Properties W a ciwo ci C Wybierz mikrofon 1 Upewnij si e jest wybrane ustawienie USB Aud...

Страница 159: ...159 4 Kliknij przycisk OK D Zwi kszaj g o no mikrofonu a lampka wska nika na urz dzeniu g o nom wi cym za wieci na niebiesko...

Страница 160: ...osuj si do instrukcji ustawie d wieku znajduj cej si na stronie internetowej www skype com intl pl help guides soundsetup html 8 Sprawd poprawno instalacji wykonuj c po czenie testowe W programie Skyp...

Страница 161: ...problem w Zmiana ustawie urz dzenia g o nom wi cego Aby zmieni ustawienia dotycz ce g o nika i mikrofonu u yj przycisk w urz dzenia g o nom wi cego w spos b opisany na str 149 lub wykonaj poni sze ins...

Страница 162: ...162 4 Z listy Mixer device Urz dzenie miksuj ce wybierz urz dzenie g o nom wi ce w nast puj cy spos b Windows XP wybierz opcj C Media USB Headphone Set Windows 2000 wybierz opcj USB Audio Device...

Страница 163: ...pcj Playback Odtwarzanie lub Recording Nagrywanie i kliknij przycisk OK Panel sterowanie zostanie ustawiony w celu regulacji ustawie urz dzenia g o nom wi cego Szczeg owe instrukcje na temat element w...

Страница 164: ...niem g o nom wi cym Powr do kroku 5 powy szych instrukcji instalacji i sprawd ustawienia urz dzenia d wi kowego W przypadku jakichkolwiek problem w z oprogramowaniem Skype nale y zapozna si z informac...

Страница 165: ...str 154 3 Je li nadal nie s ycha d wi ku uruchom ponownie komputer S ycha powitanie programu Skype a nie moj nagran wiadomo nie s ycha d wi ku z mikrofonu Mo liwe rozwi zanie 1 Upewnij si e dioda wsk...

Страница 166: ...Windows Je li nie wiesz gdzie znale ten panel zobacz Gdzie znajduje si panel Volume Control Regulacja g o no ci w systemie Windows w sekcji niniejszego podr cznika 2 Z menu Options Opcje wybierz pole...

Страница 167: ...zona jest opcja AGC i kliknij przycisk Close Zamknij G o no mikrofonu jest za du a Mo liwe rozwi zanie Mo e by konieczne zmniejszenie g o no ci mikrofonu 1 Otw rz panel Volume Control Regulacja g o no...

Страница 168: ...i mikrofonu kliknij przycisk Advanced Zaawansowane Uwaga Je li przycisk Advanced Zaawansowane nie jest wy wietlony kliknij menu Options Opcje a nast pnie wybierz polecenie Advanced Controls Sterowniki...

Страница 169: ...erowania a nast pnie wybierz aplet Sounds and Multimedia D wi ki i multimedia 2 Na karcie Audio wybierz preferowane urz dzenie odtwarzania d wi ku i kliknij przycisk OK Uwaga Przyciski g o no ci umies...

Страница 170: ...wi ki i urz dzenia audio 2 Na karcie Volume G o no kliknij przycisk Advanced Zaawansowane przy ustawieniu g o no ci urz dzenia Windows 2000 1 Z menu Start systemu Windows wybierz kolejno opcje Settin...

Страница 171: ...ce wymaga rodowiska komputerowego sk adaj cego si z nast puj cych element w Dodatkowa pomoc Aby uzyska dodatkow pomoc techniczn dla urz dzenia g o nom wi cego 1 Przygotuj numer modelu i numer seryjny...

Страница 172: ...10 900 116 Belgia flamandzki www usr com emailsupport bn 07 023 3545 Belgia francuski www usr com emailsupport be 07 023 3546 Czechy www usr com emailsupport cz Dania www usr com emailsupport ea 38323...

Страница 173: ...oraz warunki gwarancji mo na znale w podr czniku u ytkownika zamieszczonym na p ycie CD ROM firmy USRobotics Rosja www usr com emailsupport ru 8 800 200 200 1 Hiszpania www usr com emailsupport es 902...

Страница 174: ...174...

Страница 175: ......

Страница 176: ...Printed in Xxxxxx...

Отзывы: