background image

25

DS1375-008E

5.  Press SAVE. The device will reboot. When the device becomes available again, the PC will be able to 

reach all the devices present in the VLAN network.

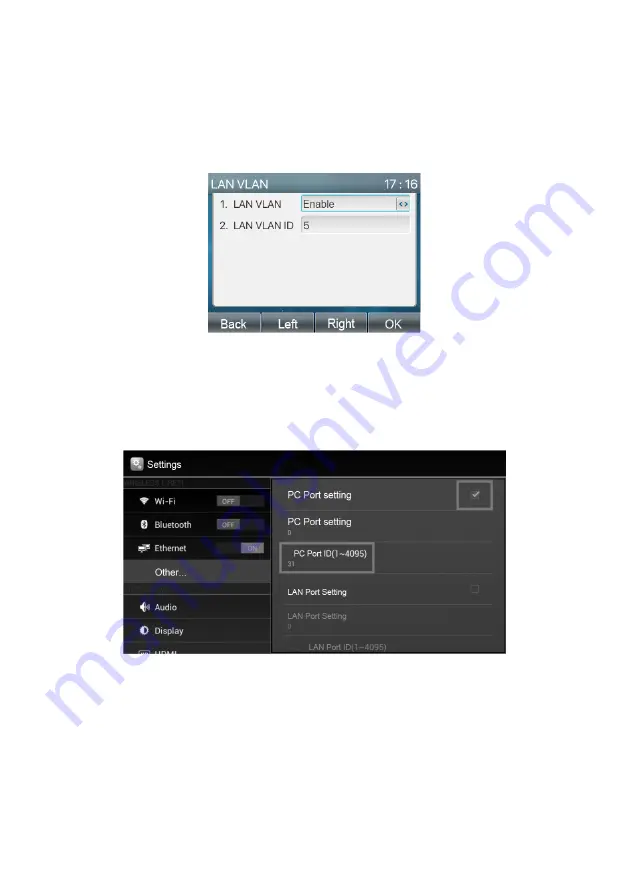
10.2  MODELS REF. 1375/806 - 1375/812

To configure the VLAN mode through the phone user interface, follow the procedure below:

1.  Press  Menu 

  Advanced  Settings  (default  Password:  123) 

 Network 

 QoS and VLAN 

 LAN 

VLAN.

2.  Enable the LAN VLAN parameter.

3.  Indicate the value 5 (default for iPerTAlk) the LAN VLAN ID.

10.3  MODEL REF. 1375/815

Proceed as follows to configure VLAN mode via the telephone user interface:

1.  Access the device settings.

2.  Select “Other” and go to the VLAN parameter.

3.  Check the box under the “PC Port Settings” heading and set the VLAN number (

default 5 for iPerTAlk) 

under the “PC Port ID” parameter. Press OK to confirm.

4. The change occurs immediately. At this point, the PC will be able to reach all the devices present in the 

VLAN network.

5. Restart the terminal to start the automatic configuration. At this point, the PC will be able to reach all the 

devices present in the VLAN network.

Содержание IPerTalk 1375/10

Страница 1: ...DS1375 008E LBT20526 Mod 1375 IPERTALK IP PBX IP PBX IPERTALK Sch Ref 1375 10 1375 11 1375 12 1375 13 Sch Ref 1375 10A 1375 11A 1375 12A 1375 13A GUIDA RAPIDA PER L UTILIZZO QUICK START GUIDE FOR USE...

Страница 2: ...ULSANTE DI RIAVVIO E DI RESET 3 6 6 VERIFICHE PRELIMINARI 6 7 CONNESSIONE ALLA RETE 7 8 DISTANZE MASSIME E SEZIONI CAVI 8 9 CONFIGURAZIONE E PRIMO UTILIZZO 8 10 ACCESSO A RETE TELEFONICA 11 10 1 TELEF...

Страница 3: ...ria Sistemi IP oppure scansionando con la fotocamera del proprio smartphone o tablet il QR Code in ultima pagina 2 CONTENUTO DELLA CONFEZIONE Unit iPerTAlk Alimentatore per Unit iPerTAlk Tasselli e vi...

Страница 4: ...ezza nell apposita sezione del presente libretto istruzione Per effettuare la prima installazione del dispositivo necessario seguire i seguenti passi 1 Aprire lo sportello 4 facendolo scorrere verso l...

Страница 5: ...ndo la giusta polarit 5 Collegare l alimentatore al connettore di alimentazione 9 Utilizzare in base alla posizione del dispositivo i fori di prerottura A di destra o di sinistra predisposti per il pa...

Страница 6: ...escrizione Connettori USB 4 porte USB 2 0 per il collegamento di storage esterni USB o per espansori Pulsante di reset Riavvio del sistema premere il pulsante fino all accensione del led di stato di c...

Страница 7: ...ivo effettuer la procedura di avvio del software Al completamento della procedura di avvio il Led di stato 2 del dispositivo si illuminer di colore VERDE fisso ad indicare che il sistema funzionante e...

Страница 8: ...i consiglia di utilizzare i seguenti browser Internet Explorer 11 X o superiori Mozilla Firefox 50 X o superiori Chrome 60 X o superiori Di seguito le istruzioni per effettuare la configurazione del s...

Страница 9: ...ati Permette l acquisizione e configurazione automatica dei gateway per derivati interni 5 Interfacce VoIP L U ISDN GSM Permette l acquisizione e configurazione automatica dei gateway di linea analogi...

Страница 10: ...dere al caricamento della licenza dal proprio PC scegliendo il file di licenza generato dal portale delle licenze store urmet com e premendo il tasto Carica 10 Attendere il riavvio dell applicazione e...

Страница 11: ...izione automatica dei terminali funziona solo con i dispositivi Urmet Sch 1375 805 1375 806 1375 810 1375 812 1375 815 e 1375 816 telefoni IP ATTENZIONE la procedura di acquisizione automatica prevede...

Страница 12: ...TAlk la LAN VLAN ID 10 3 MODELLO SCH 1375 815 Per configurare la modalit VLAN tramite l interfaccia utente del telefono seguire la seguente procedura 1 Accedere alle Impostazioni del dispositivo 2 Sel...

Страница 13: ...UZIONE DELLA BATTERIA 1 Disalimentare il dispositivo togliendo l alimentatore dalla presa di alimentazione 2 Aprire lo sportello 4 facendolo scorrere svitare la vite mediante un cacciavite Phillips e...

Страница 14: ...08E Modelli Sch 1375 10A 11A 12A 13A Tensione di ingresso alimentatore 110 240 V Tensione di uscita alimentatore 12 V Assorbimento Max 6W 25 C Temperatura 5 C a 45 C Batteria CR2032 Dimensioni 180 x 1...

Страница 15: ...REBOOT AND RESET BUTTON 3 19 6 PRELIMINARY CHECKS 19 7 CONNECTION TO THE NETWORK 20 8 MAXIMUM DISTANCES AND WIRE SECTIONS 21 9 CONFIGURATION AND FIRST USE 21 10 ACCESS TO THE TELEPHONE NETWORK 24 10...

Страница 16: ...Systems telephony section or by scanning with the camera of your smartphone or tablet the QR Code on the last page 2 CONTENT OF THE BOX iPerTAlk unit iPerTAlk power unit Wall anchors and screws for fi...

Страница 17: ...ion in the appropriate section of this instruction booklet For the first installation of the device proceed as follows 1 Open flap 4 by making it slide outwards 140 mm 41 mm 180 mm 2 Undo the screw us...

Страница 18: ...8 following the correct polarity 5 Connect the power supply to the power connector 9 According to the position of the device use the pre cut holes A on the right or on the left arranged for passing t...

Страница 19: ...storage devices or expansion units Reset button Reboot the system press the button until the WHITE LED lights up Restore default settings Press and hold the button until the purple status LED lights u...

Страница 20: ...2 of the device will turn GREEN fixed to indicate that the system is working and ready to be configured If you do not have an Internet connection the status LED 2 will blink alternatively BLUE and GRE...

Страница 21: ...owing browsers is recommended to ensure maximum compatibility Internet Explorer 11 x or higher Mozilla Firefox 50 x or higher Chrome 60 x or higher Follow the instructions below to complete the config...

Страница 22: ...f the system 4 VoIP interfaces Extensions This can be used to automatically acquire the extension gateways 5 VoIP L U ISDN GSM interfaces This can be used to automatically acquire the gateways of anal...

Страница 23: ...cense if it was previously installed 9 Proceed by loading the license from the PC by selecting the file license generated by the license portal store urmet com and pressing Upload 10 Wait for the syst...

Страница 24: ...ted to the telephone network The automatic terminal acquisition procedure only works with the Urmet devices Ref 1375 805 1375 806 1375 810 1375 812 1375 815 and 1375 816 IP telephones IMPORTANT The au...

Страница 25: ...efault for iPerTAlk the LAN VLAN ID 10 3 MODEL REF 1375 815 Proceed as follows to configure VLAN mode via the telephone user interface 1 Access the device settings 2 Select Other and go to the VLAN pa...

Страница 26: ...Cut off power to the device by removing the plug 2 Open door 4 by making it slide undo the screw using a Phillips screwdriver and remove the front cover 3 Replace the flat battery from the battery co...

Страница 27: ...008E Models Ref 1375 10A 11A 12A 13A Power supply input voltage 110 240 V Power supply output voltage 12 V Max consumption 6W 25 C Operating Temperature 5 C a 45 C Battery CR2032 Dimensions 180 x 140...

Страница 28: ...tare possibili effetti negativi sull ambiente e sulla salute e favorisce il reimpiego e o riciclo dei materiali di cui composta l apparecchiatura ENGLISH DIRECTIVE 2012 19 EU OF THE EUROPEAN PARLIAMEN...

Отзывы: