background image

4

Total Control

TKP-8600

Owner’s Manual

Installation

The

TKP-8600 fits

into any

2-Gang LV Bracket

. However, there are certain

aspects of the installation that must be highlighted.

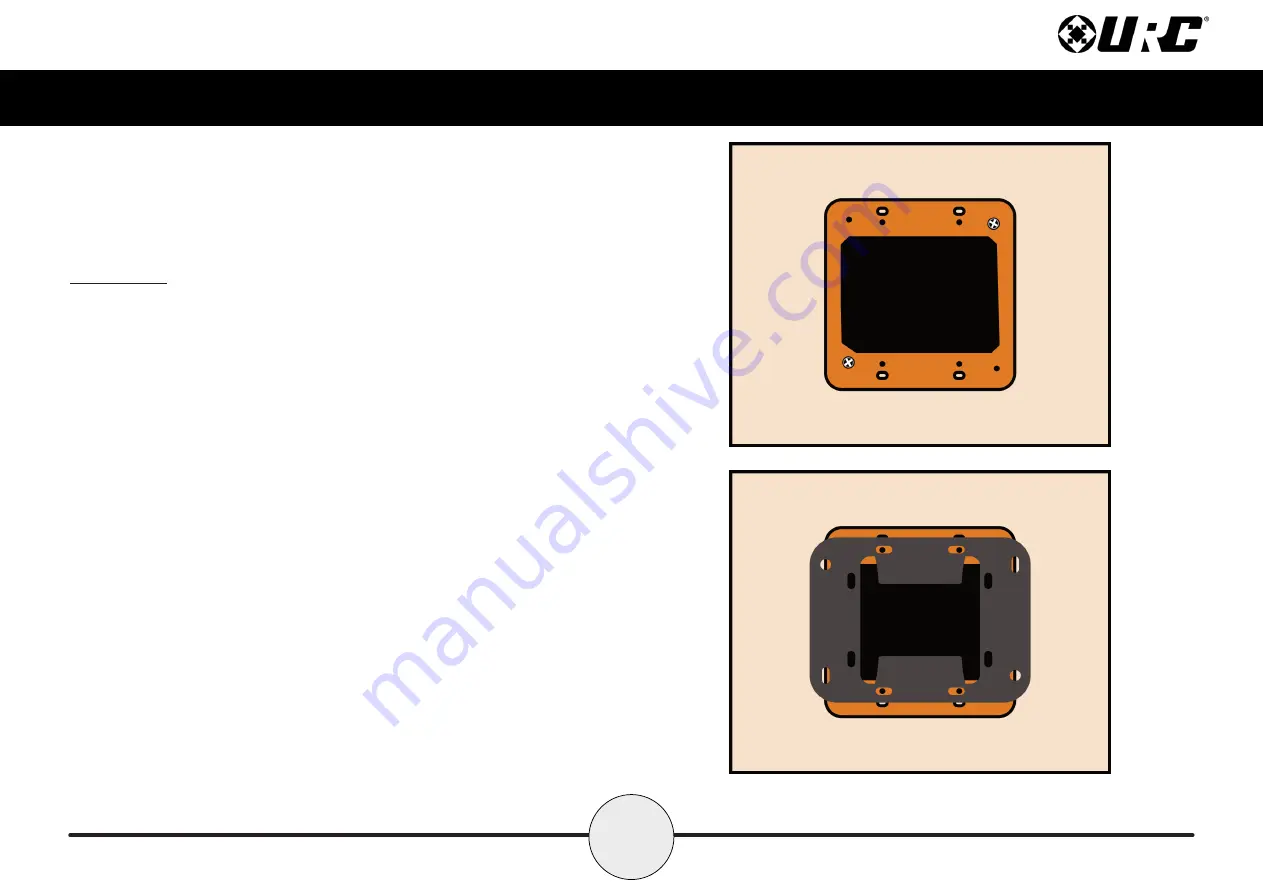
1. Measure the 2-gang bracket and mark the installation area. Using

your preferred cutting tool,

cut a hole in the wall that

matches the measurements

.

2. Install the 2-gang bracket into the cut out and

securely

tighten all the necessary screws

.

3. Align the mounting bracket with the appropriate slots on the 2-gang box.

Using the

supplied screws, securely tighten the mounting bracket

onto the 2-gang bracket

.

4. Connect the POE RJ45 cable and install the TKP-8600 onto the mounting

bracket. The

TKP-8600 is equipped with magnets that make the

installation process easier

and more secure.

Wall

2-Gang LV Bracket

MOUNTINGBRACKET

Содержание Total Control TKP-8600

Страница 1: ...TKP 8600 Owner s Manual Total Control TKP 8600 Owner s Manual ...

Страница 2: ... product sold direct only For questions or assistance contact your Custom Installer Programmer My Installer Programmer Technical Support Toll Free 800 904 0800 Main 914 835 4484 techsupport urc automation com Hours 9 00am 5 00pm EST M F Features and Benefits 1 Amazon Alexa Audio Video Interface 1 Proximity Sensor Flexible Orientation 2 Parts List 3 Installation 4 The TKP 8600 5 Alexa Features 6 Se...

Страница 3: ... Total Control Enjoy these key features Amazon Alexa This keypad is capable of integrating with Amazon Alexa devices bringing voice control to home automation solutions Audio Video Interface Communicate with any other URC Intercom Enabled device in the system with this feature The end user can make Audio Video Audio or Audio Broadcast calls directly from the TKP 8600 ...

Страница 4: ...stances from up to three 3 feet away This setting can be adjusted in the device s Settings menu Flexible Orientation The TKP 8600 offers the ability to display the device in either portrait or landscape mode making it the perfect keypad for almost any room This feature can only be set from within the Total Control software speak to a custom home professional prior to installation ...

Страница 5: ...3 Total Control TKP 8600 Owner s Manual Parts List The following is included in the box ...

Страница 6: ...hat matches the measurements 2 Install the 2 gang bracket into the cut out and securely tighten all the necessary screws 3 Align the mounting bracket with the appropriate slots on the 2 gang box Using the supplied screws securely tighten the mounting bracket onto the 2 gang bracket 4 Connect the POE RJ45 cable and install the TKP 8600 onto the mounting bracket The TKP 8600 is equipped with magnets...

Страница 7: ... s camera A small blue light activates when the camera is in use D Proximity Sensors These dual sensors allow the keypad to sense users within close proximity to it E Microphone Button This is used for accessing voice control Amazon Alexa can also utilize the Alexa wake word for hands free interaction F Reset Button Along the bottom of the keypad directly beneath the microphone button is the reset...

Страница 8: ...a Double tap the button to turn on or off the microphone Microphone Button Notification Colors Alexa notifications are reflected on the TKP 8600 through the Microphone Button It is able to glow several different colors informing the user of package deliveries new deals and various other information Blue The microphone is enabled Cyan Announcements Purple Do Not Disturb is enabled Red Microphone is...

Страница 9: ...he TKP 8600 Allows from the adjustment of Date Time and Temperature Scale Sound Adjust the volume of the audio feedback when pressing buttons on the interface Brightness Allows for the adjustment of the LCD screen s brightness Proximity Sensor Allows for the adjustment of the proximity level System Provides general information such as memory used current version and version details Network Allows ...

Страница 10: ...een will Turn Off When selected the Turn Off After section is selectable Choose from a 20 second 30 second or one 1 minute time out 3 LCD Screen will Display a Night Mode When selected the Start After and Duration option become active Start After The TKP 8600 times out based on the value entered here and goes into Night Mode Duration The TKP 8600 turns off Night Mode after the value entered here ...

Страница 11: ...following can have its value changed Month Day Year 2 Time The following can have its value changed Hour Minutes Seconds AM PM 12 Hour 24 Hour 3 Automatically Adjust Clock for Daylight Savings Check this box to have the TKP 8600 automatically adjust for daylight savings 4 Temperature Scale Set this either to Fahrenheit or Celsius ...

Страница 12: ...splay brightness or press the plus button to increase the brightness Additionally dragging the slider to the right increase the display brightness while dragging it to the left decreases it Brightness Level How bright the screen is when in use Night Mode Brightness Level How bright the screen is when in Night Mode Mic Backlight Brightness Level How bright the mic button appears Enable Light Sensor...

Страница 13: ...or press the plus button to increase the sensitivity Additionally dragging the slider to the right increases the sensitivity while dragging it to the left decreases it The maximum distance of the proximity sensor is about three 3 feet Enable Proximity Sensor By default this check box is enabled Uncheck the box to disable the proximity sensor ...

Страница 14: ... System Information Although none of the information can be modified this System Information page displays important information about the TKP 8600 This information is only needed by a custom installation professional or URC Technical Support ...

Страница 15: ...600 failing to function correctly Here is the information that can be displayed here 1 Connection Displays the status of the network connection connected or not connected 2 TCP IP Displays information such as Address Type DHCP or Static IP Address Subnet Mask Gateway and DNS Select the Edit button to reveal additional options For DHCP select Obtain an IP Address Automatically For Static select Use...

Страница 16: ...14 Total Control TKP 8600 Owner s Manual Voice Assistant The Voice Assistant menu is where Alexa integration settings are located Select Alexa Voice Assistant to access the individual settings ...

Страница 17: ...rther tailor the user experience Some options are not available until Alexa has been enabled Login To use Alexa the TKP 8600 must be added to an Amazon account This requires the use of a web browser to complete Perform the following to enable Alexa 1 Select Login 2 A new window appears explaining the benefits of enabling the Alexa Voice Assistant Select Get Started 1 2 ...

Страница 18: ... A new window appears and provides a device code This code will need to be entered on Amazon s website at www amazon com us code 4 After logging into your Amazon account enter the provided device code to register the TKP 8600 to the account 3 4 ...

Страница 19: ...KP 8600 Owner s Manual 5 A permissions page appears providing a summary of Alexa s services Select Allow to complete the process 6 The registration process is now complete Return to the TKP 8600 to finish the process 5 6 ...

Страница 20: ...18 Total Control TKP 8600 Owner s Manual 7 Select Next to move through the tip screens On the third screen select Done to complete the login process 7 ...

Страница 21: ...19 Total Control TKP 8600 Owner s Manual Logout To disable the Alexa Voice Assistant perform the following 1 Select Logout 2 A confirmation window appears Select Yes to complete the process 1 2 ...

Страница 22: ...20 Total Control TKP 8600 Owner s Manual 3 The TKP 8600 returns to the Voice Assistant menu When enabled a green icon appears on the right side of the button 3 ...

Страница 23: ...21 Total Control TKP 8600 Owner s Manual Audio Settings Select Audio Settings from the menu to configure voice and audio levels for the Alexa Voice Assistant ...

Страница 24: ... Owner s Manual A Alexa Voice Volume How soft or loud Alexa will speak when replying B Notification Volume How soft or loud Notification audio will play C Audio Cue Enable or disable the audio cue when Alexa is listening A B C ...

Страница 25: ...23 Total Control TKP 8600 Owner s Manual Language Several languages along with several variations are available for selection ...

Страница 26: ...or how Alexa is accessed through the TKP 8600 Wake Word Alexa is activated vocally with her wake word Push To Talk Alexa is activated with the microphone button Both Both the wake word and push to talk will activate Alexa None Neither the wake word or push to talk are enabled ...

Страница 27: ...iar with Total Control or under instruction from URC Technical Support Selecting this option resets the TKP 8600 to its factory state and does not function until the device is reprogrammed by a custom install professional 1 Press and hold the Factory Default button for over five 5 seconds 2 A confirmation window appears Select Yes 1 ...

Страница 28: ...site to remove a device from an account 1 From the Your Account page select Your devices and content from the menu 2 The Digital Services and Device Support page will list several options Select Manage devices 3 The next page lists out the devices connected to the account Select Other devices and then select the TKP 8600 1 2 3 ...

Страница 29: ...l Control TKP 8600 Owner s Manual 4 On the Device Summary page select Deregister Voice recording data may also be deleted at this time for privacy concerns 5 Select Deregister again to complete the process 4 5 ...

Страница 30: ...ith the limits for a Class B digital device pursuant to part 15 of the FCC Rules These limits are designed to provide reasonable protection against harmful interference in a residential installation This equipment generates uses and can radiate radio frequency energy and if not installed and used in accordance with the instructions may cause harmful interference to radio communications However the...

Страница 31: ...ve Emission Immunity Power Declaration of Conformity Hereby Universal Remote Control Inc declares that this MRX 12 is in compliance with the Essential requirements Warning The manufacturer is not responsible for any Radio or TV interference caused by unauthorized modifications to this equipment Changes or modifications not expressly approved by the manufacturer could void the user s authority to o...

Отзывы: