


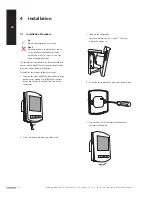


o
ptional
F
eatures
o
vervieW
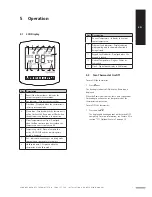
Feature Description
Setting
01
Temperature
Format
00 = °C
01 = °F
(°C default)
02
Switching
Differential
01-03 °C
(01 °C default)
03
Frost
Protection
00 = Enabled (default)
01 = Disabled
04
Frost
Protection
Temperature
07-17 °C
(12 °C default)
05
Output Delay
00-15 Minutes
(00 default)
06
Communication
Address
Not in use on this
model
07
Temperature
Up/Down Limit
00-10 °C
(00 °C default)
08
Sensor
Selection
00 = Built In Air Sensor
(default)
01 = Remote Air Sensor
02 = Floor Sensor Only
03 = Floor Sensor and
Built In Air Sensor
04 = Floor Sensor and
Remote Air Sensor
09
Floor
Temperature
Limit
20-45 °C
(27 °C default)
10
Optimum Start
00-03 Hours
(00 hours default)
11
Rate of Change Minutes to raise by 1 °C
12
Programming
Mode
00 = Non-
Programmable
01 = 5/2 Day
Programming
02 = 7 Day
Programming
o
ptional
F
eatures
e
xplained
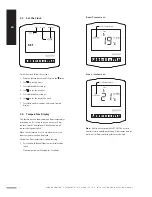
Feature 01
– Temperature Format: This function allows
you to select between °C and °F.
Feature 02
– Switching Differential: This function
allows you to increase the switching differential of the
thermostat. The default is 1°C which means that with
a set temperature of 20°C, the thermostat will switch
the heating on at 19°C and off at 20°C. With a 2°C
differential, the heating will switch on at 18°C and off
at 20°C.
Feature 03
– Frost Protection: You can set whether the
thermostat will maintain the frost temperature when
the thermostat display is turned off. As a default, this is
enabled.
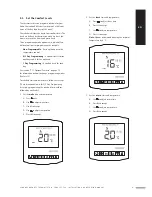
Feature 04
– Frost Protection Temperature: This is the
temperature maintained when the thermostat is in frost
protection mode. The range is 07 - 17°C. The default is
12°C and is suitable for most applications.
Feature 05
– Output Delay: To prevent rapid switching,
an output delay can be entered. This can be set from
00 - 15 minutes. The default is 00 which means there is
no delay.
Feature 06
– Communication Address: Not in use on
this model.
Feature 07
– Temperature Up/Down Limit: This
function allows you to limit the use of the Up and Down
keys. This limit is also applicable when the thermostat is
locked and so allows you to give others limited control
over the heating system.
Feature 08
– Sensor Selection: On this thermostat,
you can select which sensor should be used. You can
select between air temperature only, floor temperature,
or both. When you enable both sensors, the floor sensor
is used as a floor limiting sensor and is designed to
prevent the floor from overheating.
Note:
Built in air sensor only MUST NOT be used to
control electric underfloor heating. Floor sensor only or
built in air & floor sensor together must be used.
Feature 09
– Floor Temperature Limit: When the Floor
Sensor has been enabled in feature 08, you can set
a floor limiting temperature between 20-45°C. This
protects the floor from overheating.
(27°C is the default).
1 3
U P O N O R C O M F O RT- E T H E R M O S TAT D I G . P R O G S E T T- 8 6 · I N S TA L L AT I O N A N D O P E R AT I O N M A N U A L
EN
DK
FI
NO
SE