background image

Figure 6 Main page 

3. 


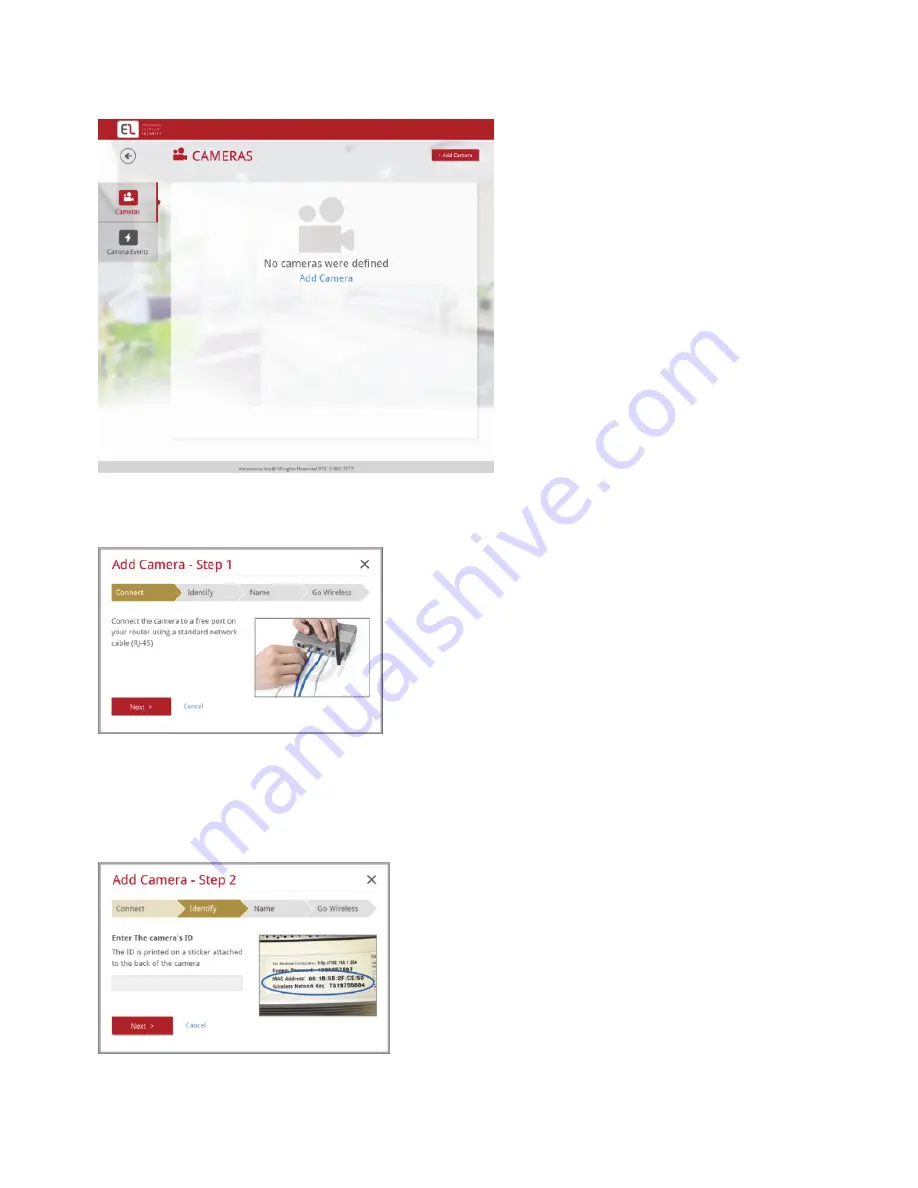
On the Main page, click Cameras, the Cameras page is displayed. 


Figure 7 Cameras page 

4. 


Click Add Camera; Step 1 of the Add Camera wizard is displayed. 


Figure 8 Add Camera Wizard – Step 1 

5. 


Connect the IP camera to a free port on a compatible AP (Access Point), e.g. 
gateway or router and click Next. Step 2 of the Add Camera wizard is 
displayed. 


Figure 9 Add Camera Wizard – Step 2


Содержание InSight

Страница 1: ...InSight Visual Verification Platform Cube Indoor IP Camera Installation Guide ...

Страница 2: ...y yourself as doing so could result in damage injury or death always contact your installer supplier agent for service CAUTIONS Make sure the power supply voltage is correct before using the camera Do not drop the camera or subject it to physical shock Do not touch sensor modules with fingers If cleaning is necessary use a clean cloth with a bit of ethanol and wipe it gently Do not aim the camera ...

Страница 3: ...amera to the Network 6 Connecting to a LAN Network 6 Connecting to a Wireless Network using WPS 7 Connecting to a Wireless Network using MyELAS 7 IP Cameras and the MyELAS Web Application 8 Defining IP Camera Settings 8 Defining Camera Event Settings 12 Product Specification 14 Performance 14 Electronics Line 3000 Ltd Limited Warranty 16 Contacting your Installer Supplier Agent 17 Contacting Elect...

Страница 4: ...of security and live video monitoring capabilities to monitoring stations and end users alike The Cube Indoor IP Camera is an important part of this solution and is easily controlled through Electronics Line s intuitive Web and Smartphone applications Features Simple Plug Play installation 1 3 Megapixel Color HD Day Night White LED s Length 10m Components and Accessories Indoor IP camera and mount...

Страница 5: ...camera is upgrading Green light flashes Interval is 0 5s When camera is in alarm Green light flashes Interval is 0 2s 2 Network indicator light NET Wired network connection Red light is on Wireless network connection Green light is on 3 Speaker Output audio signal This function is optional 4 White light Can activate motion detect PIR human body movement detect external alarm 5 N A N A N A N A ...

Страница 6: ...on for at least 5 seconds system can restore factory default setup 9 WPS button WPS Fast wireless connection Press the WPS button of the router and the device respectively for at least 2 seconds Usually the device connects to the router within 1 minute Please note that this is for wireless router with WPS functionality only 10 N A N A N A N A 11 Power port DC12V Input DC 12V power 12 Network port ...

Страница 7: ...the most optimal areas for installing your IP camera IMPORTANT Please make a record of the MAC address located on the box or on the back cover of the IP camera before installation You may need it during the network connection stage Mounting the IP Camera The IP camera support two mounting options ceiling and wall mount see Figure 3 and Figure 4 below Figure 3 Ceiling Mount Figure 4 Wall Mount IMPO...

Страница 8: ...onnect the provided electrical power adapter to the Power port on the IP camera 2 Connect the power adapter to an electrical outlet When the IP camera boots up the GREEN power indicator light turns on NOTE The IP camera can also be powered through PoE Power over Ethernet which simplifies the installation for LAN network connection only If your network connection is PoE compatible you only need to ...

Страница 9: ... seconds The GREEN network indicator light indicates that your IP camera is now ready for defining camera settings Refer to Defining IP Camera Settings Connecting to a Wireless Network using MyELAS Connecting the IP camera to a wireless network using MyELAS requires that you first physically connect the IP camera to the AP and then from the MyELAS Web Application define the IP camera settings and ...

Страница 10: ...d define camera settings Refer to the MyELAS Web Application User Guide or www myelas com register Defining IP Camera Settings Once you have connected the IP camera to the network refer to Connecting the IP Camera to the Network you can define the camera settings To define IP camera settings 1 Enter the Web page address supplied by your service provider and press Go The Login page is displayed Fig...

Страница 11: ...ameras page 4 Click Add Camera Step 1 of the Add Camera wizard is displayed Figure 8 Add Camera Wizard Step 1 5 Connect the IP camera to a free port on a compatible AP Access Point e g gateway or router and click Next Step 2 of the Add Camera wizard is displayed Figure 9 Add Camera Wizard Step 2 ...

Страница 12: ...ayed Figure 11 Add Camera Wizard Step 4 8 Select one of the following options Connect to LAN to establish a LAN network connection click Done Connect to Wi Fi to establish a wireless network connection select a wireless network from the available list and click Done NOTE If your network is password protected a password must be entered into the displayed password field IMPORTANT Once a wireless con...

Страница 13: ...11 9 Once the camera is ready for use the defined IP camera is displayed in the IP Cameras page Figure 12 IP Cameras page NOTE You also have the option to edit or delete the selected IP camera ...

Страница 14: ...o define camera event settings 1 On the Main page click Camera Events the Camera Events page is displayed Figure 13 Camera Event page 2 Click the required Camera the Select Detectors dialog box appears Figure 14 Select Detector 3 Select the detectors area that will be associated to the defined camera ...

Страница 15: ...13 4 Once finished click Save The defined camera events are displayed in the Camera Event page Figure 15 Camera Event page NOTE You also have the options to edit or to delete the selected camera event ...

Страница 16: ...Main stream 1280 960 15fps extra stream 352 288 15fps Main stream 1280 720 25fps extra stream 352 288 25fps NTSC Main stream 1280 960 15fps extra stream 352 240 15fps Main stream 1280 720 30fps extra stream 352 240 30fps Video Bit Rate H 264 56Kbps 6144Kbps MJPEG is adjustable and bit rate is adjustable Support customized setup Video Flip Support mirror Support flip function Snapshot Max 1f s snap...

Страница 17: ...in antenna Network Protocol Standard HTTP TCP IP ARP IGMP ICMP RTSP RTP UDP RTCP SMTP FTP DHCP DNS DDNS PPPOE UPNP NTP Bonjour SNMP Remote Operation IR light Monitor system setup file download log information maintenance upgrade and etc AUX Port Compensation Light White light Max 1W Auto turn on white light when an alarm is activated The light can last until the alarm ends Support compensation lig...

Страница 18: ... of installation or any liability for direct indirect or not be compromised or circumvented that the product will prevent any persona injury or property loss by intruder robbery fire or otherwise or that the product will in all cases provide adequate warning or protection Buyer understands that a properly installed and maintained alarm may only reduce the risk of intruder robbery or fire without w...

Страница 19: ...alling for service ordering components or for questions related to your camera please contact us for assistance Company agent address phone e mail address Contact department Hours of business Website URL Company logo Other supplier specific information ...

Страница 20: ...ctronics Line 3000 Ltd 14 Hachoma St 75655 Rishon Le Zion Israel Tel 972 3 963 7777 Fax 972 3 961 6584 All rights reserved No part of this document may be reproduced in any form without prior written permission from the publisher Electronics Line 3000 Ltd 04 2014 5IN2190 ...

Отзывы: