

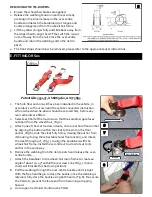


Fitting the Combined Systems - 2Point Occupant Restraint
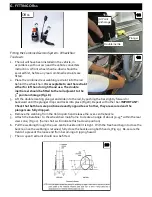
1. Ensure the Comfort Clip is released (Fig 25) and press the buckle to
release the lap belt.
2. Pull the metal tongue on the black webbing upwards to release the
webbing from both inertia reels.
3. Position the webbing across the occupant with the black webbing
forming the lap belt and the red webbing forming the shoulder belt
(Fig 26).
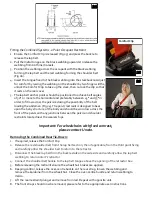
4. Insert the tongue fixed to the black webbing into the stalk buckle. Adjust
for comfort by raising the webbing on the shoulder by two finger widths,
unlock the Comfort Clip to take up the slack, then re-lock the clip so that
it rests on the reel cover.
5.
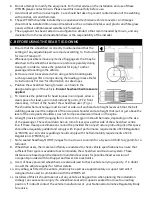
The lap belt anchor points should be positioned to achieve belt angles
of 30° or more to the horizontal and preferably between 45° and 75° in
order to fit low across the pelvis reducing the possibility of the belt
loading the abdomen (Fig 24). The pelvic restraint is designed to bear
upon the bony structure of the body and should be worn low across the
front of the pelvis with any junctions between the pelvic and shoulder
restraints located near the wearers hips.
Important: For wheelchairs with fixed armrest,
please contact Unwin.
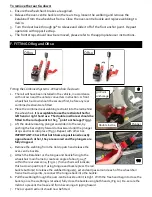
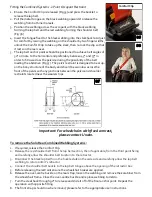
Removing the Combined Rear Tie-Down:
1.
If required, release the Comfort Clip
2. Release the red shoulder belt from the lap belt section, then if applicable, from the third point fixing
and carefully allow the shoulder belt to return to the retractor.
3. Disconnect the black lap belt from the buckle stalk on the aisle side and carefully allow the lap belt
webbing to return onto it’s retractor.
4. Connect the shoulder belt buckle to the lap belt tongue above the opening of the retractor box.
5. Before releasing the restraint ensure the wheelchair brakes are applied.
6. Keeping control, release the over-centre buckle on the rear strap, loosen the webbing and
remove the karabiner from the wheelchair. Close the over-centre buckle and return webbing to
Velcro.
7. Lift the rear restraint plunger and remove from rail. Repeat with opposite unit.
8. The front straps should now be removed, please refer to the appropriate user instructions.
24
Comfort Clip
25
26


