background image

TABLE OF CONTENTS

Alarm Technology & Key Product Features

   .  .  .  .  .  .  .  .  .  .  .  .  .  .  .  .  .  .  .  .  .  .  .  .  .  .2

Alarm Limitations and Functions

   .  .  .  .  .  .  .  .  .  .  .  .  .  .  .  .  .  .  .  .  .  .  .  .  .  .  .  .  .  .  .  .  .  .  .2

Installation Instructions

   .  .  .  .  .  .  .  .  .  .  .  .  .  .  .  .  .  .  .  .  .  .  .  .  .  .  .  .  .  .  .  .  .  .  .  .  .  .  .  .  .  .  .3


Where This Alarm Should Be Installed    .  .  .  .  .  .  .  .  .  .  .  .  .  .  .  .  .  .  .  .  .  .  .3


Where This Alarm Should Not Be Installed   .  .  .  .  .  .  .  .  .  .  .  .  .  .  .  .  .  .  .  .5


Mounting Instructions   .  .  .  .  .  .  .  .  .  .  .  .  .  .  .  .  .  .  .  .  .  .  .  .  .  .  .  .  .  .  .  .  .  .  .  .  .6


Tamper Resistant Alarm Locking Feature   .  .  .  .  .  .  .  .  .  .  .  .  .  .  .  .  .  .  .  .  . 6 

Industry & Agency Recommendations 

   .  .  .  .  .  .  .  .  .  .  .  .  .  .  .  .  .  .  .  .  .  .  .  .  .  .  .  .  .  .7

Alarm Operation 

   .  .  .  .  .  .  .  .  .  .  .  .  .  .  .  .  .  .  .  .  .  .  .  .  .  .  .  .  .  .  .  .  .  .  .  .  .  .  .  .  .  .  .  .  .  .  .  .  .7


Normal Operation    .  .  .  .  .  .  .  .  .  .  .  .  .  .  .  .  .  .  .  .  .  .  .  .  .  .  .  .  .  .  .  .  .  .  .  .  .  .  .7


Trouble Signal    .  .  .  .  .  .  .  .  .  .  .  .  .  .  .  .  .  .  .  .  .  .  .  .  .  .  .  .  .  .  .  .  .  .  .  .  .  .  .  .  .  .7


Alarm Reset   .  .  .  .  .  .  .  .  .  .  .  .  .  .  .  .  .  .  .  .  .  .  .  .  .  .  .  .  .  .  .  .  .  .  .  .  .  .  .  .  .  .  .  .8


Quick Find®  Alarm Origination   .  .  .  .  .  .  .  .  .  .  .  .  .  .  .  .  .  .  .  .  .  .  .  .  .  .  .  .  .8


Silence Feature    .  .  .  .  .  .  .  .  .  .  .  .  .  .  .  .  .  .  .  .  .  .  .  .  .  .  .  .  .  .  .  .  .  .  .  .  .  .  .  .  .9


Testing Instructions  .  .  .  .  .  .  .  .  .  .  .  .  .  .  .  .  .  .  .  .  .  .  .  .  .  .  .  .  .  .  .  .  .  .  .  .  .  .  .9

Alarm & Battery Deactivation 

   .  .  .  .  .  .  .  .  .  .  .  .  .  .  .  .  .  .  .  .  .  .  .  .  .  .  .  .  .  .  .  .  .  .  .  .  .  .9

What To Do If Alarm Sounds—Carbon Monoxide Detected

   .  .  .  .  .  .  .  .  .  .  .  .10


What You Should Know about Carbon Monoxide  .  .  .  .  .  .  .  .  .  .  .  .  .  .10


Symptoms of CO   .  .  .  .  .  .  .  .  .  .  .  .  .  .  .  .  .  .  .  .  .  .  .  .  .  .  .  .  .  .  .  .  .  .  .  .  .  .  .10


Required CO Alarm Levels  .  .  .  .  .  .  .  .  .  .  .  .  .  .  .  .  .  .  .  .  .  .  .  .  .  .  .  .  .  .  .  .10


Response to CO Alarm Sounding   .  .  .  .  .  .  .  .  .  .  .  .  .  .  .  .  .  .  .  .  .  .  .  .  .  .10


Potential Sources of CO  .  .  .  .  .  .  .  .  .  .  .  .  .  .  .  .  .  .  .  .  .  .  .  .  .  .  .  .  .  .  .  .  .  . 11

What To Do If Alarm Sounds—Smoke Detected

   .  .  .  .  .  .  .  .  .  .  .  .  .  .  .  .  .  .  .  .  .  .12


How Can I Protect My Family from Fire    .  .  .  .  .  .  .  .  .  .  .  .  .  .  .  .  .  .  .  .  .12


Develop An Escape Plan   .  .  .  .  .  .  .  .  .  .  .  .  .  .  .  .  .  .  .  .  .  .  .  .  .  .  .  .  .  .  .  .  .12

Quick Reference Guide

   .  .  .  .  .  .  .  .  .  .  .  .  .  .  .  .  .  .  .  .  .  .  .  .  .  .  .  .  .  .  .  .  .  .  .  .  .  .  .  .  .  .13


Troubleshooting Information    .  .  .  .  .  .  .  .  .  .  .  .  .  .  .  .  .  .  .  .  .  .  .  .  .  .  .  .  .  .13

Warranty 


Alarm Returns    .  .  .  .  .  .  .  .  .  .  .  .  .  .  .  .  .  .  .  .  .  .  .  .  .  .  .  .  .  .  .  .  .  .  .  .  .  .  .  .  .15


Repairs and Service    .  .  .  .  .  .  .  .  .  .  .  .  .  .  .  .  .  .  .  .  .  .  .  .  .  .  .  .  .  .  .  .  .  .  .  .15


Regular Maintenance   .  .  .  .  .  .  .  .  .  .  .  .  .  .  .  .  .  .  .  .  .  .  .  .  .  .  .  .  .  .  .  .  .  .  .  .15

PLEASE READ AND SAVE!

THANK YOU for purchasing this 3-in-1 Photoelectric Smoke + Fire + Carbon Monoxide 
Smart Alarm . This tamper-proof alarm does not require battery changes .  This alarm 
contains a 10 year permanent power sealed battery to provide continuous protection-
-even in the event of a power outage .  The sealed battery will last for approximately 10 
years . This manual includes important information regarding where to install the alarm, 
how to operate, maintenance, testing and product features . It also includes tips and 
information which could help protect you and your family .

MODEL 

MPC322S

Содержание MPC322S

Страница 1: ...tential Sources of CO 11 What To Do If Alarm Sounds Smoke Detected 12 How Can I Protect My Family from Fire 12 Develop An Escape Plan 12 Quick Reference Guide 13 Troubleshooting Information 13 Warrant...

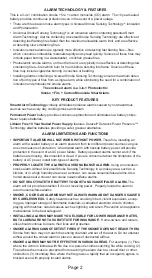
Страница 2: ...Therefore installing an alarm with a sealed battery or an alarm powered from two different power sources can give an extra measure of protection A hardwired alarm with backup battery power will provi...

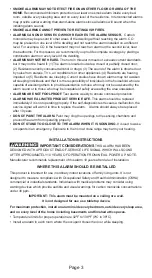
Страница 3: ...ssisted ALARMS ARE NOT FOOLPROOF Test alarms weekly to ensure continued protection ALARMS HAVE A LIMITED PRODUCT SERVICE LIFE This alarm should be replaced immediately if it is not operating properly...

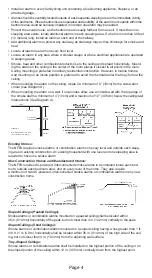
Страница 4: ...on a wall if local codes allow use an inside wall with the top edge of the smoke alarm a minimum of 4 10cm and a maximum of 12 30 5cm below the ceiling wall intersections See Diagram A Page 4 Ceiling...

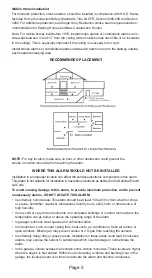
Страница 5: ...s not suitable for installation in hazardous locations as defined in the National Electri cal Code To avoid causing damage to this alarm to provide maximum protection and to prevent unnecessary alarms...

Страница 6: ...above situations These placement recommendations are intended to keep alarms at a reasonable distance from a fuel burning source and reduce unwanted nuisance alarms Nuisance alarms may occur if an al...

Страница 7: ...ntial board and care occupancy small facility including base ments and excluding crawl spaces and unfinished attics 5 In the living area s of a guest suite 6 In the living area s of a residential boar...

Страница 8: ...rm do not use the Silence feature until the source of the alarm has been identified and safe conditions exist The Silence feature is intended to temporarily silence the horn while identifying and corr...

Страница 9: ...alarm ALARM AND BATTERY DEACTIVATION This alarm uses a sealed battery for power The battery should last for approximately 10 years under normal operating conditions Deactivation of the alarm is perman...

Страница 10: ...m to stop a nuisance alarm Doing so will disable the alarm and remove the protection In the case of a true unwanted alarm use the silence feature The silence feature is intended to temporarily silence...

Страница 11: ...pe connections improperly designed or becoming loose Improper use of appliances by operating a barbeque grill using charcoal gas or wood pel lets hibachi in an enclosed area such as a garage or screen...

Страница 12: ...our home when they hear the sound Identify children s bedrooms with red stickers placed in the upper left corner of the windows They are available from your local fire department Practice a fire drill...

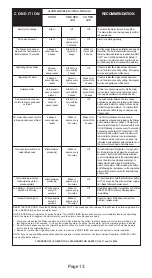
Страница 13: ...tions if an alarm sounds by calling Emergency Service and getting out of the home Nuisance alarm Horn sounds when no hazard present Blinks On in sync with the 3 beeps Blinks On in sync with the 4 bee...

Страница 14: ...Page 14...

Страница 15: ...roduct created by state law shall extend beyond the term of this warranty unless such law otherwise provides USI specifically disclaims any liability and shall not be liable for any consequential or i...

Отзывы: