background image

Troubleshooting

17

Troubleshooting the Heating Circuit

If the heater is non-operational or the unit is not heating properly, re-check 
that the code settings have been programmed correctly for the hot tub’s 
heating con

fi

 guration. If programmed correctly, the heating circuit should 

be tested.

Testing the Heating Element

To test the heating element, you must 

fi

 rst make sure the topside is calling 

for heat (The display should be 

fl

 ashing the heat message - HEt). Then 

place one probe of your voltmeter/multi-meter on Testing Point 11 (Heater 
Line-1), and the other on Testing Point 9 (Heater Line-2). You should get a 
voltage reading equal to the control box’s incoming power voltage (240VAC 
or 120VAC). If that is the case, but the water is not getting heated, then the 
heating element has failed/burnt-out/dry-

fi

 red.

If the voltage reading was not equal to the incoming power voltage, then 
proceed with checking the heater relays.

Testing the Heating Relays

Place one probe of your voltmeter/multi-meter on Line-1 (Test Point 1), and 
the other on Test Point 9 (Heater Line-2). You should get a voltage reading 
equal to the control box’s incoming power voltage (240VAC or 120VAC). If 
that is the case, proceed to the next test. If you read no voltage, however, 
then the K10 relay has failed.

If the K10 relay checks out, place one probe of your voltmeter/multi-meter 
on Line 2 (Test Point 2) and the other on Test Point 10 (T18/Gas Terminal). 
You should get a voltage reading equal to the control box’s incoming power 
voltage (240VAC or 120VAC). If that is the case, proceed to the next test. If 
you read no voltage, however, then the K1 relay has failed.

If the K1 relay checks out, place one probe of your voltmeter/multi-meter 
on Line 2 (Test Point 2) and the other on Test Point 11 (Heater Line-1). You 
should get a voltage reading equal to the control box’s incoming power 
voltage (240VAC or 120VAC). If you read no voltage, then the K9 relay 
has failed.

Содержание C5 Series

Страница 1: ......

Страница 2: ...ill expose dangerous voltage points and other serious risks Non qualified users should not attempt to make changes to the topside s programming as mis programming can result in malfunction or possible...

Страница 3: ...llation 3 Wire No Neutral 6 Control Box Installation 7 Finishing Installation 9 Troubleshooting 10 Important Troubleshooting Information 10 Incoming Voltage 11 Troubleshooting Test Points 13 Transform...

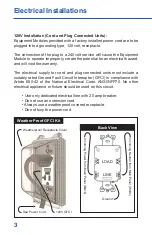
Страница 4: ...ply for cord and plug connected units must include a suitably rated Ground Fault Circuit Interrupter GFCI in compliance with Article 680 42 of the National Electrical Code ANSI NFP70 No other electric...

Страница 5: ...Modules installed for 120 volt operation require a two wire electrical service plus ground Line 1 black Neutral white and Ground green The disconnecting means must be readily accessible to the tub occ...

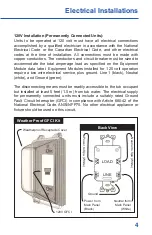
Страница 6: ...ervice plus ground Line 1 black Line 2 red Neutral white and Ground green The disconnecting means must be readily accessible to the tub occupant but installed at least 5 feet 1 5 m from tub water The...

Страница 7: ...wire electrical service plus ground Line 1 black Line 2 red and Ground green The disconnecting means must be readily accessible to the tub occupant but installed at least 5 feet 1 5 m from tub water T...

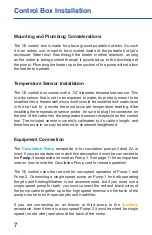
Страница 8: ...perature sensor receptacle on the control box The included sensor is carefully calibrated to it s cable s length and therefore must in no way be altered or shortened lengthened Equipment Connection Th...

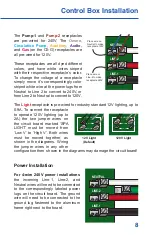
Страница 9: ...acle to operate 120V lighting up to 2A the two jumper wires on the circuit board marked SPA LIGHT must be moved from Low V to High V Both wires must be moved together as shown in the diagrams Wiring t...

Страница 10: ...eed to be swapped out with it s 120V equivalent The incoming Line 1 and Neutral wires will need to be connected to the correspondingly labeled power lugs on the circuit board The incoming Neutral will...

Страница 11: ...ur multi meter or voltmeter to DC Volts when testing the IC Regulator Chip Once you ve completed the incoming voltage and transformer voltage checks as outlined on the next few pages you can proceed w...

Страница 12: ...Incoming Power 240VAC Range of acceptability 216VAC to 264VAC should be read between Line 2 and Line 1 and between Neutral and Line 1 NEUTRAL LINE 2 LINE 1 NEUTRAL LINE 2 LINE 1 Neutral and Line 1 240...

Страница 13: ...t boards s glass fuse should be tested next By testing the incoming voltage and the power to the board the transformer and glass fuse you can proceed with further troubleshooting without possibly miss...

Страница 14: ...Neutral 20 Incoming Line 2 30 Incoming Line 1 40 20A Fuse F1 50 20A Fuse F2 60 20A Fuse F3 70 2A Glass Fuse F4 80 Transformer Receptacle 90 Heater Line 2 10 T18 Gas Terminal 11 Heater Line 1 12 IC Reg...

Страница 15: ...ss Fuse Testing Point 7 should be checked next If the incoming voltage checks out proceed to test the output voltage 12VAC Range of acceptability 12VAC to 14VAC should be read between yellow wires If...

Страница 16: ...ectifier marked BR1 on the board has failed and needs to be replaced Next leaving one probe on the mounting nut move the other probe to the LEFT most pin coming out of the top of the chip You should g...

Страница 17: ...ove the other probe to the LEFT fuse clip You should again get a voltage reading equal to the incoming power voltage if you do not then the fuse has blown and needs replacing Checking the Output Volta...

Страница 18: ...power voltage then proceed with checking the heater relays Testing the Heating Relays Place one probe of your voltmeter multi meter on Line 1 Test Point 1 and the other on Test Point 9 Heater Line 2...

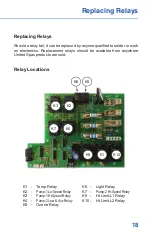
Страница 19: ...ics Replacement relays should be available from anywhere United Spas products are sold Relay Locations K3 K10 Temp Relay K20 Pump 1 Lo Speed Relay K30 Pump 1 Hi Speed Relay K40 Pump 2 Low Aux Relay K5...

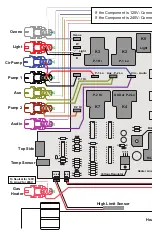
Страница 20: ...nsor Ozone Gas Heater To Neutral for 120V To Line 2 for 240V If the Component is 120V Conne If the Component is 240V Conne Heater Line Hi L K2 K3 K4 K7 P 1 Hi P 1 Lo AUX or P 2 Lo P 2 Hi P 2 Hi Aux P...

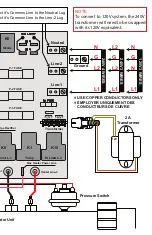
Страница 21: ...E N G L2 L1 240V 3 WIRES L2 G L2 L1 N G N L1 NOTE To convert to 120V system the 240V transformer will need to be swapped with its 120V equivalent P 3 FUSE P 2 FUSE P 1 FUSE ct it s Common Line to the...

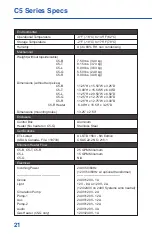
Страница 22: ...3 kg 5 50 lbs 2 49 kg 9 00 lbs 4 08 kg 11 25 H x 15 50 W x 3 25 D 13 00 H x 15 50 W x 6 00 D 11 25 H x 20 50 W x 6 50 D 11 25 H x 12 75 W x 3 00 D 11 25 H x 12 75 W x 3 00 D 6 00 H x 15 50 x 3 25 D 13...

Отзывы: