United States Stove HOTBLAST 1300 Скачать руководство пользователя страница 17

CAUTION

GASES THAT ARE DRIVEN FROM FRESH
COAL MUST BE BURNED OR THEY WILL
ACCUMULATE AND EXPLODE.  NEVER
SMOTHER A FIRE WHEN ADDING FRESH
COAL.

CAUTION

DO NOT OPERATE WITH THE FEED AND/OR
ASH DOOR OPEN.  THIS FURNACE IS DE-
SIGNED FOR THERMOSTATIC OPERATION.
OPERATION WITH ANY OF THESE DOORS
OPEN WILL OVERHEAT AND DAMAGE THE
FURNACE.

CAUTION

NEVER USE GASOLINE, GASOLINE-TYPE
LANTERN FUEL, KEROSENE, CHARCOAL
LIGHTER FLUID, OR FLAMMABLE LIQUIDS
TO START OR "FRESHEN UP" A FIRE IN THE
FURNACE.

WARNING

NEVER STORE FLAMMABLE LIQUIDS, ES-
PECIALLY GASOLINE, IN THE VICINITY OF
THE FURNACE.

ADJUSTING BLOWER LIMIT CONTROL SET-
TINGS.
The temperature in the plenum of the warm air
furnace at which the blower turns on or turns off,
is controlled by the setting of the pointers in the
blower limit control.  These pointers may be ad-
justed through their entire range of settings to
achieve the desired warm air output from furnace.
(See Fig. 16 below)

Operating Instructions

FUEL, Model 1300
Egg size (1-3/16" or larger) bituminous coal
for residential furnaces, or any of the specially
packed fireplace coals can be used.  Coal with a
low ash content (2% to 6%) is recommended.
FUEL, Model 1400
Hardwood, 18" to 26" should be split and air dried
(seasoned) for 6 months.
LIGHTING
1.

2.

3.
4.

5.

Set the thermostat on "HIGH" for maximum
draft.
Open the feed door and place paper and
kindling on the grate for starting the fire.
Light the fire and close the feed door.
Add wood or about 15 lbs. of coal (depending
on which model) after fire is burning briskly.
Set thermostat for desired temperature.
"MEDIUM" setting is normally satisfactory.
Set higher or lower for your comfort.

ADDING FUEL
When starting a fire, add small amounts of fuel
instead of adding large quantities of fuel.  This will
give more complete combustion and less buildup
of tars or soot in the chimney.

Set thermostat to HIGH before opening feed
door.
Wood fire - Model 1400.
Add wood to a convenient level.
Coal Fire - Model 1300.
Never smother the fire when adding coal (See
Caution).  Gas accumulation and a mild smoky
explosion will occur.  Add fresh kindling if the
bed of coals has cooled.
Add up to 20 lbs. of coal per loading.  Never add
coal above the bottom of feed door opening.
Stir the coal and watch the fire.  Be sure the
new coal is burning briskly before you close
the doors and turn the thermostat down

.

Shake grates vigorously 1/2" left to right to spill
ashes into the ash pan.  Do this at least once
every 12 hours of operation.  Empty ash pan
regularly.  Do not allow ashes to buildup to
grate as grate will warp and burnout, and you
might spill the ashes when removing the pan.
Dispose of hot ashes properly (See note 12 on
page 4).
Rotation of the handle (5 o'clock to 7 o'clock)
position will agitate coals and spill ashes into
ash pan.
It is advisable for you to get familiar with the
shaker grate operation before firing.

1.

2.

3.
  a.

  b.

  c.

  d.

  e.

  f.

Move both pointers towards the right (counter
clockwise) - this increases the temperature
setting at which the blower will turn on and off.
Move both pointers towards the left (clock-
wise) - this decreases the temperature setting
at which the blower will turn on and off.
Move pointers away or apart from each other-
this increases the time that the blower will run
on each warm air cycle.

BLOWER FAN
"OFF" POINTER

BLOWER FAN
"ON" POINTER

BLOWER LIMIT
POINTER & STOP

17

Fig. 16

Содержание HOTBLAST 1300

Страница 1: ...HE FURNACE IMPROPER INSTALLATION MAY VOID YOUR WARRANTY DO NOT USE THIS FURNACE IN A MOBILE HOME OR TRAILER UNITED STATES STOVE COMPANY 227 Industrial Park Road P O Box 151 South Pittsburg TN 37380 42...

Страница 2: ...il 6 Foot Folding Rule or Tape Tin Snips Drill Hand or Electric Drill Bit 1 8 Dia For Sheet Metal Screws Screw Driver Blade Type Gloves Sabre Saw 5 16 Nut Driver or 5 16 Socket w Ratchet MATERIAL 6 Pi...

Страница 3: ..._______________________ INSPECT FLUE PIPES FLUE PIPE JOINTS AND FLUE PIPE SEALS REGULARLY TO ENSURE THAT SMOKE AND FLUE GASES ARE NOT DRAWN INTO AND CIRCULATED BY THE AIR CIRCULATION SYSTEM 3 CAUTION...

Страница 4: ...ce who is unfamiliar with the correct operation of the furnace 10 For further information on using your furnace safely obtain a copy of the National Fire Protection Association NFPA publication Chimne...

Страница 5: ...LATION As a central furnace the unit functions indepen dently of any other system The blower will come on when the plenum temperature reaches the setting on the blower control PARALLEL INSTALLATION U...

Страница 6: ...24 7 8 1 3 4 9 33 7 8 41 21 1 32 40 11 16 32 1 8 1 3 4 9 33 7 8 49 1 8 24 1 16 40 11 16 Figure 1A 1300 Figure 1B 1400 1500 DIMENSIONS OF FURNACE 6 Figure 1B 1400 Figure 1A 1300...

Страница 7: ...ipe to sidewall 18 460mm Chimney connector pipe to backwall 18 460mm Hot air ducts to combustibles 6 150mm Refer to Fig 2 3 Place the furnace on a noncombus tible floor Check figures 2 and 3 Be sure y...

Страница 8: ...N COMBUSTIBLE WALL Chimney Connection Fig 4 MASONRY CHIMNEY Before using an existing masonry chimney clean the chimney and inspect the flue liner to be sure it is safe to use Make repairs before attac...

Страница 9: ...ulator must be installed in the same room same pressure zone as the furnace 8 Install the barometric draft regulator strictly in accordance with the instructions that are provided with the barometric...

Страница 10: ...connected to a masonry chimney by passing through a combustible wall NFPA Standard 211 allows the following wall pass through systems FIGURE 8 CONNECTION OF CHIMNEY CONNECTORTO A MA SONRY CHIMNEYTHRO...

Страница 11: ...y means of sheet steel support plates on both ends of the chimney section The opening in the combustible wall shall be covered and the chimney section supported on both sides with sheet steel supports...

Страница 12: ...UPPORTS 24 GAUGE MIN THICKNESS CHIMNEY FLUE MINIMUM CHIMNEY CLEARANCES FROM MASONRY TO SHEET STEEL SUPPORTS AND COMBUSTIBLES 2 IN CONNECTION OF CHIMNEY CONNECTORTO A MASONRY CHIMNEYWHEN CHIMNEY CONNEC...

Страница 13: ...th screws and nuts provided Note Slotted holes are for adjustment of handle Adjust handle until some pres sure is required to lock feed door during firing sequence Install Honeywell Fan Limit Control...

Страница 14: ...B W 110 VAC 60 HZ GROUND G B W ELECTRICAL JUNCTION BOX M1 M2 M1 M2 BLOWER MOTOR BLOWER MOTOR WIRE NUT 7 PLACES IMPORTANT POWER SUPPLY WIRING MUST NOT BE LESS THAN 90 CENTIGRADE WIRE COLOR CODE G GREE...

Страница 15: ...iagram Fig 12 or 13 Do not make connections across Limit Control in the furnace Make electrical wire connections in accordance with NFPA Standard No 70 and local codes in the power supply junction box...

Страница 16: ...home at normal temperatures 3 Do not load fuel above bottom of feed door TO GAS OIL ELECTRIC TRANSFORMER AND COMBUSTION FAN OF SOLID FUEL UNIT H N POWER SUPPLY FURNACE BLOWER MOTOR FAN LIMIT COMBINAT...

Страница 17: ...DIUM setting is normally satisfactory Set higher or lower for your comfort ADDING FUEL When starting a fire add small amounts of fuel instead of adding large quantities of fuel This will give more com...

Страница 18: ...ge 29 for list of trouble shooting tips 5 6 A draft reading of 05 to 06 w c is suggested for proper burning of this unit when using wood or bituminous coal as fuel When using anthracite coal this draf...

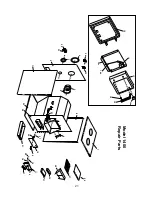
Страница 19: ...19 Model 1300 Repair Parts 9 11 7 8 3 1 2 23 24 22 21 20 17 18 35 33 32 31 29 28 27 26 19 25 34 6 30 10 4 5 30 14a 16 15 13 12 38 36 37 14 14c 14b...

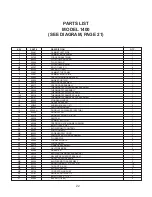
Страница 20: ...CONDUIT ASSEMBLY CORD STRAIN RELIEF BLOWER LIMIT CONTROL JUNCTION BOX POWER SUPPLY CORD FLUE BAFFLE SHAKER GRATE SHAKER FRAME SHAKER HANDLE FRONT AND REAR LINER FIREBOX ASSEMBLY FIREBRICK BLOWER THER...

Страница 21: ...21 9 11 7 8 3 1 2 23 24 22 21 20 17 18 35 33 32 31 29 28 27 26 19 25 34 6 30 10 4 5 36 37 Model 1400 Repair Parts 14a 16 15 13 12 14 14c 14b...

Страница 22: ...FLUEBAFFLE FURNACEGRATE FRONTLINER FIREBOXASSEMBLY HALF FIREBRICK FIREBRICK BLOWERTHERMOSTATBRACKET RELAYBOXSUPPORTBRACKET DRAFTCONTROLKNOB BLOWERMOTORASSEMBLY MOUNTING BOLT 1 4 20 X 3 4 CLIPNUT 1 4 2...

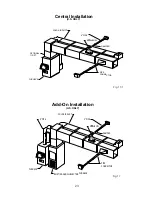
Страница 23: ...ONAL 11 RPT 90 ELBOW FURNACE PIPE CONNECTOR Central Installation Fig 16 1 U S ONLY Add On Installation COLD AIR DUCT 6 PIPE DAMPER 90 ELBOW FURNACE PIPE CONNECTOR EXISTING GAS OIL ELECTRIC FURNACE 8 P...

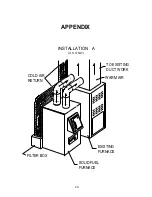
Страница 24: ...COLD AIR RETURN TO EXISTING DUCT WORK WARM AIR EXISTING FURNACE SOLID FUEL FURNACE FILTER BOX APPENDIX INSTALLATION A 24 U S ONLY...

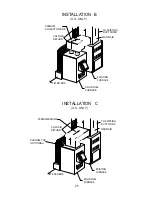
Страница 25: ...RN TO EXISTING DUCT WORK WARM AIR EXISTING FURNACE SOLID FUEL FURNACE FILTER BOX PLENUM COLLECTOR BOX COLD AIR RETURN TO EXISTING DUCT WORK WARM AIR EXISTING FURNACE SOLID FUEL FURNACE FILTER BOX PLEN...

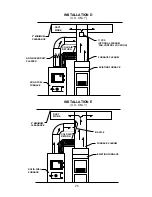
Страница 26: ...CONTROL LOCATION FURNACE PLENUM EXISTING FURNACE ANTI BACKDRAFT FLAPPER SOLID FUEL FURNACE COLD AIR RETURN INSTALLATION D 2 MINIMUM CLEARANCE DUCT WORK FURNACE PLENUM EXISTING FURNACE SOLID FUEL FURN...

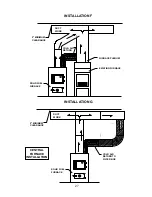
Страница 27: ...DUCT WORK FURNACE PLENUM EXISTING FURNACE SOLID FUEL FURNACE COLD AIR RETURN INSTALLATION F 2 MINIMUM CLEARANCE DUCT WORK SOLID FUEL FURNACE INSTALLATION G COLD AIR RETURN TO FILTER BOX CENTRAL FURNA...

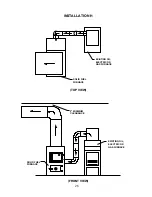
Страница 28: ...26 2 MINIMUM CLEARANCE EXISTING OIL ELECTRIC OR GAS FURNACE SOLID FUEL FURNACE INSTALLATION H EXISTING OIL ELECTRIC OR GAS FURNACE SOLID FUEL FURNACE TOP VIEW FRONT VIEW...

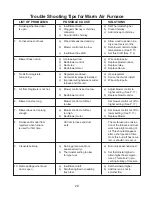
Страница 29: ...See P 17 b Bad blower control b Replaceblowercontrol 6 Blower runs too long Blower control cut off set Set blower control cut off to too low higher setting See P 17 7 Blower does not run long a Blower...

Страница 30: ...NOTES 30...

Страница 31: ...NOTES 31...

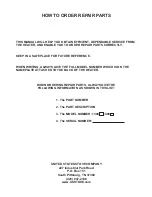
Страница 32: ...WRITING ALWAYS GIVE THE FULL MODEL NUMBER WHICH IS ON THE NAMEPLATE ATTACHED TO THE BACK OF THE HEATER WHEN ORDERING REPAIR PARTS ALWAYS GIVE THE FOLLOWING INFORMATION AS SHOWN IN THIS LIST 1 The PART...

Отзывы: