background image

Provide adequate cross ventilation to clear any smoke or 

odor caused by initial firings.

Notice: Use solid wood fuel only! Do not burn garbage, 

or flammable fluids. Do not use coal. This appliance 

is not designed to accommodate the air flow (draft) 

required to properly burn coal or coal products. Do 

not elevate the fire using grates or irons. Build the fire 

directly on the firebrick.

FUELING INSTRUCTIONS

This wood stove has been certified by the US EPA 

to meet strict 2020 guidelines. To ensure this unit 

produces the optimal minimum emissions it is critical 

that only well-seasoned cordwood is burned (see the 

“Fuel Recommendations” section of this manual). 

Burning unseasoned wet wood only hurts your stoves 

efficiency and leads to accelerated creosote buildup in 

your chimney. Be considerate of the environment and 

only burn dry wood.

CAUTION:

DO NOT LEAVE APPLIANCE UNATTENDED THE 

WITH DOOR OPEN.

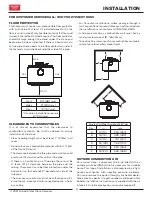
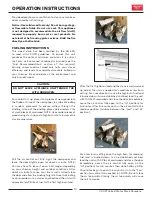
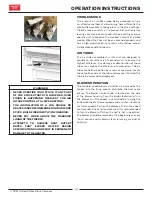
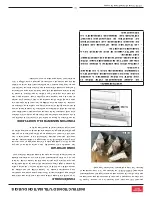
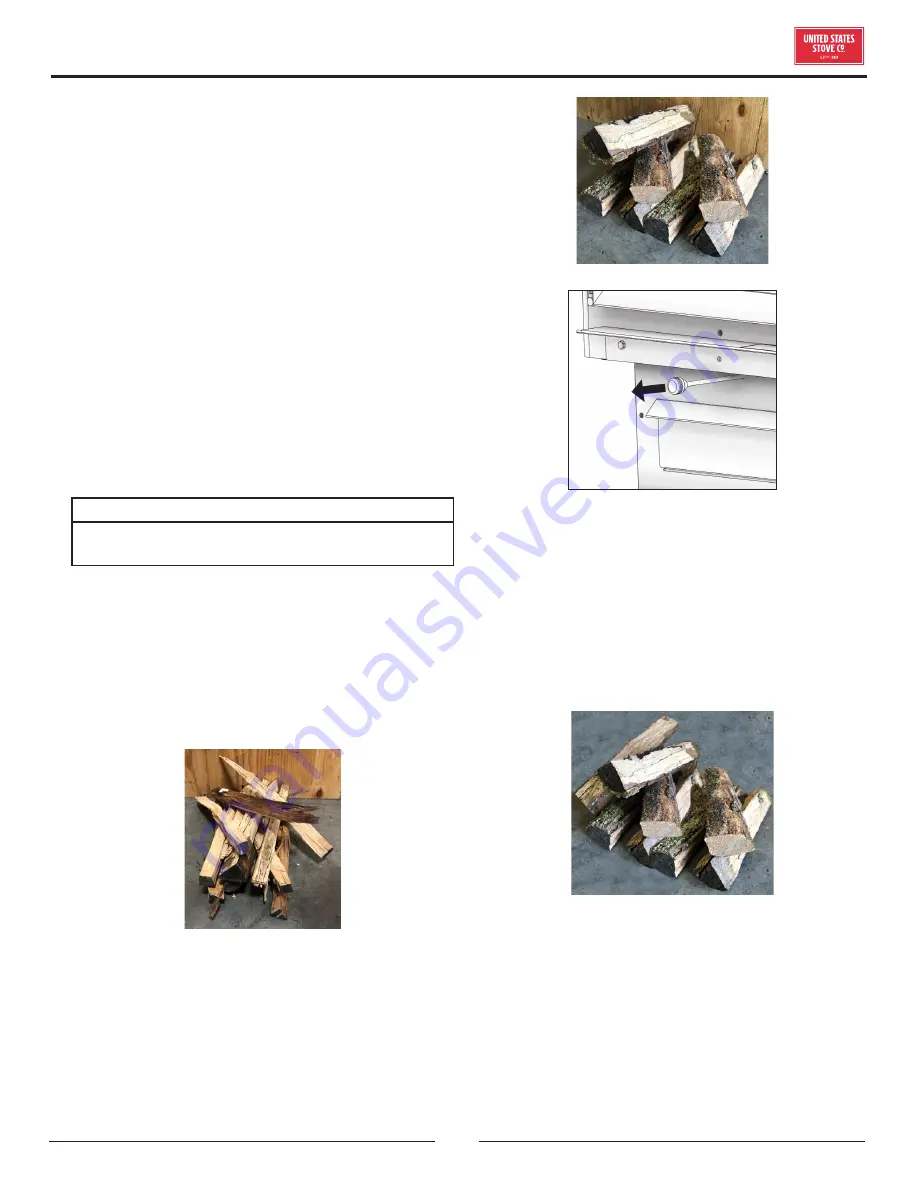
For a cold start-up, place 4 to 5 pieces of newspaper into 

the firebox. On top of the newspaper, lay 4 lbs of kindling 

in random placement to ensure airflow through the 

kindling. On top of the kindling, place approximately 7 lbs 

of small pieces of cordwood. NOTE: Use smaller pieces of 

wood during start-up and a high burn rate to increase the 

stove temperature.

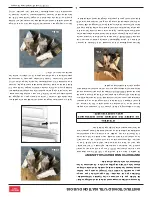
7 lb

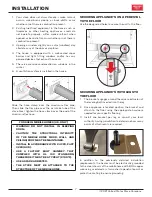
Pull the air control out fully. Light the newspaper and 

leave the door slightly open for about a minute. NOTE: 

You may have to leave it open a bit longer, depending 

on your chimney height and outdoor conditions. After 

about a minute (or once your fire is well started) close 

the door and allow the kindling to ignite. Once the kindling 

has burned down to a starter coal bed, load the unit with 

approximately 29 lbs of fuel for the first high burn load.

29 lbs

HIGH

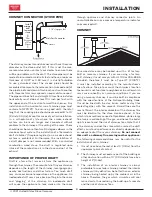
After the first high burn load and the stove is well warmed 

up, adjust the unit as needed for a medium or low burn 

setting. For a medium burn, once the high burn fuel load 

is burned down to an established coal bed, load the unit 

with 34 lbs of cordwood and close the door immediately. 

Leave the air control fully open (in the “HI” position) for 

5 minutes. After 5 minutes push in the air control to the 

medium position (midway between the “Low” and “Hi” 

position).

34 lbs

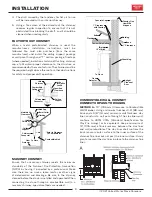
For a low burn setting once the high burn (or medium) 

fuel load is burned down to an established coal bed, 

load the unit with 32 lbs of cordwood and close the door 

immediately. Leave the air control fully open (in the 

“HI” position) for 4.5 minutes then close halfway. After 

15 minutes begin to push the air control in to the “Low” 

postion (air control fully pushed in). NOTE: Do not close 

the air too quickly. Closing the air too quickly will cause 

the unit to smoke.

OPERATION INSTRUCTIONS

© 2021 United States Stove Company

13

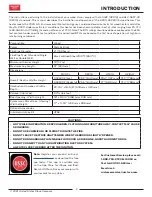
Содержание US2500E-P

Страница 1: ...installation requirements in your area NEVER OPERATE THIS PRODUCT WHILE UNATTENDED CAUTION Please read this entire manual before you install or use your new room heater Failure to follow instructions may result in property damage bodily injury or even death Improper Installation Will Void Your Warranty Save These Instructions In A Safe Place For Future Reference CALIFORNIAPROPOSITION65WARNING This...

Страница 2: ...od heaters sold after May 15 2020 Under specific test conditions this heater has been shown to deliver heat at rates ranging from 20 374 to 60 065 Btu hr 0 88 g hr and an efficiency of 73 Note The BTU ratings mentioned above are based on the EPA test protocol under specific test conditions Our advertised BTU s are based on the first hour of operation at high burn rate burning cordwood CAUTIONS HOT...

Страница 3: ...______ If no Date of inspection of the existing chimney system ___________________________________________________________ COMMISSIONING Confirm Hearth Pad Installation as per Installation Instructions Confirm proper placement of internal parts Check soundness of door gasket and door seals Confirm clearances to combustibles as per installation instructions in this manual Check the operations of th...

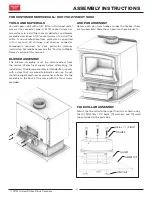
Страница 4: ... from the source of electrical supply before attempting the installation The blower assembly is intended for use only with a stove that is marked to indicate such use Do not route the supply cord near or across hot surfaces Fix the assembly to the back of the stove with the four screws provided ASH PAN ASSEMBLY Remove ash pan from firebox Under the firebox there are two brackets Slide the ash pan ...

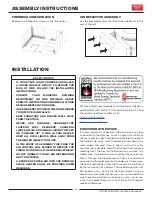
Страница 5: ...HEN REQUIRED US Stove highly recommends your stove be installed by a qualified NFI US or WETT Canada technician To find the nearest qualified installer go to https nficertified org https www wettinc ca POSITIONING THE STOVE It is very important to position the wood stove as close as possible to the chimney and in an area that will favor the most efficient heat distribution possible throughout the ...

Страница 6: ...he ceiling There also has to be floor protection under the horizontal run that extends 2 beyond each side of the flue pipe The chimney connector must not pass through an attic or roof space closet or similar concealed space a floor or a ceiling For Canadian installations where passage through a wall or partition of combustible construction is desired the installation must conform to CAN CSA B365 A...

Страница 7: ...ON THE STRUCTURAL INTEGRITY OF THE MOBILE HOME FLOOR WALL AND CEILING ROOF MUST BE MAINTAINED INSTALL IN ACCORDANCE WITH 24 CFR PART 3280 HUD USE A FACTORY BUILT CHIMNEY THAT COMPLIES WITH UL 103 STANDARDS THEREFORE IT MUST BE A TYPE HT 2100 F USE A SPARK ARRESTER THE STOVE MUST BE ATTACHED TO THE STRUCTURE OF THE MOBILE HOME SECURING APPLIANCE S ON A PEDESTAL TO THE FLOOR Use the designated holes...

Страница 8: ...inadequate draft may cause back puffing into the room and plugging of the chimney An inadequate draft will cause the appliance to leak smoke into the room through appliance and chimney connector joints An uncontrollable burn or excessive temperature indicates an excessive draft CHIMNEY Your wood stove may be hooked up with a 6 factory built or masonry chimney If you are using a factory built chimn...

Страница 9: ...SONRY CHIMNEY Ensure that a masonry chimney meets the minimum standards of the National Fire Protection Association NFPA by having it inspected by a professional Make sure there are no cracks loose mortar or other signs of deterioration and blockage Be sure to the chimney cleaned before the stove is installed and operated When connecting the stove through a combustible wall to a masonry chimney sp...

Страница 10: ...l support Maintain the 6 153 mm space There should also be a support sized to fit and hold the metal chimney connector See that the supports are fastened securely to wall surfaces on all sides Make sure fasteners used to secure the metal chimney connector do not penetrate chimney flue liner METHOD D 2 51 mm Clearance to Combustible Wall Member Start with a solid pak listed factory built chimney se...

Страница 11: ...have better energy yields than others Higher efficiencies and lower emissions generally result when burning air dried seasoned hardwoods as compared to softwoods or too green or freshly cut hardwoods The following resources can assist in learning the burn characteristics of various species of wood http firewoodresource com firewood btu ratings or https forestry usu edu forest products wood heating...

Страница 12: ...ds from the time it was placed in the stove your wood is correctly dried If ignition takes longer your wood is damp If your wood hisses and water or vapor escapes at the ends of the piece your wood is soaked or freshly cut green Do not use this wood in your stove Large amounts of creosote could be deposited in your chimney creating potential conditions for a chimney fire TAMPER WARNING This wood h...

Страница 13: ...erature 7 lb Pull the air control out fully Light the newspaper and leave the door slightly open for about a minute NOTE You may have to leave it open a bit longer depending on your chimney height and outdoor conditions After about a minute or once your fire is well started close the door and allow the kindling to ignite Once the kindling has burned down to a starter coal bed load the unit with ap...

Страница 14: ...cess visible smoke and burn poorly AIR TUBES The air tubes assembled in this unit are designed to provide an accurate mix of secondary air to ensure the highest efficiency Any damage or deterioration of these tubes may reduce the efficiency of combustion The air tubes are held in position by screws or snap pins Locate these to either side of the tube and remove it to allow the tube to be removed a...

Страница 15: ...re TO PREVENT CREOSOTE BUILD UP Always burn dry wood This allows clean burns and higher chimney temperatures therefore less creosote deposit Leave the air control fully open for about 5 min every time you reload the stove to bring it back to proper operating temperatures The secondary combustion can only take place if the firebox is hot enough Always check for creosote deposit once every two month...

Страница 16: ...hould be washed only when cold GASKET CARE WARNING NEVER OPERATE THE STOVE WITHOUT A GASKET OR WITH A BROKEN ONE DAMAGE TO THE STOVE OR EVEN HOUSE FIRE MAY RESULT This unit s door uses a 3 4 diameter rope gasket It is recommended that you change the door gasket which makes your stove door air tight once a year in order to ensure good control over the combustion maximum efficiency and security To c...

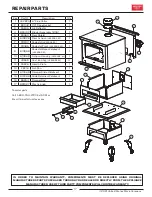
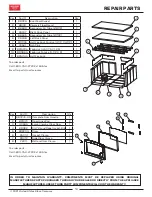
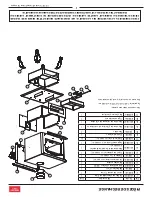
Страница 17: ...Housing US2500E BL 1 11 40566 Cast Iron Leg US2500E BL 4 12 25826 Hearth Plate 1 13 29216 Ash Pan 1 14 610068 Damper Slide Weldment 1 15 610066 Slide Retainer Weldment 1 16 86954 Damper Rod 1 17 891987 Plastic Knob 1 IN ORDER TO MAINTAIN WARRANTY COMPONENTS MUST BE REPLACED USING ORIGINAL MANUFACTURERS PARTS PURCHASED THROUGH YOUR DEALER OR DIRECTLY FROM THE APPLIANCE MANUFACTURER USE OF THIRD PAR...

Страница 18: ...1373 Door Hinge Pad 2 3 40585 Large Viewing Glass Door 1 4 88082 3 4 Round Rope Gasket Blk 1 5 892204 Glass 1 6 26314 Gasket Clamp 1 7 26312 Side Glass Clamp 4 8 26311 Bottom Glass Clamp 1 9 11 10 8 7 6 5 1 2 3 4 5 4 3 2 1 6 7 8 To order parts Call 1 800 750 2723 Ext 5051 or Email to parts usstove com To order parts Call 1 800 750 2723 Ext 5051 or Email to parts usstove com IN ORDER TO MAINTAIN WA...

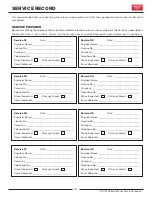
Страница 19: ..._______ Engineer Name _____________________________________ License No _________________________________________ Company ___________________________________________ Telephone No ______________________________________ Stove Inspected Chimney Swept Items Replaced _____________________________________ Service 02 Date _______________________ Engineer Name _____________________________________ License ...

Страница 20: ...NOTES 20 2021 United States Stove Company ...

Страница 21: ...NOTES 2021 United States Stove Company 21 ...

Страница 22: ...vice de 07 Date ______________________ Nom de l ingénieur _________________________________ N de licence ______________________________________ Compagnie ________________________________________ N de téléphone ___________________________________ Poêle Inspecté Cheminée balayée Articles Remplacé _________________________________ Service de 02 Date ______________________ Nom de l ingénieur _________...

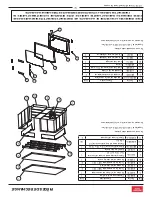
Страница 23: ... ponce brique réfractaire 4 1 2 x 4 1 2 1 8 40561 Bouchon de cendre 1 9 891530A Brique réfractaire 4 5 x 7 5 x 1 25 1 10 89066A Pierre ponce brique réfractaire 4 1 2 x 9 18 11 891414A Demi brique réfractaire 2 Clé Partie Description Qté 1 893240 US Poignée de porte complète 1 2 891373 Patte de charnière de porte 2 3 40585 Grande porte vitrée 1 4 88082 Joint de corde ronde 3 4 noir 1 5 892204 Verre...

Страница 24: ...45 Déflecteur d air 1 4 891492 Ensemble ventilateur B36 1 5 26060 Bouclier arrière 1 6 610926 Cendrier arrière US2500E BP 1 7 29243 Piédestal US2500E BP 1 8 29065 Front de piédestal US2500E BP 1 9 610969 Soudure de la base du piédestal US2500E BP 1 10 610968 Logement Ashpan US2500E BL 1 11 40566 Pied en fonte US2500E BL 4 12 25826 Plaque de foyer 1 13 29216 Cendrier 1 14 610068 Soudure de glissièr...

Страница 25: ...ve un potentiel de génération de CO ENTRETIEN VERRE Inspectez et nettoyez régulièrement la vitre pour détecter d éventuelles fissures Si vous en repérez éteignez immédiatement le poêle N abusez pas de la porte vitrée en la claquant ou en la claquant N utilisez pas le poêle si le verre est cassé Si le verre de votre poêle se brise remplacez le uniquement par le verre fourni par votre revendeur de c...

Страница 26: ...ULATION DE CRÉOSOTE Brûlez toujours du bois sec Cela permet des brûlures propres et des températures de cheminée plus élevées donc moins de dépôt de créosote Laissez le contrôle d air complètement ouvert pendant environ 5 min chaque fois que vous rechargez le poêle pour le ramener à des températures de fonctionnement appropriées La combustion secondaire ne peut avoir lieu que si le foyer est suffi...

Страница 27: ... fumée visible Le bois qui n a pas été correctement séché et qui a une teneur élevée en humidité produira un excès de fumée visible et brûlera mal CONDUITS D AIR Les conduits d air assemblés dans cette unité sont conçus pour offrir un mélange précis d air secondaire et assurer une plus grande efficacité Tout dommage ou détérioration de ces conduits peuvent réduire l efficacité de la combustion Les...

Страница 28: ...x de bois de corde REMARQUE Utilisez de plus petits morceaux de bois pendant le démarrage et un taux de combustion élevé pour augmenter la température du poêle 7 lb Retirez complètement la commande d air Allumez le journal et laissez la porte légèrement ouverte pendant environ une minute REMARQUE Vous devrez peut être la laisser ouverte un peu plus longtemps selon la hauteur de votre cheminée et l...

Страница 29: ...la vapeur s échappe aux extrémités de la pièce votre bois est trempé ou fraîchement coupé vert N utilisez pas ce bois dans votre poêle De grandes quantités de créosote pourraient se déposer dans votre cheminée créant des conditions potentielles pour un feu de cheminée ALTÉRER AVERTISSEMENT Ce chauffage au bois a un taux de combustion minimum réglé à la fabrication et qui ne peut être modifié La mo...

Страница 30: ...meilleurs rendements énergétiques que d autres Des rendements plus élevés et des émissions plus faibles résultent généralement de la combustion de bois durs séchés à l air par rapport aux résineux ou aux feuillus trop verts ou fraîchement coupés Les ressources suivantes peuvent aider à apprendre les caractéristiques de combustion de diverses essences de bois http firewoodresource com firewood btu ...

Страница 31: ...aintenir le raccord de cheminée métallique Vérifiez que les supports soient fixés de façon sûre aux surfaces de la paroi sur tous les côtés Assurez vous que les éléments de fixation utilisés pour maintenir le raccord de cheminée métallique ne pénètrent pas dans le revêtement du carneau de la cheminée Cheminée en maçonnerie Supports de tôle d acier Conduit de cheminée Conduit de raccordement Le dég...

Страница 32: ...qu il n y ait pas de fissures de mortiers perdus ou d autres signes de détérioration et de blocage Faites nettoyer la cheminée avant d installer et de faire fonctionner le poêle Lors du raccordement du poêle à travers une paroi combustible vers une cheminée en maçonnerie des méthodes spéciales sont requises Revêtement Porte de nettoyage étanche Protecteur de plancher Virole 305 mm 12 po des brique...

Страница 33: ...e la cheminée Un tirage inadéquat causera des fuites de fumée par l appareil dans la pièce s infiltrant par l appareil et les joints du conduit de raccordement Un brûlage incontrôlable ou une température excessive indique un tirage excessif CHEMINÉE Règle 2 10 3 Faîtage 3 pi min 2 pi min 10 pi Votre poêle à bois peut être raccordé à une cheminée préfabriquée de 6 po ou en maçonnerie Si vous utilis...

Страница 34: ...EMENT ATTENTION NE PAS INSTALLER DANS LA CHAMBRE À COUCHER MISE EN GARDE L INTÉGRITÉ STRUCTURELLE DU PLANCHER DU MUR ET DU PLAFOND DU TOIT DE LA MAISON MOBILE DOIT ÊTRE MAINTENUE INSTALLER CONFORMÉMENT AU 24 CFR PARTIE 3280 HUD UTILISEZ UNE CHEMINÉE FABRIQUÉE EN USINE ET CONFORME AUX NORMES UL 103 CELA DOIT DONC ÊTRE UN TYPE HT 2100 F UTILISEZ UN AGRESSEUR À ÉTINCELLES LE POÊLE DOIT ÊTRE FIXÉ À LA...

Страница 35: ...uyau et le plafond Il doit également y avoir une protection de plancher sous le conduit horizontal qui s étend de 2 po au delà de chaque côté du conduit de fumée Le raccord de cheminée ne doit pas traverser un grenier ou un espace sur le toit un placard ou un espace dissimulé similaire un plancher ou un plafond Pour les installations canadiennes où le passage à travers un mur ou une cloison de con...

Страница 36: ...t son remplacement par de l air plus froid Si nécessaire la distribution d air chaud du poêle peut être facilitée par l installation d un ventilateur Le poêle à bois ne doit pas être branché à un système de distribution d air chaud car une accumulation excessive de chaleur peut se produire Un poêle à bois ne doit jamais être installé dans un couloir ou à proximité d un escalier car il pourrait blo...

Страница 37: ... électrique avant de tenter l installation L ensemble souffleur est destiné à être utilisé uniquement avec un poêle qui est marqué pour indiquer une telle utilisation Ne faites pas passer le cordon d alimentation à proximité ou sur des surfaces chaudes Fixez l ensemble à l arrière du poêle avec les quatre vis fournies ASSEMBLAGE DU BAC À CENDRES Enlevez la casserole de cendre du foyer Sous le foyer ...

Страница 38: ...ection du système de cheminée existant ____________________________________________________________________ MISE EN SERVICE Confirmer l installation du tapis de foyer conformément aux instructions d installation Confirmer le bon placement des pièces internes Vérifier la solidité du joint de porte et de l étanchéité de la porte Confirmer les dégagements aux combustibles selon les instructions d ins...

Страница 39: ...rgeur La Taille US2500E jambe 25 3 po 643 mm 29 4 po 747 mm 31 3 po 796 mm US2500E piédestal 25 5 po 648 mm 27 po 686 mm 31 4 po 798 mm Chambre de combustion Largeur x Profondeur 22 3 4 po x 16 5 8 po 578 mm x 423 mm Volume Pieds cubes 2 73 pieds cubes Ouverture de la porte Largeur x Hauteur 18 po x 9 3 4 po 458 mm x 248 mm Porte en verre pyrocéramique Visualisation Largeur x Hauteur 17 po x 11 1 ...

Страница 40: ...e région NE JAMAIS UTILISER CE PRODUIT SANS SURVEILLANCE MISE EN GARDE Veuillez lire l intégralité de ce manuel avant d installer ou d utiliser votre nouveau radiateur Le non respect des instructions peut entraîner des dommages matériels des blessures corporelles ou même la mort Une installation incorrecte pourrait annuler votre garantie Conservez ces instructions dans un endroit sûr pour référenc...

Отзывы: