background image


4

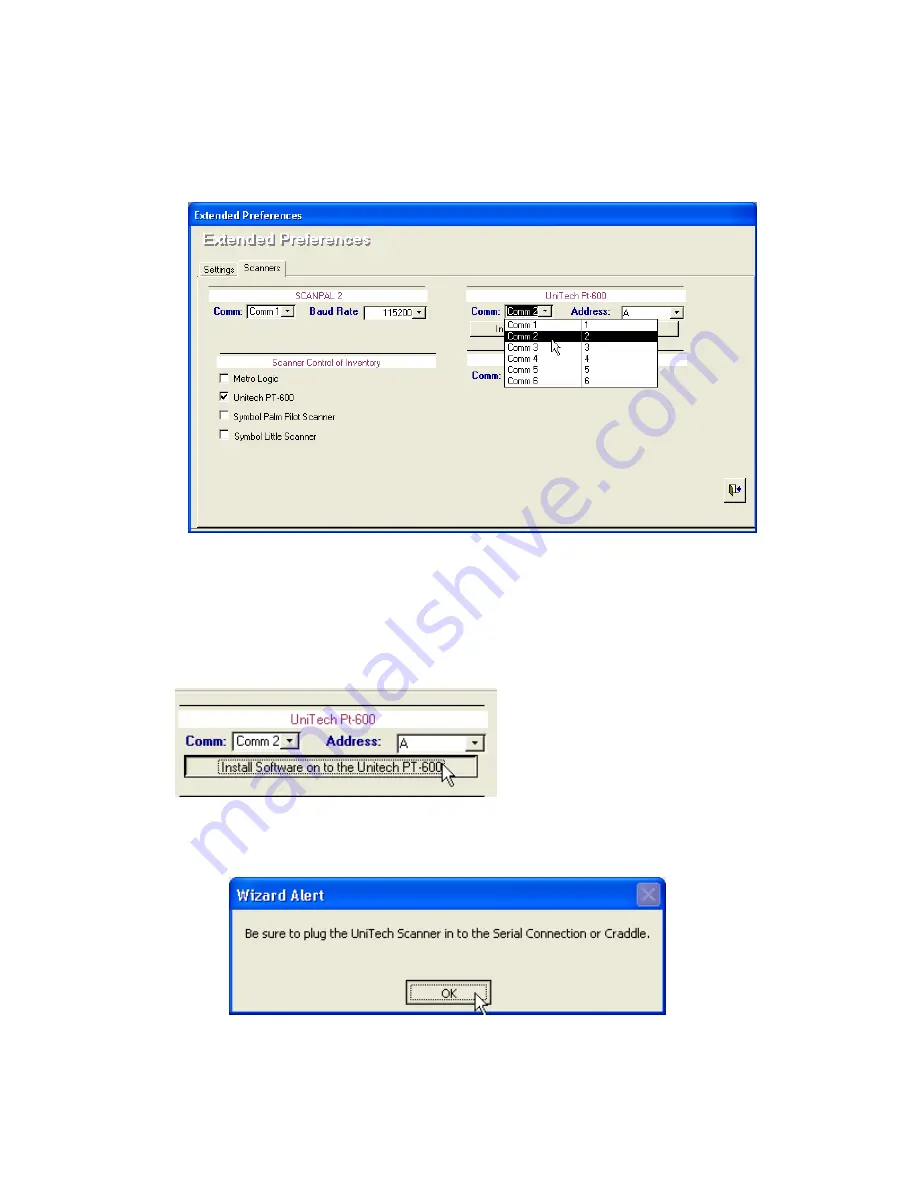
Put a checkmark next to “Unitech PT-600” in the lower left-hand corner of the 

window. This will let Furniture Wizard know that you will be using the PT600 Scanner. 
Now on the right side of the window, click on the down-arrow next to “Comm 1” and 
select the Comm port that your scanner is connected to. Also, make sure that “A” is 
selected as the address, as that is the default setting. 


Next you will need to install the software onto your scanner. To do so, you will 

simply need to click the “Install Software on to the Unitech PT-600” button. At this point, 
please make sure you have your scanner plugged into the serial cable included with your 
system, or with the optional docking cradle.  


You will be prompted to make 

sure your scanner is plugged into the 
serial cable or cradle. Click OK to 
proceed. 


Select the Comm port that your scanner is plugged into and verify that the 

Address is set to A (the default). 

Click the “Install Software on to the 

Unitech PT-600” button to install the 

software on your new scanner

Make sure your scanner is plugged in, and then click OK 

Содержание PT600/630

Страница 1: ...Scanner is a powerful tool for your inventory needs It allows you to do all of your inventory fast and easily Point scan and plug it into your computer Then simply import the data into Furniture Wiza...

Страница 2: ...to check the port settings for your Comm port a For Windows 98 ME i Open up your control panel and double click on the System icon ii Click on the Device Manager tab in the top b For Windows 2000 XP...

Страница 3: ...nd Registration screen Here you will want to click on the advanced setup button A window will pop up with a warning saying If you are not sure what to do here Please Exit Now Click Ok to close it You...

Страница 4: ...your scanner To do so you will simply need to click the Install Software on to the Unitech PT 600 button At this point please make sure you have your scanner plugged into the serial cable included wit...

Страница 5: ...ght back into the Extended Preferences window Please exit out of the Extended Preferences window and then exit out of the Setup and Registration window Congratulations You are now ready to use your ne...

Страница 6: ...w check how many of those items you have in your inventory Using the keypad type in the number of items you have Your scanner defaults to a quantity of 1 If you have more then one item then you will n...

Страница 7: ...ry Button on the main screen On the inventory screen click the Reconcile Inventory button This will bring up the Reconciliation Menu To import your data into the computer click on the PT 600 button on...

Страница 8: ...am window will now pop up on your screen Click on the Import button to begin importing your data You will now be asked whether this will be part of an On Going Inventory Session If this is the first t...

Страница 9: ...rniture wizard As you might have several dozens of items on there it might be useful to have a report outlining all the items Click on the Reconcile Report button and you will be shown a report of all...

Страница 10: ...data You will now be asked whether this will be part of an On Going Inventory Session Since you have already performed an Inventory session and just want to add some items select yes Choosing NO will...

Страница 11: ...wish to add all of the items you have scanned in then you can click on the Tag All button and all of the items will be marked for you Now that you have selected which items you wish to permanently add...

Страница 12: ...d allows you to see a list of items that were missed during your scan To see this report click on the Reconcile Inventory button from the Inventory screen in Furniture Wizard This will bring you to th...

Страница 13: ...e By selecting a date range you can make sure to exclude items that were scanned in a prior scan but not the latest one Once you have a scan date selected click on the Print button to see your report...

Страница 14: ...30 for PT630 scanners 5 From the menu that you are presented with press 1 for DEV 6 Now press 2 for SERIAL 7 You will now be shown a series of properties and the values that are assigned to them To mo...

Отзывы: