background image

Chapter 1


Getting Started

9

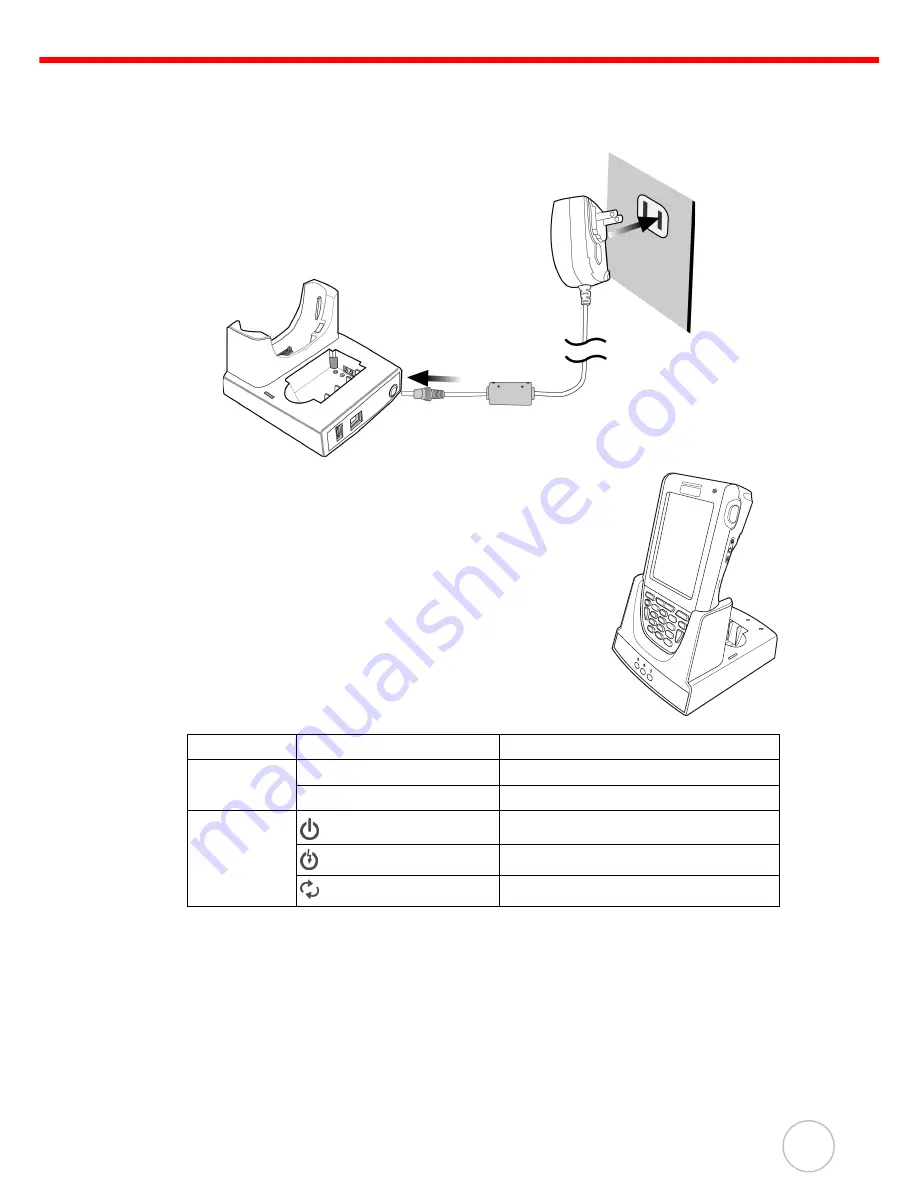
Charging the Battery with the Docking Station

1. Plug the AC Adapter Cable into the Docking Station’s power jack, and connect 

the other end of the AC Adapter into an electrical outlet.

2. Slide the PA600 down into the Docking Station until it 

snaps into place. 

3. The connection is secure when the PA600’s bottom 

edge aligns with the Cradle. (The PA600’s LED indica-
tor lights up red.)

Checking the Battery Status

If the battery level becomes low during the course of normal use, a status icon 
appears on the PA600’s screen indicating low or very low battery status. In both 
cases, perform a Microsoft ActiveSync operation to backup data, and recharge the 
PA600 as soon as possible. If the battery level reaches low status, the device will 
enter a sleep mode and cannot power up until the battery is charged, or until the 
PA600 connects to an external power source. Windows Mobile 6.1 will retain installed 
applications and data when the main battery is drained for extended time periods.

LED Status

LED

Description

PA600

Solid Red

Charging.

Solid Green

Charging Complete.

Docking 
Station

Power LED 

Power is On.

Charging LED

Charging (For Spare Battery Only).

Sync LED

Synchronization is occurring.

Содержание PA600

Страница 1: ...d com puter with a Windows Mobile 6 1 operating system an integrated laser bar code scanner cell phone functionality color LCD touch screen keypad and wireless communication capability It provides a s...

Страница 2: ...ost Client Bluetooth 2 0 EDR supports Bluetooth Printer Bluetooth Modem Bluetooth ActiveSync eGPRS Siemens MC75 Radio Module quad band GSM 850 900 1800 1900 Mhz EDGE Multislot Class 10 GPRS Multislot...

Страница 3: ...e contact a local Unitech representative if anything appears damaged or miss ing A Tour of the PA600 The main components and features of the PA600 are described through the following PA600 PE Terminal...

Страница 4: ...the PA600 off 4 Microphone Records audio 5 Universal Connector Connects the PA600 to a USB Charging Communication Cable This USB cable connects to the computer s USB Port and accepts the 5V AC Adapter...

Страница 5: ...set Button to Clean Boot the device 12 Handstrap Enables users to securely hold the PA600 13 Speaker Enables audio from the PA600 14 Stylus Enables users to interact with the operating system To use t...

Страница 6: ...empt to open or service the battery pack Dispose of used batteries according to local recycling guidelines A Backup Battery cell is embedded in the PA600 to prevent data loss when the remov able Batte...

Страница 7: ...so the Battery Contacts align with the Battery Compartment Contacts Place the Battery on top of the Plastic Tab as shown below 4 Simultaneously slide the Battery Pack into the Battery Compartment whil...

Страница 8: ...Adapter and without fully charging the Backup Battery may result in RAM memory data loss When the Main Battery is removed the Backup Battery retains RAM data for 2 hours Charge the battery within thi...

Страница 9: ...tatus icon appears on the PA600 s screen indicating low or very low battery status In both cases perform a Microsoft ActiveSync operation to backup data and recharge the PA600 as soon as possible If t...

Страница 10: ...to a PC Connect the PA600 to a PC with the USB Cable through the following 1 Press and hold the USB Charging Cable s Release Buttons while connecting to the PA600 1 2 Connect the USB Charging Cable t...

Страница 11: ...A600 by pressing the Power Button on the front panel NOTE The PA600 s screen ships with a protective plastic film Remove the plastic film by peeling from one corner to another The screen will be more...

Страница 12: ...the Stylus CAUTION Never use anything other than the PA600 Stylus on the PA600 s screen Using an object other than the PA600 Stylus could cause per manent damage 1 Remove the Stylus from its holder 2...

Страница 13: ...the PA600 powers on for the first time or after the system is reset 1 Calibrate the screen at any time through the following Tap Start Settings and select the System tab 2 Tap the Screen icon NOTE Or...

Страница 14: ...corners of the screen 6 Continue tapping the target until calibration is complete Set Date and Time Tap Start Settings System Clock Alarms to set the time zone time and date Select the time zone time...

Страница 15: ...erate secondary functions Press to access the function icon in the operating system as shown on the screenshot to the right The Keypad Keys are described through the following Key Main Function Second...

Страница 16: ...f Right soft key activates a shortcut for the function listed on the bottom right of the screen Tab Opens the Start menu Backspace Escape key Alphanumeric 4 g h and i Left navigation key Alphanumeric...

Страница 17: ...is compatible with a range of SD and MMC storage cards which are primarily used to backup or transfer files and data The expansion slot also supports SDIO cards for additional connectivity options In...

Страница 18: ...rotating the screws counterclockwise with a screwdriver 2 Press the card in and release The card should automatically release 3 Remove the SD Card from the slot Using the Laser Scanner The PA600 has a...

Страница 19: ...bar code symbologies set data transmission options configure magnetic and proximity reading options and set power management options 3 To test the bar code scanner tap the Test tab 4 Tap Tools 5 Tap...

Страница 20: ...PA600 s GPRS SIM Card Slot is inside the Battery Compartment Inserting the SIM Card 1 Remove the Battery Cover and the Main Battery Insert the SIM Card with the metallic gold side facing up and with t...

Страница 21: ...and customize phone settings NOTE If the SIM Card is protected by a PIN code input the code before using any phone features Tap the Antenna Signal icon on the upper right corner of the screen Tap Wir...

Страница 22: ...Talk Send 2 Enter a phone number 3 Tap Talk on the Phone screen 4 Tap Hold to place the number on hold when the call connects 5 Enter the second phone number and tap Talk 6 Tap Swap to switch between...

Страница 23: ...location is reserved for voice mail Make a speed dial call through one of the following Tap and hold the speed dial location number assigned to a contact on the Phone keypad 5 Tap Speed Dial on the Ph...

Страница 24: ...ng station to connect the PA600 with a computer NOTE If a previous version of Microsoft ActiveSync is installed on the computer uninstall it first before installing the latest version of Microsoft Act...

Страница 25: ...25 4 Click Next The End User License Agreement EULA appears 5 Accept the license agreement terms and click Next Fill out the information fields 6 Type the user name and organization and click Next Se...

Страница 26: ...ech Electronics Co Ltd 7 Select a drive to install the program and click Next The installation wizard gathers all the information it needs to install Microsoft ActiveSync and prompts users to begin th...

Страница 27: ...he USB Charging Cable into the computer s USB Port 3 Start the PA600 4 Microsoft ActiveSync starts automatically and configures the USB Port to work with the PA600 The New Partnership setup wizard aut...

Страница 28: ...ces folder Connect the USB Cable between the computer and PA600 Connection options Set remote synchronization with the computer through following connection options USB connection Bluetooth connection...

Страница 29: ...Chapter 3 Getting Connected 29 1 Tap Start Settings Connections Bluetooth Mode and check Turn on Bluetooth 2 Tap Devices Add new device 3 Select a device from the list Tap Next...

Страница 30: ...h PIN Code Request 5 Enter the same Blue tooth PIN Code that was entered in step 4 6 Select service Check ActiveSync and tap Finish 7 Preserve battery power by ending the Bluetooth Microsoft ActiveSyn...

Страница 31: ...PRS module which enables users to connect to the internet Access the internet through the following NOTE Insert the SIM card properly See Using the SIM Card on page 20 1 Tap Start Settings Under the C...

Страница 32: ...embedded WLAN module users can send and receive signals to a Wi Fi network and synchronize files NOTE Wi Fi access requires a service contract through a wireless service pro vider Contact a wireless s...

Страница 33: ...d 33 2 Tap the Wireless Manager icon 3 Tap Menu at the bottom right corner of the Wireless Manager window Select Wi Fi Set tings 4 If there are available networks detected tap and hold the network nam...

Страница 34: ...s Co Ltd NOTE Simultaneously press Func and 9 to access the Device Setting screen Under IO select Wireless and Enable While the Multiple Networks Detected screen appears select a network connection Ad...

Страница 35: ...the new wireless network becomes available in the list Disable the wireless network through one of the following 1 Double tap the Wi Fi icon and tap Disable Wireless 2 Tap the Wi Fi bar in the Wirele...

Страница 36: ...he amount of synchronized data To do this select a service and click Settings After enabling a service close and reopen Microsoft ActiveSync Using ActiveSync to Exchange Files Use Microsoft ActiveSync...

Страница 37: ...Do one of the following To copy the file to the PA600 right click the file and click Copy Place the cur sor in the desired folder for the device right click then click Paste To copy the file to the co...

Страница 38: ...el provides the ability to change the default symbology place delimiter characters behind scanned data and save scanner set tings Tap Start Settings System Scanner Scan2Key User s can populate bar cod...

Страница 39: ...it Start Stop Bits Function Code Data Length Double Labels Decoding Double Labels Separator Code 93 YES YES Data Length Delta Code YES YES YES EAN 128 YES Transmit Code ID Fields Separator EAN 13 YES...

Страница 40: ...ttings Adjusting Settings Adjust the PA600 settings to accommodate personal work habits through the follow ing To access the Settings screen tap Start Set tings The Settings screen appears where users...

Страница 41: ...ttery through the following NOTE Minimize power consumption by defining the auto off function and the processor s speed 1 Access the Power properties screen through either of the following Tap the Plu...

Страница 42: ...ht use Changing the Automatic Power Settings The PA600 enters idle mode when there is no task or all tasks are waiting for input In the default setting the PA600 automatically turns off when it remain...

Страница 43: ...ing In the Battery Power tab select Turn off backlight if device is not used for and select the amount of time before the PA600 turns off from the drop down menu while connected to a battery In the Ex...

Страница 44: ...files and programs saved in Flash Storage are unaffected by the PA600 power status To access the Flash Memory files 1 Tap Start Programs File Explorer My Device Flash Storage folder Transfer files to...

Страница 45: ...rt similar to rebooting a computer This restarts the PA600 and adjusts memory allocation All records and entries are retained after a soft reset However unsaved data in open programs may be lost in so...

Страница 46: ...torage is retained NOTE Only perform a hard reset unless a soft reset does not correct the prob lem Data can restore through the next Microsoft ActiveSync operation or it can transfer from a storage c...

Страница 47: ...re through the next Microsoft ActiveSync operation or data can retrieve from a storage card Perform a clean boot through the following 1 Simultaneously press and hold Func and Backspace 2 While holdin...

Страница 48: ...upports Bluetooth Printer Bluetooth Modem Bluetooth ActiveSync eGPRS Siemens MC75 Radio Module Audio Microphone Speaker Headset Connector Receiver Expansion Slot SDIO Slot Supports SDHC up to 4G Power...

Страница 49: ...ion Center www unitech adc com Unitech Taiwan adc utt unitech com tw Unitech Asia Pacific Middle www unitech utp com tw Unitech China www ute com cn Unitech Japan www unitech japan co jp Unitech Ameri...

Отзывы: