background image

U N I Q U E   2 4

&

3 0  


21

3.


Continue holding the knob in this position for 45 seconds then release the knob 

and set the thermostat to the desired temperature.  The oven burner should come 
on within a few seconds after setting the temperature.  If it does not, turn the 
thermostat knob to "Off", wait 5 minutes, open the broiler drawer and check to 
see if the pilot is lit.  If not, repeat the lighting process. 

4.


When you are done cooking turn the knob to the "Off" position. Your pilot will 

remain lit until such time as you turn off the gas to your dwelling.  

Top Burner Operation 

Note: 

When boiling food, the highest temperature that can be reached is the boiling point. 

When the liquid starts to boil, decrease the size of the flame until you reach the minimum 
flame that will hold the boil. This will save gas. It will also lessen the possibility of burning 
food or boiling food over, and help to keep your kitchen cooler. Use stable utensils with 
flat bottoms and always place the utensil on the burner grate before lighting the burner. 
Unstable or rounded bottom utensils will not contact properly with the grate and will 
affect the cooking efficiency. Select utensils large enough to avoid spillovers, but 
remember, over-sized utensils (diameters exceeding 8 1/2'') can cause the range finish to 
discolor, craze or chip. Damage caused by oversized utensils, such as those sometimes 
used in canning, are not covered by the warranty. The finish has been manufactured to a 
commercially acceptable standard and its condition is dependent upon the care of the 
user. 


Top Burner Valves 

The top burner flame size should be adjusted so that is does not extend beyond the edge 
of the cooking utensil. As a matter of safety, it's urged that you comply with these 
instructions. 

A high flame on a surface burner is both inefficient and unsafe. The flame should always 
be adjusted so that it is no larger than the bottom of the pan. Fluctuations in flame size 
could be caused by pressure variations, improperly positioned burners, damage or debris. 

Oven Ignition 

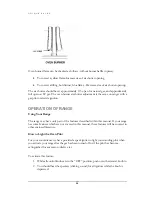
On ovens with pilot ignition, lightly press in the oven control knob and turn it 
counterclockwise to the desired temperature setting. 

If you press the knob in too far to 

the pilot lighting position, the knob will not turn. 

Gently let up on the knob, and the 

thermostat shaft will release its safety key to let you rotate the control.  

On ovens with spark ignition, lightly press in the oven control knob and turn it 
counterclockwise to the desired temperature setting. You must hold the knob in for 5 to 
10 seconds to give the flame safety probe adequate time to sense the flame. If the burner 
does not light after 15 seconds of pressing in the oven control knob, open the oven door 
and wait at least one minute before attempting to light the burner again. 

Содержание 20

Страница 1: ...s manual with the range How to Obtain Service and or Parts When your range does not operate in accordance with the instructions in the manual you should contact the dealer in the immediate vicinity for service Or the purchaser may contact the service organization noted on the warranty This manual contains information for Important Safeguards Installation Use and Care Certain ranges come equipped w...

Страница 2: ...E R T I F I E D A N D D I S T R I B U T E D B Y Unique Gas Products Ltd 2245 Wyecroft Road 5 Oakville Ontario Canada L6L 5L7 Ph 905 827 6154 Toll Free 1 877 427 2266 Fax 905 827 2027 www UniqueOffGrid com ...

Страница 3: ...11 12 Alignments and Adjustments Page 12 20 Operation of Range Page 20 25 Broiling Page 25 Cleaning the Range Page 25 28 Lift Off Doors Page 28 29 How to Gain Access to the Battery Page 29 Trouble Shooting Guide Page 30 Wiring Diagram Page 31 Warranty Page 32 Note For warranty and service information please see attachments packaged with range ...

Страница 4: ...ver every possible condition and situation that may occur Common sense and caution must be practiced when installing operating and maintaining the appliance Record in the space provided below the Model No and Serial No of this appliance These numbers are found on the serial plate located below the lift up cooktop Model No ________________________ Type Number _______________________ Serial No _____...

Страница 5: ...eparation of food in an oven requires temperatures that could cause severe burns Before using this new appliance carefully read and follow all instructions The California Safe Drinking Water and Toxic Enforcement Act of 1986 Proposition 65 requires the Governor of California to publish a list of substances known to the State of California to cause cancer or reproductive harm In addition businesses...

Страница 6: ...o shut off gas supply to the unit during an emergency The following situations may cause serious bodily harm death or property damage TO REDUCE THE RISK OF TIPPING OF THE RANGE THE RANGE MUST BE SECURED BY A PROPERLY INSTALLED ANTI TIP BRACKET PROVIDED WITH THE RANGE TO CHECK IF THE DEVICE IS INSTALLED AND ENGAGED PROPERLY CAREFULLY TIP THE RANGE FORWARD THE ANTI TIP DEVICE SHOULD ENGAGE AND PREVE...

Страница 7: ...E BURNERS OVEN BURNERS OR INTERIOR SURFACES OF THE OVEN Both surface burners and oven burners may be hot even though the flame is not visible Areas near surface burners may become hot enough to cause burns During and after use do not touch or let clothing or other flammable materials touch these areas until they have had sufficient time to cool Among these areas are the cooktop surfaces facing the...

Страница 8: ...il Doing so blocks air flow through the oven and may cause carbon monoxide poisoning Aluminum foil linings may also trap heat causing a fire hazard Refer to the cleaning section of this manual for more information on the use of aluminum foil Placement of oven racks Always place an oven rack in the desired location while the oven is cool If a rack must be moved when the oven is hot use potholders a...

Страница 9: ...e Do not touch a hot oven light bulb with a damp cloth A hot oven light bulb could break it touched with a damp cloth Disconnect the electrical service cord or shut off the power to the oven before removing and replacing the bulb Allow parts to cool to room temperature before touching or removing them from the range When a surface burner is first turned off the burner and grate are hot enough to c...

Страница 10: ...or a good seal Care should be taken not to rub damage or move the gasket Flexible Connectors If the gas range oven is connected to a gas supply with a metal flexible connector move the range oven with CAUTION for service or cleaning Flexible connectors are not intended for repeated bending Do not allow cleaners to make contact with flexible connectors The connector and its fittings are designed fo...

Страница 11: ... only when a recipe tells you Put roasts and casseroles into a cold oven then turn on the oven Opening the oven door often to check on foods wastes energy Use the oven to prepare complete meals For instance start a roast add vegetables when the meat is half cooked and then warm rolls or dessert after the main dishes are cooked Thaw frozen foods before cooking Thawed food requires less cooking ener...

Страница 12: ...U N I Q U E 2 4 3 0 9 ...

Страница 13: ...uefied petroleum gases on all threaded connections Important Do not apply pressure directly to the range manifold pipe when tightening supply connections The manifold pipe should be held securely at the pressure regulator to prevent twisting Hold the pressure regulator with a wrench during the tightening of the connection or the manifold pipe may be twisted and split and cause a dangerous leak The...

Страница 14: ...ed from the gas supply piping system by closing its individual manual shut off valve during any pressure testing of the gas supply piping system at test pressures equal to or less than 1 2 psig WALL CLEARANCES All units must be installed in accordance to minimum rear and side wall clearance and clearances extended vertically above cooking top which are stated on the serial plate The serial plate i...

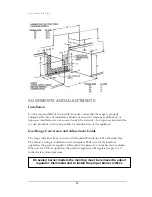
Страница 15: ...the manufacturer of the appliance Gas Range Conversion and Adjustment Guide The range will either be set for use with Liquefied Petroleum LP or Natural Gas The factory setting is indicated on the serial plate When set for Natural Gas operation the pressure regulator will regulate the pressure to 4 inches water column When set for LP Gas operation the pressure regulator will regulate the gas to 10 ...

Страница 16: ...th the nominal inlet pressure of the regulator used on the range or 1 2 psig maximum The range should be tested by pressurizing the regulator with an inlet pressure at least 1 inch water column above the manufacturer s specified manifold pressure shown on the serial plate The range will be equipped with one of the two types of regulators shown ...

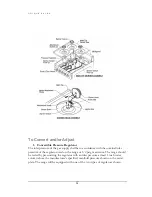
Страница 17: ...s reads NAT the regulator is set for natural gas If yours reads LP the regulator is set for LP Not Applicable for Unique Sealed Top Ranges 2 Top Pilots Gas The top burner pilots if so equipped can be adjusted by a screw located on the pilot filter attached on the rear face of the manifold pipe Adjust the pilot flame until there is ...

Страница 18: ...ARD THE UNUSED ORIFICES They should be saved in order to convert the range back to its original fuel When converting the gas valves the minimum flame adjustment screw must be adjusted through the center of the valve stem You will need a 3 32 flat blade screw driver to make this adjustment Hold the valve stem and turn the adjustment screw until the proper flame of approximately 1 8 is obtained Adju...

Страница 19: ... ignitor for each burner See page 13 in the Owner s Manual To ignite the burner depress and turn the valve knob 90 degrees to the left to the LITE position When a top burner knob is pressed ALL electrodes will spark at a rate of approximately 2 pulses sparks per second Continue to hold the knob depressed until gas ignites at the burner Adjust the intensity of top burner heat in the same manner des...

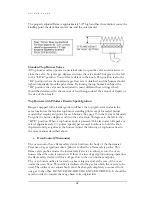
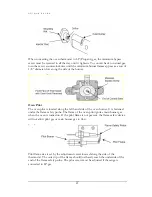
Страница 20: ...ocated along the left hand side of the oven burner It is fastened under the flame safety probe The flame of the oven pilot ignites main burner gas when the oven is turned on If the pilot flame is not present the flame safety device will not allow pilot gas or main burner gas to flow Pilot flame size is set by the adjustment screw located along the side of the thermostat The outer tip of the flame ...

Страница 21: ...ng the pilot and operating the oven for a few minutes Follow the instructions below for lighting the pilot NEVER LEAVE THE CONTROL KNOBS IN ANY POSITION OTHER THAN OFF IF THE IGNITORS OR BURNERS AREN T WORKING PROPERLY With the oven control OFF open the broiler door and position yourself so you can see the oven pilot at the back of the oven burner Next turn any top burner knob to the LITE position...

Страница 22: ...o the oven IF THE OVEN BURNER DOES NOT IGNITE WITHIN 20 TO 60 SECONDS AFTER THE PILOT IS LIGHTED TURN THE OVEN TEMPERATURE CONTROL TO OFF AND WAIT FOR POWER TO BE RESTORED DO NOT ATTEMPT TO RELIGHT THE PILOT AGAIN If the oven does not function properly when the power is restored or at any other time call a serviceman to determine the source of the problem DO NOT ATTEMPT TO SERVICE THE RANGE YOURSE...

Страница 23: ...F RANGE Using Your Range The range may have only part of the features described within this manual If your range has some features which are not covered in this manual these features will be covered in other enclosed literature How to Light the Oven Pilot For your convenience we have provided a spark igniter to light your standing pilot when you activate your range after the gas has been turned of...

Страница 24: ...r craze or chip Damage caused by oversized utensils such as those sometimes used in canning are not covered by the warranty The finish has been manufactured to a commercially acceptable standard and its condition is dependent upon the care of the user Top Burner Valves The top burner flame size should be adjusted so that is does not extend beyond the edge of the cooking utensil As a matter of safe...

Страница 25: ... 6 The spark module is defective Contact an authorized service technician Preheating Heat the oven to the desired temperature before placing the food in the oven Preheat for 10 to 12 minutes Opening Oven Door Let hot air or steam escape before removing or replacing food Hot Oven Restart If you turn off the oven but then decide to turn it back on before it has cooled to room temperature the burner ...

Страница 26: ...ying thickness amounts of fat and personal taste Be careful when handling hot broiler pans be careful of the hot grease Serious injury can result due to spillage of hot grease Never leave a dirty broil pan in place Always clean it and return it to the broiler assembly Unauthorized broil pan substitutes should never be used Excess fat should be trimmed to reduce the possibility of flame up The meat...

Страница 27: ...easier protect the oven bottom from excessive spillovers This is particularly important when baking a fruit pie or other foods with high acid content Hot fruit fillings or foods that are acidic in content such as milk tomato or sauerkraut and sauces with vinegar or lemon juice may cause pitting and damage to the porcelain enamel surface To protect the oven bottom surface place a piece of aluminum ...

Страница 28: ...r area and broil pan for a few minutes No definite time can be given for broiling meats because of varying thickness amounts of fat and personal taste Be careful when handling hot broiler pans be careful of the hot grease Serious injury can result due to spillage of hot grease Never leave a dirty broil pan in place always clean it and return it to the broiler assembly Unauthorized broil pan substi...

Страница 29: ...lug in the hole provided for it This will prevent the burner grate from rotating or tilting To remove the range top on standard models first remove the grates Lift up the front of the main top then grasp the top at each side and pull it toward you On sealed burner models you must first remove the burner grates and burner heads When removing the burner head s the ignitor wire must be disconnected a...

Страница 30: ...ner thoroughly It is very important that the burner be dry before replacing it in the range A wet burner will not allow the gas to ignite properly This could result in a build up of gas which could result in an explosion or fire Aluminum Foil in Oven and Broiler Aluminium foil when used improperly is a cause of many range fires Make certain that vents or air openings aren t covered by the foil If ...

Страница 31: ...sed from a source other than an appliance dealer you may prefer to contact the manufacturer at the address shown in this manual Moisture During the initial heat up of your range the heat mixing with the cooler air in the oven cavity may produce fogging of the door glass or a collection of water on the door To prevent this open the oven door for the first few seconds of initial oven heat up This wi...

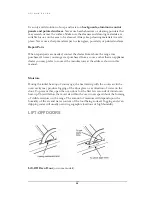
Страница 32: ...he locking mechanism back into its original position DO NOT ATTEMPT TO CLOSE THE DOOR UNTIL THIS STEP IS COMPLETE THE HINGE OR DOOR COULD BE DAMAGED HOW TO GAIN ACCESSTO THE BATTERY COMPARTMENT Gaining access to the battery compartment 1 Locate the kick plate at the front bottom of the stove 2 At the far upper left and upper right of the kick plate you will see a self tapping screw remove each of ...

Страница 33: ...U N I Q U E 2 4 3 0 30 ...

Страница 34: ...U N I Q U E 2 4 3 0 31 ...

Страница 35: ... improper installation or service delivery damage or other than normal household use and service This UNIQUE stove must be serviced regularly as outlined in the Owner s Manual Unique Gas Products Ltd the seller will not be liable for direct or indirect loss of foods caused by failure in operation In case of damage the owner must provide proof of purchase Model and Serial Number to the Seller or Un...

Отзывы: