10
ADJUSTING AND THREADING INSTRUCTION FOR THE THREAD
GUIDING PARTS
Proper adjustment of the thread guides and thread take-
ups ensures a durable seam and consequently tight clo-
sure of the bags.
Needle Thread: Basic adjustment see Adjusting Instruc-
tions. Shift needle thread take-up
c
(80865 MX) on sup-
port
d
(80865PX) as well as needle thread guide
e
(80858AX) on the machine housing for proper control of
the needle thread. The above mentioned parts should
be adjusted so that the needle thread, when slung around
the looper blade, is controlled before the needle enters
the thread triangle.
Looper Thread: Shift looper thread guide
f
(80858BX2)
so, that depending on the stitch length a sufficient amount
of looper thread is available for setting the next stitch.
Important Note: The above needle thread take-ups can-
not be used on machines with long needle bar connec-
tion (e.g. 80659 or 29774D) which should be exchanged
against the short needle bar connection 80659B together
with thread guide G334. The threaded hole required for
mounting bracket 80865QX of needle thread take up sup-
port 80865PX will already be provided in all future ma-
chines.
EINSTELL- UND EINFÄDELANLEITUNG FÜR DIE FADEN-
FÜHRUNGSTEILE
Bei richtiger Einstellung der Fadenführungen und Faden-
abzüge entsteht eine feste Naht und somit auch ein dich-
ter Verschluß des zugenähten Sackes.
Nadelfaden: Grundeinstellung siehe Einstellanleitung.
Durch Verschieben des Nadelfadenabzuges
c
(80865MX)
auf dem Halter
d
(80865PX) sowie der Nadelfadenführung
e
(80858AX) am Gehäuse wird der Anzug des Nadelfadens
so eingestellt, daß der Nadelfaden, der die Greiferklinge
umschlingt, vor dem Abstechen kontrolliert wird.
Greiferfaden: Die Greiferfadenführung
f
(80858BX2) wird
durch Verschieben so eingestellt, daß je nach Stichlänge
die für den nächsten Stich erforderliche Greiferfadenmenge
reichlich zugemessen wird.
Wichtiger Hinweis: Bei Maschinen mit langem Nadelstangen-
mitnehmer (z. B. 80659 oder kpl. 29774D) können die obigen
Nadelfadenabzüge nicht verwendet werden. In diesem Fall
muß der kurze Nadelstangenmitnehmer 80659B mit der
Fadenführung G334 eingebaut werden. Die erforderliche
Gewindebohrung zur Befestigung des Winkels 80865QX für
den Nadelfadenabzugshalter 80865PX ist in Zukunft bereits
im Gehäuse vorhanden.
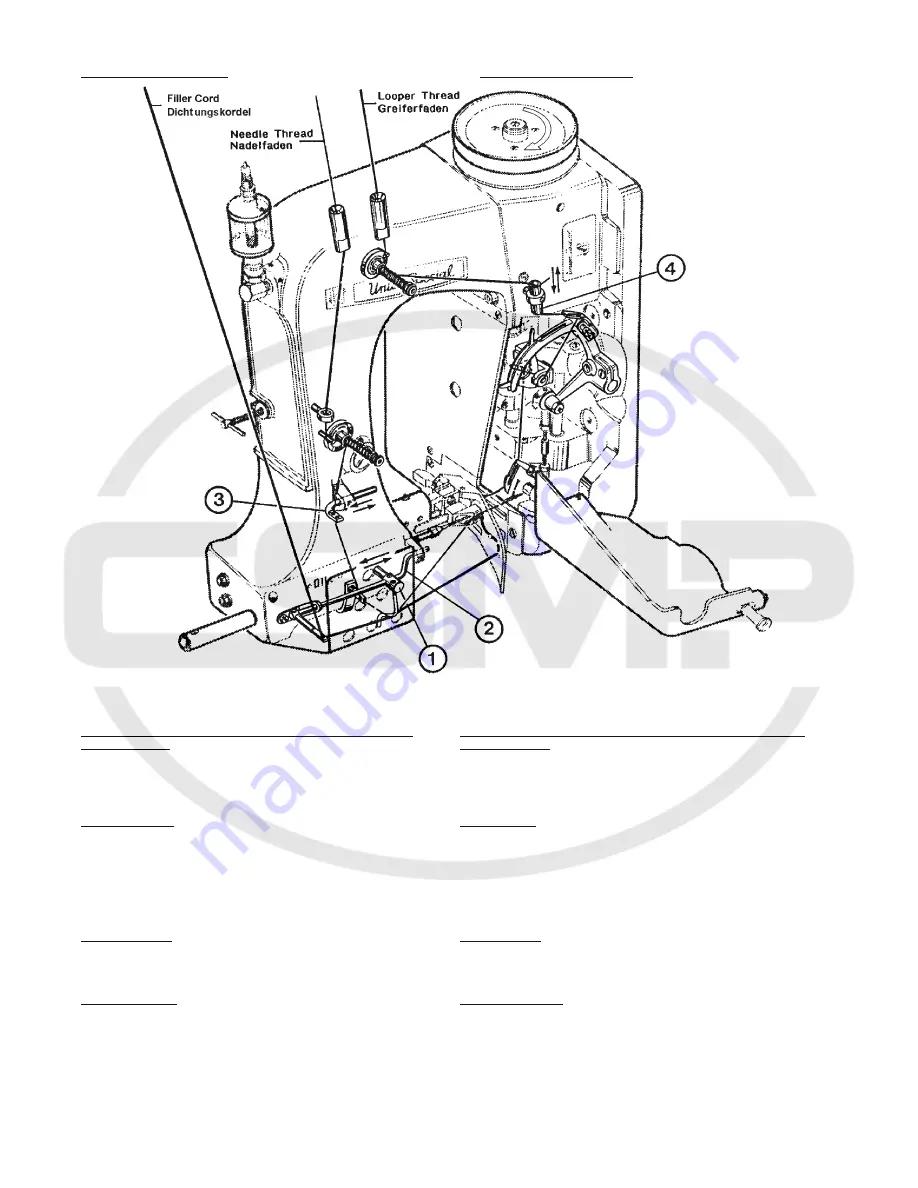
Fig. 2
THREADING THE MACHINE
EINFÄDELN DER MASCHINE
www.college-sewing.co.uk
Содержание 80800R
Страница 24: ...24 w w w c o l l e g e s e w i n g c o u k ...
Страница 26: ...26 w w w c o l l e g e s e w i n g c o u k ...
Страница 28: ...28 w w w c o l l e g e s e w i n g c o u k ...
Страница 30: ...30 w w w c o l l e g e s e w i n g c o u k ...
Страница 32: ...32 w w w c o l l e g e s e w i n g c o u k ...
Страница 34: ...34 Loctite 262 CE66 w w w c o l l e g e s e w i n g c o u k ...
Страница 36: ...36 w w w c o l l e g e s e w i n g c o u k ...
Страница 38: ...38 w w w c o l l e g e s e w i n g c o u k ...
Страница 40: ...40 w w w c o l l e g e s e w i n g c o u k ...
Страница 42: ...42 w w w c o l l e g e s e w i n g c o u k ...
Страница 44: ...44 w w w c o l l e g e s e w i n g c o u k ...
Страница 46: ...46 w w w c o l l e g e s e w i n g c o u k ...
Страница 48: ...48 w w w c o l l e g e s e w i n g c o u k ...
Страница 50: ...50 w w w c o l l e g e s e w i n g c o u k ...
Страница 52: ...52 w w w c o l l e g e s e w i n g c o u k ...
Страница 54: ...54 w w w c o l l e g e s e w i n g c o u k ...
Страница 59: ...59 NOTES NOTIZEN w w w c o l l e g e s e w i n g c o u k ...
Страница 60: ...w w w c o l l e g e s e w i n g c o u k ...


