


Page 3
For technical questions, please call 1-888-866-5797.
Item 62976
Installation Instructions
Read the ENTIRE IMPORTANT SAFETY INFORMATION section at the beginning of this document
including all text under subheadings therein before set up or use of this product.
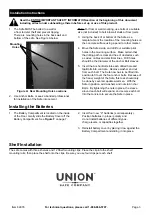
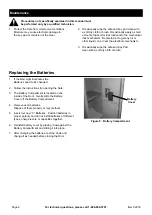
1. The Safe MUST be bolted to a wall or
a floor to deter theft and prevent tipping.
There are mounting holes in the back wall and
bottom of the safe. See Figure A below.
Mounting
Holes
Figure A: Rear Mounting Hole Locations
2. Use Anchor Bolts, or seek a bonded professional
for installation of the Safe into cement.
Note:
For floor or wall mounting, use bolts of a suitable
size (not included) to bolt into wall studs or floor joists.
3. Using the back of or bottom of the Safe as a
template, mark the location of the mounting holes on
the concrete surface using a pencil or other marker.
4. Move the Safe aside, and drill four suitable pilot
holes in the mounting surface. Make certain that
the drilling path is clear and free of obstacles such
as wires, cables and electrical lines. Drill holes
should be the diameter of the Anchor Bolt sleeves.
5. Insert the Anchor Bolts into each drilled hole and
tap Bolts into concrete. Remove washer and nut
from each bolt. The Safe now has to be lifted into
position to fit over the four anchor bolts. Because of
the heavy weight of the Safe, this task should only
be done by several capable workmen. With the
Safe in position, add washers and nuts to Anchor
Bolts. By tightening the nuts in place, the sleeve
around each bolt will expand, and secure each bolt
into the concrete to secure the Safe in place.
Installing the Batteries
1. The Battery Compartment is located on the inside
of the Door. Gently slide the Battery Cover off the
Battery Compartment. See
Figure F
on page 7.
2. Insert four new “C” batteries (sold separately).
Position batteries in proper polarity and
do not install batteries of different types,
charge levels, or capacities together.
3. Reinstall battery cover by placing it low against the
Battery Compartment and sliding it into place.
Shelf Installation
The safe comes with three shelves and 12 Shelf mounting clips. Place the clip into the shelf
mounting rails, then place the shelf onto the clips. Be sure you use four clips per each shelf.


