background image

YSELC/330/B1     YSELC/330/W1

YSELC/450/B1     YSELC/450/W1

YSELC/580/B1     YSELC/580/W1

YSELC/680/B1     YSELC/680/ W1

YSELC/900/B1     YSELC/900/ W1

YSELC/1100/B1   YSELC/1100/ W1

YSELC/1500/B1   YSELC/1500/ W1

請於使用前仔細閱讀本手冊,並妥善保管以備日後使用。

AS01-R1 (TC)

安全穩妥

守護您最重要的東西

Yale 保險箱

用戶手冊

適用型號︰

Содержание YSELC/1100/B1

Страница 1: ...SELC 450 B1 YSELC 450 W1 YSELC 580 B1 YSELC 580 W1 YSELC 680 B1 YSELC 680 W1 YSELC 900 B1 YSELC 900 W1 YSELC 1100 B1 YSELC 1100 W1 YSELC 1500 B1 YSELC 1500 W1 請於使用前仔細閱讀本手冊 並妥善保管以備日後使用 AS01 R1 TC 安全穩妥 守護您最重要的東西 Yale 保險箱 用戶手冊 適用型號 ...

Страница 2: ...一 重要信息 二 操作面板 三 首次使用指南 四 開啟保險箱 五 上鎖操作 六 其他功能 七 安裝指南 目 錄 1 2 2 7 11 13 22 ...

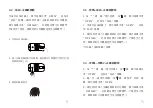
Страница 3: ...小心搬運 安裝及使用 避免 受傷 當箱門打開時重心偏移 請看管兒童不要攀爬保 險箱 避免壓傷 請將緊急鑰匙及主鑰匙分開保管 請勿將緊急鑰匙及主鑰匙存放入保險箱 出廠用戶密碼為 1234 出廠主密碼為 88888888 請儘快修改密碼及指紋 緊急鑰匙 附件清單 AA 電池 4粒 三 首次使用指南 3 1 1 2 3 4 5 6 注 購買時請仔細檢查附件確認齊全 說明書 1本 主鑰匙 2條 緊急鑰匙 2條 固定螺栓 2條 保養卡 1張 注 因各型號差異 產品款式稍有不同 把手 只限部分型號 主鑰匙 主鎖匙孔 液晶體顯示屏 指紋 數字按鈕 緊急鎖匙蓋 ...

Страница 4: ...蓋 2 水平插入緊急鑰匙 順時針方向轉動鑰匙 3 垂直插入主鑰匙 順時針方向轉動鑰匙 此時輕拉便可打開 櫃門 注 帶把手之型號 需順時針方向轉動把手及拉開櫃門 3 3 安裝電池 電池盒 3 4 登記指紋 登記指紋後 只能用已登記的指紋開啟保險箱 2 位於 保險箱需要 4 節 AA 1 5V R06 電池 電池盒 保險箱門內上方 1 在使用保險箱前 必須裝上電池 1 按一下登記開關 保險箱 門內上方的紅色按鈕 顯示 屏會出現 FINGER ...

Страница 5: ...IN 再次輸入新主密碼 按 鍵確認 顯示屏會出現 dONE 輸入8位新主密碼 按 鍵 顯示屏會出現 注意 1 為了減少被盜竊的風險 請儘快更改主密碼 2 主密碼適用於遺忘用戶密碼時作緊急開門使用 請妥 善保存勿向他人透露 1 長按 鍵3秒 顯示屏會出現 NEU 2 再按 鍵 輸入出廠主密碼 出廠主密碼為 88888888 表 示 密 碼 已 成 功 更 改 如 錯 誤 輸 入 顯 示 屏 會 出 現 E CODE 並退回待機狀態 3 6 更改 新增用戶密碼 首次使用設置 1 長按 鍵3秒 2 戶 顯示屏會出現 USER 輸入出廠用戶密碼 出廠用 密碼為 1234 再按 鍵 3 鍵 碼 按 鍵確認 顯示屏會出現 dONE 表示密碼 已成功更改 出廠用戶密碼便會失效 成功更改後 顯示 屏會出現 ADD 用家可繼續新增其他用戶密碼 最多 30組 如錯誤輸入 顯示屏會出現 E 顯示屏會出現 ADD...

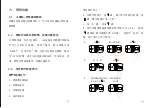
Страница 6: ... 顯示屏會 顯示屏會出現 ADD 輸入4 8位新用戶密碼 按 顯示屏會出現 AGAIN 再次輸入新用戶密碼 出現 ADD 四 開啟保險箱 此系列採用雙重驗証模式 為你提供更高 安度 保 5 種開啟方法 4 1 密碼 主鑰匙開啟 按 鍵 輸入用戶密碼 按 鍵 顯示屏會出現 並發出 咇咇 兩聲 請於5秒內插入主鑰匙順時針方向轉動 顯示屏會出現 OPENED 此時輕拉便可打開櫃門 帶把 手之型號 需順時針方向轉動把手及拉開櫃門 OPEN 回待機狀態 3 驟 機狀態 用家可繼續新增其他用戶密碼 最多30組 重覆1 2步 如錯誤輸入 顯示屏會出現 E CODE 並退回待 按 鍵 輸入用戶密碼 按 鍵 1 插入主鑰匙順時針方向轉動 輕拉便可打開櫃門 需操作第三步 帶把手之型號 2 順時針轉動把手 3 ...

Страница 7: ...號 需順時針方向轉動把手及拉開櫃門 4 3 密碼 指紋 主鑰匙開啟 1 按 鍵 輸入用戶密碼 按 鍵 顯示屏會出現 OPEN 並發出 咇咇 兩聲 2 手指放在指紋器上 顯示屏會出現 OPEN 並發 出 咇咇 兩聲 3 請於5秒內插入主鑰匙順時針方向轉動 顯示屏會出現 OPENED 此時輕拉便可打開櫃門 帶把手之型 號 需順時針方向轉動把手及拉開櫃門 可先輸入指紋再輸入密碼 4 4 密碼1 密碼2 主鑰匙開啟 1 按 鍵 輸入用戶密碼1 按 鍵 顯示屏會出 現 OPEN 並發出 咇咇 兩聲 2 輸入另一組用戶密碼2 按 鍵 會發出 咇咇 兩 聲 顯示屏會出現 OPEN 3 請於5秒內插入主鑰匙順時針方向轉動 顯示屏會出現 OPENED 此時輕拉便可打開櫃門 帶把手之型 號 需順時針方向轉動把手及拉開櫃門 ...

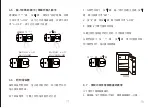
Страница 8: ...現 OPEN 並發出 咇咇 兩聲 3 請於5秒內插入主鑰匙順時針方向轉動 顯示屏會出現 OPENED 此時輕拉便可打開櫃門 帶把手之型 號 需順時針方向轉動把手及拉開櫃門 注意 1 虛位密碼功能 於正確密碼前及後任意增加隨機數字 最 多30位 2 任何情況下 如錯誤輸入 顯示屏會出現 E CODE 並退回待機狀態 3 更改開門認證模式請參考6 3 五 上鎖操作 關上櫃門 插入主鑰匙逆時針方向轉動至鎖上 帶把手之型號 關上櫃門 逆時針方向轉動把手 插入 主鑰匙逆時針方向轉動至鎖上 操作示意圖 輕推關上櫃門 1 帶把手之型號需逆時針方向轉動把手 2 插入主鑰匙逆時針方向轉動至鎖上 3 ...

Страница 9: ...示 屏 會 出 現 RESET 並發出 咇 一聲 此時可放開登記開關 當發 出 咇咇 兩聲 表示已經回復出廠設定 所有指紋 密 碼 開門記錄會被清除 回復出廠設定 6 3 更改開門認證模式 開門有4種方式 1 單密碼或單指紋 2 密碼加指紋 3 密碼加密碼 4 指紋加指紋 更改操作如下 3 用戶根據需要選擇相應的開門模式 1 2 3 4 再按 聲 表示模式已成功更改 1 在開門狀態下 按 鍵 輸入用戶密碼 主密碼 按 2 按 1 鍵 再按 鍵 鍵確認 顯示屏會出現 dONE 並發出 咇咇 兩 鍵 顯示屏會出現 SET 輸入用戶密碼 按 鍵 按 鍵 按 1 鍵 按 鍵 選擇相應的開門模式 1 2 3 4 按 鍵 顯示屏會出現 dONE dONE 1 2 3 ...

Страница 10: ...向上翻查 按 0 鍵向下翻查 按 鍵 或 鍵退出 開門記錄說明如下 001 1 1 001 表示第一條開門記錄 1 1 表示密碼開門 1 2 表示指紋開門 1 3 表示指紋 密碼開門 1 4 表示密碼1 密碼2開門 1 5 表示指紋1 指紋2開門 2 0 表示主密碼開門 3 0 表示緊急鑰匙開門 輸入用戶密碼 按 鍵 按 鍵 按 2 鍵 按 鍵 按 8 鍵 向上翻查 按 0 鍵 向下翻查 按 鍵或 鍵退出 1 2 3 001 指第一條開門記錄 1 1 密碼開門 1 2 指紋開門 1 3 指紋 密碼開門 1 4 密碼1 密碼2開門 1 5 指紋1 指紋2開門 2 0 主密碼開門 3 0 緊急鑰匙開門 ...

Страница 11: ...o ON 表示已完成設置 顯示屏出現 o OFF 表示已完成顯示設置 6 6 照明燈設置 當保險箱門開啟時 燈光將自動亮起 如不關門15秒 燈光會自動熄滅 為了節省電源 可關上照明燈自動亮起功能 1 鍵 顯示屏會出現 SET 2 按 3 鍵 再按 鍵 顯示屏會出現 L OFF 3 重覆1 2步驟 可重啟照明燈 在開門狀態下 按 鍵 輸入用戶密碼 主密碼 按 在關上照明燈自動亮起功能時 可手動操作開燈 在開門狀態下 按 鍵 按 鍵 便可打開照明燈 如不關門15秒 燈光會自動熄滅 按 鍵 按 鍵 照明燈 6 7 警報功能及警報器響起處理 以下情況下警報器會響起 1 錯誤輸入3次密碼或5次指紋 警報器會響起一分鐘 ...

Страница 12: ...開門狀態下 按 鍵 輸入用戶密碼 主密碼 按 鍵 2 顯示屏會出現 SET 按 4 鍵 再按 鍵進入更改震動檢測 靈敏度 靈敏度如下 AL 1 最低1級靈敏度 AL 2 2級靈敏度 AL 3 3級靈敏度 AL 4 4級靈敏度 AL 5 最高5級靈敏度 AL ON 啟動警報器 AL OFF 關上警報器 3 按 0 鍵向下調整 按 8 鍵向上調整 4 按 鍵退出 按 鍵確認 顯示屏會出現 dONE 表示設定 完成 注意 當關上警報器後 需手動啟動警報器 操作如下 在關門狀態下 連續按2次 鍵 會發出 咇咇 兩聲 顯示屏會 出現 dONE 表示設定完成 6 9 啟用 取消提示聲響 1 在開門狀態下 按 鍵 輸入用戶密碼 主密碼 按 鍵 顯示屏會出現 SET ...

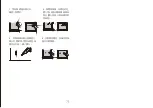
Страница 13: ...設置 部分型號 出廠密碼為 0 0 0 打開小抽屜密碼鎖 逆時針方向轉動密碼鎖 此時輕拉轉盤即 可打開小抽屜 設置小抽屜密碼 1 在開門狀態下 2 可用筆 棒狀物一直按著密碼鎖下方的設置小孔 3 直至調到個人密碼後鬆開設置小孔 4 設置密碼完成 5 順時針方向轉動密碼鎖便可鎖上 轉盤 開 關 七 安裝指南 為降低盜竊風險 穩固地安裝保險箱至為重要 請使用隨保險 箱附送的螺栓將保險箱固定在堅固的磚牆上 建議專業安裝人員安裝以獲得最佳效果 保險箱預設有2個安裝孔於背面 2個安裝孔於底部 安裝孔被內 襯覆蓋 請先用工具從後面戳穿安裝孔內襯 方便定位 2 顆磚牆用之固定螺栓 隨保險箱附送 鉛筆 扳手 電鑽 建議所需工具 ...

Страница 14: ...1 用鉛筆通過安裝孔在 牆壁上做標記 2 移開保險箱 在標記的位 置上用12毫米鑽頭鑽兩個安 裝孔 鑽孔深度以附設螺栓長 度為宜 3 將保險箱安裝孔與牆壁上 鑽孔位置對齊 用附設螺栓由 櫃內向外插入牆上鑽孔 4 收緊固定螺栓 並確定保險 箱已足夠穩固 ...

Страница 15: ...Safe Series YSELC 330 B1 YSELC 450 B1 YSELC 580 B1 YSELC 680 B1 YSELC 900 B1 YSELC 1100 B1 YSELC 1500 B1 Thank you for choosing the Yale Elite Digital Safe Please keep manual safe for future reference AS01 R1 EN YSELC 330 W1 YSELC 450 W1 YSELC 580 W1 YSELC 680 W1 YSELC 900 W1 YSELC 1100 W1 YSELC 1500 W1 ...

Страница 16: ...CONTENT 1 Important Information 2 Display 3 Basic Set Up 4 Unlock the Safe 5 Lock the Safe 6 Additional Functions 7 Installation ...

Страница 17: ...lt user passcode is 1234 and the default administration code is 88888888 The default fingerprint is empty so any fingerprint can unlock the safe Please change your passcode and add master fingerprint before you use this product DO NOTlock the keys in the safe 2 Display Master Key Hole LED Display Fingerprint Sensor Keypad Manual Override Key Hole Handle only applies to certain models Note The prod...

Страница 18: ...ster key gently to open the safe 3 2 Unlock the Safe 3 3 Install Battery Get the batteries from the package Put them in the battery box as per the diagram Battery Box 3 4 Register Fingerprint The default fingerprint is empty so any fingerprint can unlock the safe Only registered fingerprint can be identified after fingerprint set up To reduce the risk of theft it is essential to register your fing...

Страница 19: ...will display E CODE and a long Beep sound to alert you before it returns to resting mode Repeat step if more fingerprints need to be regisyered 3 5 Reset Master Code The default master code is 88888888 Note It is important for user to re program the User Passcode and Master Code for a new safe as soon as it is in place In resting mode press for 3 seconds until the display NEU is shown Input the de...

Страница 20: ...play USER is shown and inputthe recorded User Passcode then press to confirm When it displys ADD input new User Passcode then press to confirm The display AGAIN is shown means input the same new User Passcode again then press to confirm The display DONE means new User Passconde is saved successfully The display shows ADD to let the user register more User Passcode up to 30 units The display E CODE...

Страница 21: ...irm Put in Master Key Turn handle in clockwise Place your finger on the sensor until you hear 2 Beep sound and the display will show OPEN Put the Master Key in within 5 seconds and turn clockwise until you see OPENED in display Pull the key gently or turn the handle in clockwise to open the safe If wrong User Passcode is input the display shows E CODE and follows by a long Beep sound Re do step 1 ...

Страница 22: ...of User Passcode then press to confirm The display shows OPEN follows by 2 Beep sound If wrong User Passcode is input the display shows E CODE and follows by a long Beep sound Re do step 1 3 to unlock the safe 4 5 Fingerprint 1 Fingerprint 2 Master Key Put the Master Key in within 5 seconds and turn clockwise until you see OPENED in display Pull the key gently or turn the handle in clockwise to op...

Страница 23: ...fe 6 2 Delete Fingerprint Passcode Open the safe door and remove 1 unit of battery and press the red set up button and hold it Restore the battery and after 4 seconds there will be a Beep sound When the display shows RESET you can release the set up button When you hear 2 Beep sound it means all fingerprint and passcode and access record will be deleted The setting will resume to the default ex fa...

Страница 24: ...s to confirm Shows dONE to complete 6 4 Track the Access The system can save up to 112 access record old record will be erased accordingly Open the safe door press and enter User Passcode then press to enter administration mode when the display shows SET Press 2 and press to track the user access Press 8 to scroll UP and 0 to scroll DOWN Press or to exit Access record coding example 001 1 1 First ...

Страница 25: ... Passcode 1 Passcode2 Fingerprint1 passcode2 Master Code Manual Override Key 6 5 Turning Display On Off In the resting mode press 2 times and then press until you hear 2 Beep sound The display shows o ON means the display is ON the display shows o OFF means the display is OFF Press and then press until you hear 2 Beep sound to confirm the change o ON means display on o OFF means display off Press ...

Страница 26: ...s off You can repeat step 1 2 to switch the light on Note you can switch on off the light manually under this mode 6 7 Alarm Setting 1 The alarm will ring for 1 minute after 3 consecutive wrong passcode entry 5 consecutive wrong fingerprint entry Enter the correct User Passcode Master Code Fingerprint to stop the alarm 2 The alarm will ring for 1 minute if anyone is trying to hit the safe or move ...

Страница 27: ...and press 2 times until you hear 2 Beep sound follows by the display dONE and it means successful 6 9 Button Sound On Off 1 Open the safe door and press to activate the system Input the Passcode User Passcode Master Code and press to 2 The display shows SET press 5 to enter Administration Setting Mode and press 3 The default setting is button sound on The display will shows U OFF and it means the ...

Страница 28: ... 4 Close the drawer and turn the lock clockwise to lock it 7 Installation below diagram 2 Remove the safe and drill the holes as marked If needed drop the plugs in the drilled holes 3 Reposition the safe over the holes Drop the bolts and washers through the safe into the drilled holes Bolt X 2 pieces Please prepare the above Pencil Spanar Electric Drill 1 Mark the position with pencil 2 Put screws...

Отзывы: