background image

M039437CB  Rel 

0.4 03/2022

BURNERS - BRUCIATORI - BRULERS - BRENNER - QUEMADORES - 

ГОРЕЛКИ

MANUAL OF INSTALLATION - USE - MAINTENANCE

C83X

Microprocessor controlled

LMV2x / 3x

Gas burners

Содержание C83X

Страница 1: ...M039437CB Rel 0 4 03 2022 BURNERS BRUCIATORI BRULERS BRENNER QUEMADORES ГОРЕЛКИ MANUAL OF INSTALLATION USE MAINTENANCE C83X Microprocessor controlled LMV2x 3x Gas burners ...

Страница 2: ...be employed exclusively for the use for which it was designed Before connecting the burner make sure that the unit rating is the same as delivery mains electricity gas oil or other fuel Observe caution with hot burner components These are usually near to the flame and the fuel pre heating system they become hot during the unit operation and will remain hot for some time after the burner has stoppe...

Страница 3: ...mixtures DIRECTIVES AND STANDARDS Gas burners European directives Regulation 2016 426 UE appliances burning gaseous fuels 2014 35 UE Low Tension Directive 2014 30 UE Electromagnetic compatibility Directive 2006 42 EC Machinery Directive Harmonized standards UNI EN 676 Automatic forced draught burners for gaseous fuels EN 55014 1 Electromagnetic compatibility Requirements for house hold appliances ...

Страница 4: ...equipment of machi nes EN 60335 2 Electrical equipment of non electric appliances for house hold and similar purposes Safety requirements Burner data plate For the following information please refer to the data plate burner type and burner model must be reported in any communication with the supplier burner ID serial number must be repor ted in any communication with the supplier date of productio...

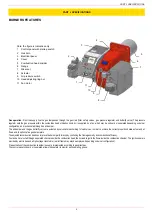
Страница 5: ... can improve the burner performance by controlling the flame geometry and combustion efficiency Fuel and air are routed through separated channels inside the combustion head then mixed to ignite the flame inside the combustion chamber The ignition spark is provided by electrodes and a high voltage transformer a pilot flame may also be employed depending on burner configuration Pre ventilation of t...

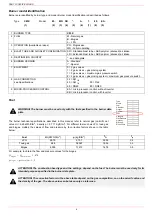
Страница 6: ...VERSION A Standard Y Special 7 EQUIPMENT 0 2 gas valves 1 2 gas valves gas proving system 7 2 gas valves maximum gas pressure switch 8 2 gas valves gas proving system maximum gas pressure switch 8 GAS CONNECTION see Specifications 32 Rp11 4 40 Rp11 2 50 Rp2 65 DN65 80 DN80 9 MICRO PROCESSOR CONTROL EA micro processor control without inverter EB micro processor control with inverter WARNING The bur...

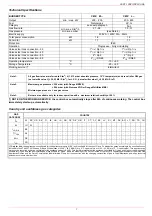
Страница 7: ... calorific value Hi 93 5 MJ Stm3 Note2 Maximum gas pressure 360 mbar with Dungs MBDLE 500 mbar with Siemens VGD or Dungs MultiBloc MBE Minimum gas pressure see gas curves Note3 Burners are suitable only for indoor operation with a maximum relative humidity of 80 GAS CATEGORY COUNTRY I2H AT ES GR SE FI IE HU IS NO CZ DK GB IT PT CY EE LV SI MT SK BG LT RO TR CH I2E LU PL I2E R B BE I2EK NL I2ELL DE...

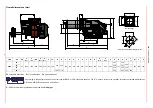
Страница 8: ...8 300 450 705 342 978 634 344 219 249 233 300 347 M10 330 216 250 233 387 131 256 540 502 198 155 40 458 327 50 473 342 526 65 1062 718 563 432 593 292 K K O max O min H P M P N AA CC BB F C W U E Q Z L B J R G Y A S D Boiler recommended drilling template Burner flange V S According to the gas train size and the burner type MB DLE or VGD valves are supplied The V measure refers to the gas filter f...

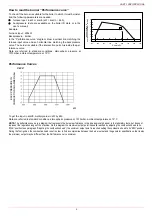
Страница 9: ...spheric pressure at 1013mbar ambient temperature at 15 C NOTE The performance curve is a diagram that represents the burner performance in the type approval phase or in the laboratory tests but does not represent the regulation range of the machine On this diagram the maximum output point is usually reached by adjsuting the combustion head to its MAX position see paragraph Adjusting the combustion...

Страница 10: ...axis the related network pressure is quoted on the y axis pressure value in the combustion chamber is not included To know the minimum pressure at the gas train inlet necessary to get the requested gas rate add the pressure value in the combustion chamber to the value read on the y axis The values in the diagrams refer to natural gas with a calorific value of 8125 kcal Stm3 15 C 1013 mbar and a de...

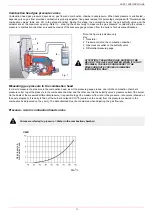
Страница 11: ...s Measuring gas pressure in the combustion head In order to measure the pressure in the combustion head insert the pressure gauge probes one into the combustion chamber s pressure outlet to get the pressure in the combustion chamber and the other one into the butterfly valve s pressure outlet of the burner On the basis of the measured differential pressure it is possible to get the maximum flow ra...

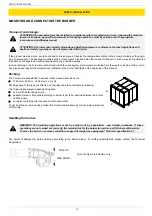
Страница 12: ... operations must be carried out with appropriate resources and qualified personnel ATTENTION Use intact and correctly dimensioned hoisting equipment conforms to the local regulations and health and safety regulations Do not stand under lifted loads Packing The burners are despatched in wooden crates whose dimensions are 1330 mm x 820 mm x 600 mm L x P x H Packing cases of this type are affected by...

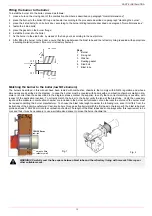
Страница 13: ... in the diagram In case the burner must be coupled with boilers with a combustion chamber smaller in dia meter or shorter than those described in the diagram please contact the supplier to verify that a correct matching is possible with respect of the application involved To correctly match the burner to the boiler verify the type of the blast tube Verify the necessary input and the pressure in co...

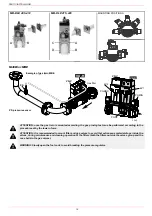
Страница 14: ...ount the gas train proceed as follows NOTE the bellows unit the manual cutoff valve and the gaskets are not part of the standard supply WARNING before executing the connections to the gas pipe network be sure that the manual cutoff valves are closed ATTENTION it is recommended to mount filter and gas valves to avoid that extraneous material drops inside the valves during maintenance and cleaning o...

Страница 15: ...mandatory for MBE optional for VGD and MB DLE 10 Manual valve optional MULTIBLOC DUNGS MB DLE 405 412 MB DLE 415 420 Mounting 1 Mount flange onto tube lines use appropriate sealing agent 2 Insert MB DLE note position of O rings 3 Remove MultiBloc between the threaded flanges 4 After installation perform leakage and functional test 5 Disassembly in reverse order GAS INLET by burner constructor by o...

Страница 16: ...al drops inside the valves during maintenance and cleaning operation of the filters both the filters outside the valves group and the ones built in the gas valves WARNING Slowly open the fuel cock to avoid breaking the pressure regulator A B MB DLE 405 412 A B C D MB DLE 415 420 MOUNTING POSITIONS ALLA V FARFALLA GAS BRUCIATORE ø185 501939 PGMAX PGCP PGMI EV1 EV2 S EV2 EV1 PGMAX PGMIN VD R PGCP VD...

Страница 17: ...les specified by DUNGS are authorised to be used to connect the PS to the VD R Max cable length 3 m A A C B B C 1 Mount flange into pipe systems Use appropriate sealing agent 2 Insert VB together with supplied O rings Check current position of O rings 3 Tighten supplied screws 8xM8x30 in accordance with section 8 4 Screws 4xM5x25 for VD assembly are supplied 5 After installation perform leakage an...

Страница 18: ...om becoming rapidly blocked The filter is normally installed upstream from all the control and on off devices Caution the SKP2 diaphragm D must be vertical see Fig 3 WARNING removing the four screws BS causes the device to be unserviceable ATTENTION it is reccomended to install the filter with gas flow parallel to the floor in order to prevent dust fall on the safety valve during maintenance opera...

Страница 19: ...ns and with a signal in 0 10V controls it through the inverter Generally the curve of the inverter goes from 50 to 100 of the engine revolutions This in addition to improving the setting of the burner also allows a saving on the consumption of the fan engine Terminal interface with Inverter DANFOSS Type Model LMV5 XXXXX M MD xx xx x x xxx EI XXXXX M MD xx xx x x xxx EG XXXXX MG MD xx xx x x xxx EK...

Страница 20: ...trols the fan motor revolutions and with a signal in 0 10V controls it through the inverter Generally the curve of the inverter goes from 50 to 100 of the engine revolutions This in addition to improving the setting of the burner also allows a saving on the consumption of the fan engine Terminal interface with Inverter KOSTAL Tipo Modello LMV5 XXXXX M MD xx xx x x xxx EI XXXXX M MD xx xx x x xxx E...

Страница 21: ...the connection functionality and compliance with the health and safety principles of the earth cable If in doubt ask for an accurate inspection by qualified technical engineers Check the connection to the grounding system Do not use any extraneous conductive parts i e fuel feeding pipes metal structures to connect the burner to ground In connecting the supply wires to the burner MA terminal strip ...

Страница 22: ...ration with separate electrical panel optional The length of the electrical cables must comply with the provisions in the technical sheets of the equipment or the advice the company gives at the time of the offer contract Provide sufficient protections for cables and connectors taking into consideration positioning spaces and the panel burner tracing sur faces Always consult beforehand the electri...

Страница 23: ...ANOMALIES THAT REQUIRED A SHUT DOWN OF THE BURNER IT S POSSIBLE TO ACT ON THE AUXILIARY LINE SWITCH LOCATED ON THE BURNER FRONT PANEL IN CASE OF A BURNER SHUT DOWN RESET THE CONTROL BOX BY MEANS OF THE RESET PUSHBUTTON IF A SECOND SHUT DOWN TAKES PLACE CALL THE TECHNICAL SERVICE WITHOUT TRYING TO RESET FURTHER WARNING DURING NORMAL OPERATION THE PARTS OF THE BURNER NEAREST TO THE GENERATOR COUPLIN...

Страница 24: ...t B2 on see front panel At the end of the pre purge the air damper is driven to the ignition position the ignition transformer is energised signalled by the light B4 on the front panel then few seconds later the EV1 and EV2 gas valves are energised light G1 and G2 on the front panel Few seconds after the gas valves opening the ignition transformer is de energised and light B4 turns to off The burn...

Страница 25: ... and the safety chain 7 Turn the main switch on the panel front with the ON OFF selector to position ON 8 Check the phase and neutral position is correct 9 Open the manual shut off valves slowly in order to prevent any water hammers that might seriously damage valves and pressure regulator 10 Check the sense of rotation of the electrical motors 11 Bleed the line getting rid of all the air in the p...

Страница 26: ... and keys Key F A While pressing the two keys contemporarly the code message will appear by entering the proper password it is possible to access the Service mode Info and Enter keys Used for Info and Service menues Used as Enter key in the setting modes Used as Reset key in the burner operation mode Used to enter a lower level menu Key Used to decrease a a value Used to enter Info and Serivce dur...

Страница 27: ...ta OEM Service Info Fase Funzione Function Ph00 Fase blocco Lockout phase Ph01 Fase di sicurezza Safety phase Ph10 t10 tempo raggiungimento posizione riposo t10 home run Ph12 Pausa Standby stationary Ph22 t22 tempo di salita ventilatore motore ventilatore ON valvola intercetta zione di sicurezza ON t22 fan ramp up time fan motor ON safety shutoff valve ON Ph24 Verso posizione preventilazione Trave...

Страница 28: ... t62 massimo tempo bassa fiamma funzionamento 2 in preparazione per spegnimento verso bassa fiamma t62 max time low fire operation 2 prepa ring for shutdown traveling to low fire Ph70 t13 tempo postcombustione t13 afterburn time Ph72 Verso posizione postcombustione Traveling to the postpurge position Ph74 t8 tempo postventilazione t8 postpurge time Ph80 t80 tempo evacuazione controllo tenuta valvo...

Страница 29: ...shows some basic parameters as 5 Example choose parameter 102 to show the date the display shows parameter 102 flashing on the left and characters _ _ on the right 6 press InFo for 1 3 seconds the date will appear 7 press InFo to go back to parameter 102 8 by pressing it is possible to scroll up down the parameter list see table above or by pressing ESC or InFo for more seconds the display will sh...

Страница 30: ...s and find out the fault in the Error table To perform the reset press InFo for one second The unit displays an event which does not lead to shutdown The display shows current error code c alternating with diagnostic code d Press InFo to return to the display of phases Example Error code 111 diagnostic code 0 To reset press InFo for a second Record the codes and check the Error List to find the ty...

Страница 31: ...S3 switch on the burner control panel see next picture instead of the TAB thermostat as described on the previous paragraphs about the progressive burners Go on adjusting the burner as described before paying attention to use the CMF switch intead of TAB The S3 position sets the oprating stages to drive the burner to the high flame stage set S3 MAX to drive it to the low flame stage set S3 MIN To ...

Страница 32: ...lockwise rotation reduces start flow rate anticlockwise rotation incre ases it Do not use a screwdriver on the screw VR The pressure stabilizer is adjusted by operating the screw VS located under the cover C By screwing down the pressure is increased and by unscrewing it is reduced Note the screw VSB must be removed only in case of replacemente of the coil Fig 6 Fig 7 Key 1 Electrical connection f...

Страница 33: ... requires PS 10 40 or PS 50 200 Outlet pressure MIN 10 25 50 75 MAX PS 10 40 4 mbar 0 4 kPa 2 w c 10 mbar 1 0 kPa 4 w c 25 mbar 2 5 kPa 10 w c 50 mbar 5 0 kPa 20 w c 75 mbar 7 5 kPa 30 w c 100 mbar 10 0 kPa 40 w c PS 50 200 20 mbar 2 0 kPa 8 w c 50 mbar 5 0 kPa 20 w c 125 mbar 12 5 kPa 50 w c 250 mbar 25 0 kPa 100 w c 375 mbar 37 5 kPa 150 w c 500 mbar 50 0 kPa 200 w c ATTENTION To set the outlet ...

Страница 34: ...uced by 15 Repeat the ignition cycle of the burner and check it runs properly Refit the transparent plastic cover on the pressure switch Calibration of low gas pressure switch As for the gas pressure switch calibration proceed as follows Be sure that the filter is clean Remove the transparent plastic cap While the burner is operating at the maximum output test the gas pressure on the pressure port...

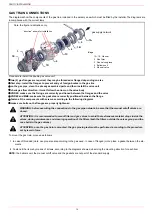
Страница 35: ...n head backwards turning clockwise the knob VRT Fasten VB screw when the adjustment is accomplished Depending on the boiler application it is possible to act on the holes figure B to improve the flame stability and NOx CO emission values If necessary close open the holes in figure B using the screws kit given with the burner CAUTION perform these adjustments once the burner is turned off and coole...

Страница 36: ... cloths Eventually wash it with non corrosive detergents Check the blast tube it must be substituted in case of obvious cracks or anomalous holes Slight deformations that do not affect combustion may be tolerated Check the condition of the burner boiler gasket Eventually substitute it Check the fan s motor no specific maintenance is needed In case of anomalous noises when running check the conditi...

Страница 37: ... filter if the pressure difference between pressure connection 1 and 3 Fig 1 Fig 3 is twice as high compared to the last check You can change the filter without removing the fitting 1 Interrupt the gas supply closing the on off valve 2 Remove screws 1 4 using the Allen key n 3 and remove filter cover 5 in Fig 5 3 Remove the filter 6 and replace with a new one 4 Replace filter cover 5 and tighten s...

Страница 38: ...tion on the combustion head C B A To clean or remove the filter proceed as follows 1 remove the cap unscrewing the fixing screws A 2 remove the filtering cartridge B clean it using water and soap blow it with compressed air or replace it if necessary 3 replace the cartridge in its proper position taking care to place it inbetween the guides as not to hamper the cap replacement 4 be sure to replace...

Страница 39: ...r Flame detection probe To clean replace the detection photocell proceed as follows 1 Disconnect the system from the electrical power supply 2 Shut off the fuel supply 3 remove the photocell from its slot see next figure 4 clean the bulbe if dirty taking care not to touch it with bare hands 5 if necessary replace the bulb 6 replace the photocell into its slot ATTENTION avoid the ignition and detec...

Страница 40: ...iry of the terms of use is strictly prohibited Seasonal stop To stop the burner in the seasonal stop proceed as follows 1 turn the burner main switch to 0 Off position 2 disconnect the power mains 3 close the fuel valve of the supply line Burner disposal In case of disposal follow the instructions according to the laws in force in your country about the Disposal of materials WIRING DIAGRAMS Refer ...

Страница 41: ...witch functions and links Burner control damaged Replace burner control BURNER LOCKS OUT WITHOUT ANY GAS FLOW Gas valves don t open Check voltage on valves if necessary replace valve or the burner control Check if the gas pressure is so high that the valve cannot open Gas valves completely closed Open valves Pressure governor too closed Adjust the pressure governor Butterfly valve closed Open the ...

Страница 42: ......

Страница 43: ......

Страница 44: ...ia L Galvani 9 35011 Campodarsego PD ITALY Tel 39 049 9200944 Fax 39 049 9200945 9201269 web site www cibunigas it e mail cibunigas cibunigas it Note specifications and data subject to change Errors and omissions excepted ...

Страница 45: ...Service manual AZL2x LMV2x 3x Burner Management System M12916CD Rev 3 4 03 2023 ...

Страница 46: ...k 900 Process data 32 Actuators references 33 Gas proving system 33 Air fuel curve points 33 COMMISSIONING THE BURNER 34 Warm setting 38 Cold setting 39 BURNER STARTUP WITH LMV2x ALREADY PROGRAMMED 40 Reset manual lockout 42 Timeout for menu operation 42 Entering the Parameter levels 43 Info level 44 Service level 46 PHASES LIST 47 BACKUP PARAMETER WITH AZL2x 48 RESTORE PARAMETER FROM AZL2x TO LMV...

Страница 47: ...UCTIONS FOR BURNERS z The burner should be installed in a suitable room with ventilation openings complying with the requirements of the regulations in force and sufficient for good combustion z Only burners designed according to the regulations in force should be used z This burner should be employed exclusively for the use for which it was designed z Before connecting the burner make sure that t...

Страница 48: ...nditions such as the development of toxic or explosive mixtures DIRECTIVES AND STANDARDS Gas burners European directives Directive 2009 142 EC Gas Appliances Directive 2006 95 EC on low voltage Directive 2004 108 EC on electromagnetic compatibility Harmonised standards UNI EN 676 Gas Burners EN 55014 1Electromagnetic compatibility Requirements for household appliances electric tools and similar ap...

Страница 49: ...r apparatus EN 50165 Electrical equipment of non electric appliances for household and similar purposes Safety requirements UNI EN 746 2 Industrial thermoprocessing equipment Burner data plate For the following information please refer to the data plate z burner type and burner model must be reported in any communication with the supplier z burner ID serial number must be repor ted in any communic...

Страница 50: ...rforms all the burner control functions and of the Siemens AZL local programming unit that interfaces the system with the user Keys 1 Burner 2 AZL2 3 Air actuator 4 Fuel actuator 5 LMV2 User interface The AZL2x display programming unit is shown below 3 4 1 2 5 2 Bild 1 0707 P V h min s VSD ESC nfo A F ...

Страница 51: ...vice mode Info and Enter keys Used for Info and Service menues Used as Enter key in the setting modes Used as Reset key in the burner operation mode Used to enter a lower level menu Key Used to decrease a a value Used to enter Info and Serivce during the curve adjustments Key Used to increase a a value Used to enter Info and Serivce during the curve adjustments Keys ESC By pressing and at the same...

Страница 52: ...8 Parameters level heating engineer ...

Страница 53: ...cription Password 000 Internal parameters OEM Service 100 Informazioni generali General OEM Service Info 200 Controllo bruciatore Burner control OEM Service 300 Controllo bruciatore solo LMV26 Burner control LMV26 only OEM Service 400 Curve rapporto Ratio curves OEM Service 500 Controllo rapporto Ratio control OEM Service 600 Servocomandi Actuators OEM Service 700 Storico errori Error history OEM ...

Страница 54: ...kup data set Service Info Param Descrizione Description Password LMV20 LMV27 LMV26 LMV37 102 Data produzione in gg mm aa Identification date yy mm dd Service Info x x x 103 Numero identificativ Identification number Service Info x x x 104 Set di parametri preimpostati codice cliente Preselected parameter set customer code Service Info x x x 105 Set di parametri preimpostati versione Preselected pa...

Страница 55: ...ved OEM Service x x 145 Indirizzo dispositivo per Modbus Device address for Modbus OEM Service x x 146 Velocità di trasmissione per Modbus Baud rate for Modbus OEM Service x x 147 Parità per Modbus Parity for Modbus OEM Service x x 148 on una interruzione della comunicazione bus 0 19 9 bruciatore spento 20 100 20 100 potenza Per il funzionamento multistadio 0 bruciatore OFF P1 P2 P3 non valido nes...

Страница 56: ...serci zio azzerabile da Service Fuel 1 Operation hours resettable Service Info x 174 Fuel 1 secondo combustibile Numero di partenze azzerabile da Service Fuel 1 Number of startups resettable Service Info x 175 Fuel 1 secondo combustibile Numero di partenze Fuel 1 Number of startups Service Info x 177 Fuel 1 secondo combustibile Volume com bustibile azzerabile da OEM Fuel 1 Fuel volume resettable m...

Страница 57: ...de fuel train modula ting multistage actuators etc __ undefined delete curves 1 gas direct ignition G mod 2 ignition by gas pilot connected between the two gas solenoid valves EV1 EV2 Gp1 mod 3 ignition by gas pilot connected upstream the gas EV1 Gp2 mod 4 light oil ignition modulating Lo mod 5 light oil ignition double stage Lo 2 stage 6 light oil ignition three stage Lo 3 stage 7 gas direct igni...

Страница 58: ...e x x x 210 Allarme impedimento avviamento 0 non attivo 1 attivo Alarm in the event of start prevention 0 deactivated 1 activated OEM Service x x x 211 Tempo aumento giri ventilatore valore fab brica 2s range impostazione 2 60 s Fan ramp up time default value 2s range 2 60 s OEM Service x x x 212 Tempo massimo raggiungimento bassa fiamma valore fabbrica 45 s range impo stazione 0 2 s 10 min Stabil...

Страница 59: ...ange impostazione 20s 60min Gas Prepurge time default value 20s range 20s 60min OEM Service x x x 226 Gas tempo di preaccensione valore fab brica 2s range impostazione 0 2s 60min Gas Preignition time default value 2s range 0 2s 60min OEM Service x x x 227 Gas tempo di sicurezza 1 TSA1 valore fabbrica 3s range impostazione 0 2 10s Gas Safety time 1 TSA1 default value 3s range 0 2 10s OEM x x x 229 ...

Страница 60: ...ivo 1 esso è modificabile solo su LMV37 Dal punto di vista della sicurezza il funzionamento continuo è valido esclusiva mente per bruciatori di gas con elettrodo di rilevazione Gas Forced intermittent operation 0 deacti vated 1 activated OEM x 240 Limite ripetizioni perdita di fiamma valore fabbrica 2 range impostazione 1 2 Repetition limit loss of flame default value 2 range 1 2 OEM x x x 241 Gas...

Страница 61: ...s Postpurge time 3 abortion with load controller LR ON OEM Service x x x 261 Olio sonda rilevazione fiamma attivo valore fabbrica 0 0 QRB QRC 1 ION QRA Oil active detector flame evaluation default value 0 0 QRB QRC 1 ION QRA OEM Service x x x 262 Olio preventilazione valore fabbrica 1 1 attivo 0 non attivo In ambito civile la norma EN267 rende obbli gatoria la preventilazione In ambito indu strial...

Страница 62: ... inactive 1 active from phase 38 2 active from safety time TSA OEM Service x x 277 Olio Pressostato olio di massima ingresso POC 0 inattivo 1 pressostato olio di massima 2 POC Oil Pressure switch max POC input 0 inactive 1 pressure switch max 2 POC x 279 Olio Forzatura al funzionamento intermittente 0 disattivato 1 attivato Attenzione di default questo parametro è attivo 1 esso è modificabile solo...

Страница 63: ...valvole EV1 EV2 del gas regolazione pneumatica Gp1 mod pneu 9 accensione tramite pilota gas con attacco a monte dell elettrovalvola EV1 del gas regolazione pneumatica Gp2 mod pneu 10 olio modulante con accensione tramite pilota LOGp mod Fuel 1 Burner operating mode fuel train modulating multistage actuators etc __ undefined delete curves 1 gas direct ignition G mod 2 ignition by gas pilot connecte...

Страница 64: ...ore fabbrica 1 0 QRB QRC 1 ION QRA Fuel 1 Gas active detector flame evalua tion default value 1 0 QRB QRC 1 ION QRA OEM Service x 322 Combustibile 1 Gas Preventilazione valore fabbrica 1 1 attivo 0 non attivo ATTENZIONE In ambito civile la norma EN676 rende obbligatoria la preventilazione In ambito industriale vedere i casi in cui la norma EN746 2 prevede la possibilità di non fare la preventilazi...

Страница 65: ...s Intervallo 2 valore fabbrica 2s range impostazione 0 2s 60min Fuel 1 Gas Interval 2 default value 2s range 0 2s 60min OEM Service x 333 Combustibile 1 Gas Tempo postcombu stione valore fabbrica 8s range imposta zione 0 2s 60s Fuel 1 Gas postcombustion time default value 8s range 0 2s 60s OEM Service x 334 Combustibile 1 Gas Tempo postventila zione valore fabbrica 0 2s range impo stazione 0 2s 18...

Страница 66: ... filling time default value 3s range 0 2s 10s OEM x 345 Combustibile 1 Gas tempo test pressione gas valore fabbrica 10s range imposta zione 0 2s 60s Fuel 1 Gas proving test time gas pres sure default value 10s range 0 2s 60s OEM x 346 Combustibile 1 Gas tempo attesa consenso pressostato di minima valore fabbrica 10s range impostazione 0 2s 60s Se la pressione del gas è troppo bassa in fase 22 non ...

Страница 67: ...ombustibile 1 Olio tempo di risposta a cadute di pressione entro TSA1 e TSA2 valore fabbrica 1 8s range imposta zione 0 2s 14 8s Fuel 1 Oil time to respond to pressure faults in TSA1 and TSA2 default value 1 8s range 0 2s 14 8s OEM x 370 Combustibile 1 Olio Intervallo 1 valore fabbrica 2s range impostazione 0 2s 60min Fuel 1 Oil Interval 1 default value 2s range 0 2s 60min OEM Service x 371 Combus...

Страница 68: ...ccensione corta Ph38 fase pro gramma 38 1 preaccensione lunga con ventilatore Ph22 fase programma 22 Fuel 1 Oil time oil ignition default value 1 0 short preignition Ph38 progr phase 38 1 long preignition with fan Ph22 program phase 22 OEM Service x 384 Combustibile 1 Olio Tempo di post ventila zione 3 abortito con regolatore di potenza LR ON Fuel 1 Oil Postpurge time 3 abortion with load controll...

Страница 69: ...tting the cur ves OEM Service x x x 403 Curve controllo inverter F A si accede alla lista dei punti da impostare da P0 a P9 con sultare paragrafo Impostazione curve Ratio control curves VSD curve setting only SO x x 404 Combustibile 1 Curve controllo servoco mando combustibile 1 F si accede alla lista dei punti da impostare da P0 a P9 consul tare paragrafo Impostazione curve Fuel 1 Ratio control c...

Страница 70: ...prepurge speed 100 Index 2 postpurge speed 50 OEM Service x x 504 Combustibile 1 Posizione servocomando combustibile in assenza di fiamma no flame Indice 0 posizione di sosta 0 Indice 1 posizione preventilazione 0 Indice 2 posizione postventilazione 15 Fuel 1 No flame position fuel actuator Index 0 no load position 0 Index 1 prepurge position 0 Index 2 postpurge position 15 OEM Service x 505 Combu...

Страница 71: ...a di carico per modulazione valore fabbrica n d range imposta zione 20 100 Lower load limit default value n d range 20 100 OEM Service x x x 546 Percentuale massima di carico per modula zione valore fabbrica n d range imposta zione 20 100 Higher load limite default value n d range 20 100 OEM Service x x x 565 Combustibile 1 Percentuale minima di carico per modulazione valore fabbrica n d range imp...

Страница 72: ... 0 combustibile Indice 1 aria Tolerance limit of position monitoring 0 1 Index 0 fuel Index 1 air OEM Service x x x 608 Combustibile 1 Impostazione punto di riferi mento Indice 0 combustibile Indice 1 aria 0 chiuso 0 1 aperto 90 Fuel 1 Selection of reference point Index 0 fuel Index 1 air 0 closed 0 1 open 90 OEM x 609 Combustibile 1 Direzione rotazione del ser vocomando Indice 0 combustibile Indi...

Страница 73: ...stop SQN1 3 both OEM x 613 Tipo di servocomando Indice 0 combustibile Indice 1 aria 0 5s 90 1Nm 1 2Nm 3Nm 1 10s 90 6Nm 2 17s 90 10Nm Type of actuator Index 0 fuel Index 1 air 0 5 s 90 1Nm 1 2Nm 3Nm 1 10 s 90 6Nm 2 17 s 90 10Nm OEM x x x 614 Combustibile 1 Tipo di servocomando Indice 0 combustibile Indice 1 aria 0 5s 90 1Nm 1 2Nm 3Nm 1 10s 90 6Nm 2 17s 90 10Nm Fuel 1 Type of actuator Index 0 fuel I...

Страница 74: ...ation of analog output default value 0 0 DC 0 10 V 1 DC 2 10 V 2 DC 0 2 10 V OEM Service LMV27 x x ATTENTION as for SQM3x actuators set the direction according to the acutator function As far as SQN1x actuators set always the counterclockwise direction independently from the model chosen for the specific function ...

Страница 75: ...rror history 701 725 02 diagnostic code Service Info Storico errori 701 725 03 classe errore Error history 701 725 03 error class Service Info Storico errori 701 725 04 fase Error history 701 725 04 phase Service Info Storico errori 701 725 05 contatore avvii Error history 701 725 05 startup counter Service Info 725 Storico errori 701 725 06 carico Error history 701 725 06 load Service Info ...

Страница 76: ... Active load source OEM Service 945 Solo con LMV26 Combustibile attuale 0 combustibile 0 1 combustibile 1 Actual fuel 0 fuel 0 1 fuel 1 Service Info 947 Risultato interrogazione contatti codifica bit Result of contact sensing bit coded Service Info 950 Stato relè codifica bit Required relay state bit coded Service Info 954 Intensità di fiamma 0 100 minima corrente 30 4µA massima corrente100 16µA m...

Страница 77: ... a leakage test designed to detect leaking gas valves and if necessary to pre vent the valves from opening or ignition from being switched on Lockout is initiated When performing valve proving the gas valve on the burner side is opened first to bring the test space to atmospheric pressure Then the valve is closed whereupon the pressure in the test space must not exceed a certain level measured by ...

Страница 78: ...V2x already programmed At the first LMV startup the AZL display will show It means that the unit was never set or that no mode was chisen or that some parameters have to be set furthert Push F fuel and A Air together untilthe display shows code and then a 7 digit dashed line blinking on the left Press the key until the first character of the password the default password is 9876 then press ENTER I...

Страница 79: ...ll elettrov EV1 del gas Gp2 mod 4 accensione a gasolio modul Lo mod 5 accens a gasolio bistadio Lo 2 stage 6 accens a gasolio tristadio Lo 3 stage Burner operating mode fuel train mod multi stage actuators etc __ undefined delete curves 1 gas direct ignition G mod 2 gas pilot ignition with connection between the two gas solenodi valves EV1 EV2 Gp1 mod 3 gas pilot ignition with connection upstrem t...

Страница 80: ...he fuel actuator 0F until the requested value is reached for example 12 15 see below for the ignition point or press F and to decrease the angle To set the air damper opening angle 0A in the ignition point 10 for example see below press A and A and at the same time LMV37 Now the air and fuel quantities are set at the ignition point P0 By pressing point P9 can be programmed to set the air and fuel ...

Страница 81: ...ner is operating warm setting by pressing the ENTER InFo or while the burner is in stand by mode cold setting by pressing ENTER CAUTION at the first burner adjustment it is recommended to set the maximum output P9 at the same value or little higher of the ignition point in order to safely reach point P9 next see next paragraph ...

Страница 82: ...ough the flue analyser Keep the air excess inside normal figures from 3 to 7 residual O2 operating by means for the air damper servomotor Keep increasing the air damper opening and then the gas throttle as done in the sequence above remebering to get the full firing rate wih the gas throttle fully open or the oil pressure regulator at its maximum pressure position See example below If while openin...

Страница 83: ...it before end by pressing ESC or for a faulty shutdown the message OFF UPr Start preven tion will be diplayed until all the curvepoints will be set Note2 if the gas flow rate at high flame point maximum load is changed by means of the pressure stabiliser all the curvepoints must be checked by going through the curve downwards and resetting them if necessary Note3 if the point does not flash it mea...

Страница 84: ...re than 5 seconds to process the curve downwards The curve is then a straight line go on checking the combustion values point by point change them if necessary and in case linearise the curve again Before starting the burner up press F and A at the same time enter the password following the procedure on chapter Programming LMV2x Press ENTER until the display will show Press ENTER again it will sho...

Страница 85: ...he burntime Ph72 travelling to postpurging Ph74 postpurge countdown is displayed Press ESC the parameter 546 Setting the maximum load is displayed Then press to exit the programming mode The display will show Press for a second time the display will show the load percentage the burner is working at When the generator reaches the programmed set point the burner will be in stand by the display will ...

Страница 86: ...on Longer or shorter pushes on the button do not produce a reset so that the system maintains the lockout position Timeout for menu operation The time for automatically leaving the parameter setting level can be adjusted between 10 and 120 minutes using the parameter 127 Timeout for menu operation If during that period of time there is no operation via the AZL2 the parameter setting level is quit ...

Страница 87: ... levels By means of a proper use of the keys it is possible to enter the various level parameters as shown in the following flow chart The burner and consequently the LMV2x are factory set the air and fuel curves as set as well ...

Страница 88: ...and go back to the flashing number The Info level shows some basic parameters as 5 Example choose parameter 102 to show the date the display shows parameter 102 flashing on the left and characters _ _ on the right 6 press InFo for 1 3 seconds the date will appear 7 press InFo to go back to parameter 102 8 by pressing it is possible to scroll up down the parameter list see table above or by pressin...

Страница 89: ...th another message Diagnostic code in the example diagnostic code 3 Record the codes and find out the fault in the Error table To perform the reset press InFo for one second The unit displays an event which does not lead to shutdown The display shows current error code c alternating with diagnostic code d Press InFo to return to the display of phases Example Error code 111 diagnostic code 0 To res...

Страница 90: ...ght By pressinf or it is possible to scroll up down the parameter list 2 Once the last parameter is accessed 143 by pressing the End message will blink 3 Press InFo for more than three seconds or for more than three seconds orto return to the normal display Parameter Description 954 Flame intensity 121 output if set automatic operation 922 Actuators position 00 combustibile 01 aria 161 Lock outs n...

Страница 91: ...eignition time OFF Ph44 t44 intervallo 1 t44 interval 1 Ph50 TSA2 secondo tempo sicurezza TSA2 2nd safety time Ph52 t52 intervallo 2 t52 interval 2 Ph60 Funzionamento 1 stazionario Operation 1 stationary Ph62 t62 massimo tempo bassa fiamma funzionamento 2 in preparazione per spegnimento verso bassa fiamma t62 max time low fire operation 2 preparing for shutdown traveling to low fire Ph70 t13 tempo...

Страница 92: ...ress ENTER until the display will show with the button go to the group 000 of the parameters and press with the buttons and go to 050 parameter press the disply show press again with the button select 1 and start the backup process by pressing After about 5 seconds the backup process ends and the display shows It is recommended that you perform a backup procedure whenever you change the parameters...

Страница 93: ... buttons by pressing enter to confirm iWith the buttons go to the group 000 of the parameters press end select the 050 parameter press the disply show with the button the display shows press again with the button select 1 and start the restore process by pressing After about 5 seconds the restore process ends and the display shows Now LMV has the same configuration that was stored on AZL2x To copy...

Страница 94: ...50 ERROR CODE TABLE ...

Страница 95: ...51 ...

Страница 96: ...52 ...

Страница 97: ...53 ...

Страница 98: ...54 ...

Страница 99: ...55 ...

Страница 100: ...56 ...

Страница 101: ...57 ...

Страница 102: ...58 ...

Страница 103: ...59 ...

Страница 104: ...60 ...

Страница 105: ...61 ...

Страница 106: ...62 ...

Страница 107: ...63 ...

Страница 108: ...64 ...

Страница 109: ... L PE QRB C N ION QRB C X75 1 X10 05 1 X10 06 1 X3 02 1 PLUFT FLAMME P L PE N L 2 3 L X5 03 1 X8 04 1 X8 02 1 X5 03 X10 05 X7 01 X8 04 X8 02 X75 X10 06 X3 02 X3 04 N PE L 1 1 1 1 1 1 1 1 1 QRA QRA QRA Electrical supply Safety loop Valve Valve Operation sgnal Reset Common Increase output Decrease input ON OFF thermosta Air pressure switch UV flame detector Flame sensors supply GNDflame sensors QRB ...

Страница 110: ...66 Wiring variants for LMV27 2 Fuel meter input 1 Supply fuel meter ConnectorX75 ConnectorX5 02 ConnectionsPmax ...

Страница 111: ...ation speed output 2 GND signal reference 1 Controller input 4 20mA 5 Supply 4 Feedback signal 3 PWM Pulse Width Modulation speed output 2 GND signal reference 1 External supply 24V DC ConnectorX75 ConnectorX64 ConnectorX74 2 Fuel meter input 1 Supply fuel meter ConnectorX08 04 X09 04 2 Fuel 0 1 Fuel1 ...

Страница 112: ...odulation speed output 2 GND signal reference 1 Controller input 4 20mA 5 Supply ConnectorX75 ConnectorX64 ConnectorX74 2 Fuel meter input 1 Supply fuel meter ConnectorX5 02 Connections Pmax 4 Feedback signal 3 PWM Pulse Width Modulation speed output 2 GND signal reference 1 External supply 24V DC ...

Страница 113: ......

Страница 114: ......

Страница 115: ......

Страница 116: ...d and data subject to change Errors and omissions excepted C I B UNIGAS S p A Via L Galvani 9 35011 Campodarsego PD ITALY Tel 39 049 9200944 Fax 39 049 9200945 9201269 web site www cibunigas it e mail cibunigas cibunigas it ...

Страница 117: ...IG FU B ...

Страница 118: ......

Страница 119: ......

Страница 120: ......

Страница 121: ......

Страница 122: ......

Страница 123: ......

Страница 124: ......

Страница 125: ......

Страница 126: ......

Страница 127: ......

Отзывы: