manualshive.com logo in svg
background image

or images directly on the system or by connecting the micro SD card to your computer. 


4.1  Video Playback 

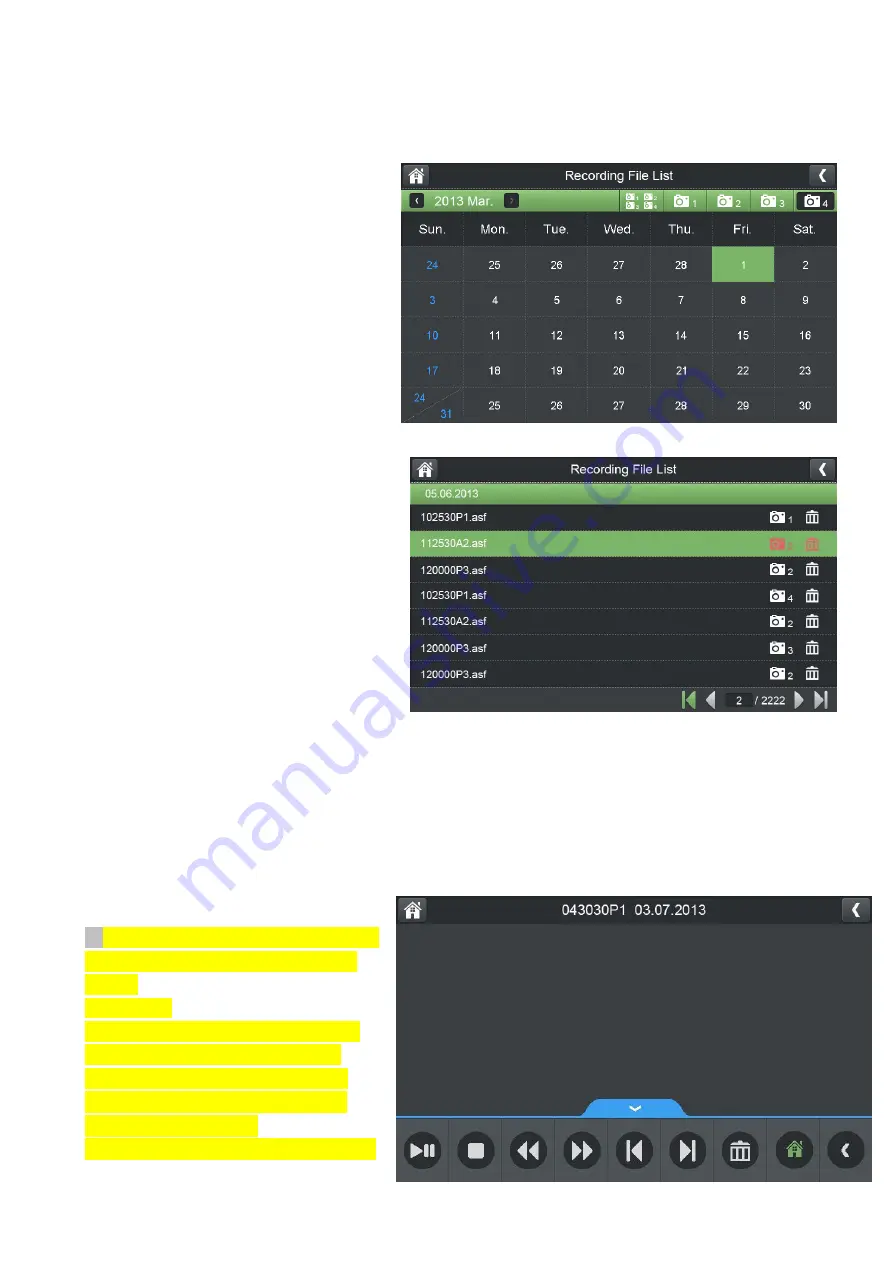
To playback recorded video on the system:   

1. During live viewing, push joystick, The 

Recording File List opens. 

2. Move the Joystick up / down to change 

the displayed month. 

3. Select the channels you would like to 

view recordings from: 

  Move the joystick left / right arrow to 

select the channel numbers 

Move the joystick up / down arrow to show 

or hide each channel on the calendar. 

  Select the button with all four channels to 

show recordings from all connected cameras 

on the calendar. 

4. Once you have selected the month and 

the channels to display on the calendar, 

push the joystick to refresh the display. 

Dates that have recordings available for 

playback are highlighted in green. 

5. Move the joystick left / right to select a 

date on the calendar, and push the joystick 

to view a list of recordings for that date. 

Note: 

  The system uses a 24-hour clock. 

  Recordings are named by start time in hhmmss format and the channel number (for example, the 

recording 133245-2 began recording at 1:32:45 PM on channel 2). 


6. Select a file from the list and push the joystick to confirm then the selected file loads and playback 

begins.. Move the joystick left / right to change pages to find video files quickly. The selected file loads 

and playback begins. 


4.2  Playback controls: 

1. Playback duration: Shows the length of 

the recording and how much has been 

viewed. 

2. File name 

3. Playback status: Shows whether the 

video is playing, paused, or stopped. 

To control playback using the joystick: 

LEFT: Rewind (2x > 4x > 8x > 16x).   

UP: Pause / Play video.


RIGHT: Fast-forward (1x>2x > 4x > 8x > 

Содержание UDRC24

Страница 1: ...DIGITAL WIRELESS 7 LCD MONITORING SYSTEM WITH SD CARD RECORDING MODEL UDR744...

Страница 2: ...g separate settings from Monday to Sunday SD Card external storage up to128GB supported One Lcd monitor can pair four cameras Individual recording files Pre recording Lcd 5v DC 2A Power adaptor 5 Came...

Страница 3: ...Wireless Receiver Front View 1 LCD Screen Displays video from the camera s or displays system operations 2 Microphone Back controls...

Страница 4: ...power adapter 7 Ethernet Port RJ45 Connect the receiver to your router using the included Ethernet cable to enable smartphone tablet connectivity 8 Reset Using a paper clip or other thin object push t...

Страница 5: ...camera it is used to pair the camera with receiver 7 PIR Sensor Detects motion in front of the lens and emits detection signal to transmitter 8 Wall Mounting Bracket Use the bracket to mount the came...

Страница 6: ...e Camera 1 Carefully unpack the camera NOTE If you are installing cameras that did not come with the system please see the pairing camera section of this manual for details on installation 2 Mount the...

Страница 7: ...onnected and powered on the system displays a full screen live view of the camera 1 Signal Indicator The signal indicator shows the strength of the signal being received from the camera The number of...

Страница 8: ...with internet mode A yellow icon shows that the system is connected to the intranet and tell you the monitor connect with intranet mode 6 Time stamp The current date and time on the system month date...

Страница 9: ...ere are four different viewing modes available on the system single channel viewing Auto Sequence Viewing mode view individual channels automatically in sequence Quad mode and Scan mode Note Auto Sequ...

Страница 10: ...panel of the receiver to start motion recording There is a on the bottom left corner In this mode the receiver starts recording prior to 5 seconds when motion detected by any activated camera The rec...

Страница 11: ...recordings available for playback are highlighted in green 5 Move the joystick left right to select a date on the calendar and push the joystick to view a list of recordings for that date Note The sy...

Страница 12: ...D Card You can view the saved video files on your computer PC or Mac by using a SD card reader not included Saved video files are in ASF format Note 1 Some PCs and Macs may have a SD card reader built...

Страница 13: ...cess to Menu system The Main Menu contains 4 submenus Playback Alarm Brightness General Settings 1 Playback Use the menu for viewing recorded videos on the SD card 2 Alarm Adjust receiver beeps volume...

Страница 14: ...3 Brightness Adjust screen brightness 4 General Settings 6 sub menus under General Settings see below picture 5 4 1 Camera Setup...

Страница 15: ...ra by connecting it to power outlet with supplied 9V power adaptor 2 Power on the receiver by connecting it to power outlet with supplied 5V power adaptor 3 Press Pairing in the Camera Setup menu Choo...

Страница 16: ...s the Pair button on the camera once paired after 3s will see the live video on monitor b Camera ON OFF Turn on off the camera by touching the switch bar below the camera icon When turning on off the...

Страница 17: ...or based on motion from one or more cameras according to a selected start and stop time Scheduled continuous recording will record constantly whereas scheduled motion recording will only record scene...

Страница 18: ...tomatically If necessary you can stop schedule recording manually To stop schedule recording Press Manual Recording to stop schedule recording c File Overwrite Use the overwrite feature to have the sy...

Страница 19: ...e is a checkmark next to Synchronize with an Internet time server then push the joystick to confirm You must keep the system connected to your wireless network using the included Ethernet cable to syn...

Страница 20: ...guages available in this system English Spanish and French d Default Settings Restore the system to default settings Default No Select Yes and then press OK to confirm The system takes a few moments t...

Страница 21: ...ll the data stored in the SD card will be deleted default NO f Information It shows the firmware information of the monitor and cameras which paired with the monitor 5 4 4 Motion Detection Settings Se...

Страница 22: ...a Sensitivity Set the motion detection sensitivity at High or Low Or you can turn off the motion detection for the camera b Mask Area Default setting is 80 of the screen count from central part...

Страница 23: ...5 4 5 Network Setup a Advanced Setup Set up Dynamic IP or Static IP address...

Страница 24: ...hanged to default password when confirmed Yes c Network Information when connect to Internet it will show the current IP information when you successfully set up the Network settings system will remin...

Страница 25: ...our PC or Mac 2 Download the latest firmware and transfer it to the root folder on the SD card 3 Once the transfer is complete insert the SD card into the card slot on the receiver 4 Select Firmware U...

Страница 26: ...r router The new download icon appears on the screen if new firmware is available 2 Select Firmware Upgrade and select From Server then select Yes 3 The system takes a few moments to install the lates...

Страница 27: ...for example Touch the App icon MyCam View to launch the app Tap Click here to add camera Then the right pictures as showed there are 2 options to get the UID from the monitor Option A Enter the UID pr...

Страница 28: ...nfirm it 4 The system will show in your device list at an online status as below picture 5 Press the camera you have added on your device now you can view live video from your camera in either portrai...

Страница 29: ...on to take photo from camera side Mute Icon It cut off the audio on the camera side Press this icon to listen the audio from camera side Talk back Icon Press it to talk back to the camera currently be...

Страница 30: ...nline 1 only one remote visit system support 4 remote visit at the same time Quality shows the network quality 6 Back to the add camera menu then press the down arrow a new interface pops out as showe...

Страница 31: ...ng default 000000 video Quality default Min and Alert interval default 3 MIN under Advance setting View Event Select it to playback the video on your phone You can tap icon to view live video by selec...

Страница 32: ...user is encouraged to try to correct the interference by one or more of the following measures Reorient or relocate the receiving antenna Increase the separation between the equipment and receiver Con...

Отзывы: