background image

8

GETTING TO KNOW THE UDR744 SYSTEM

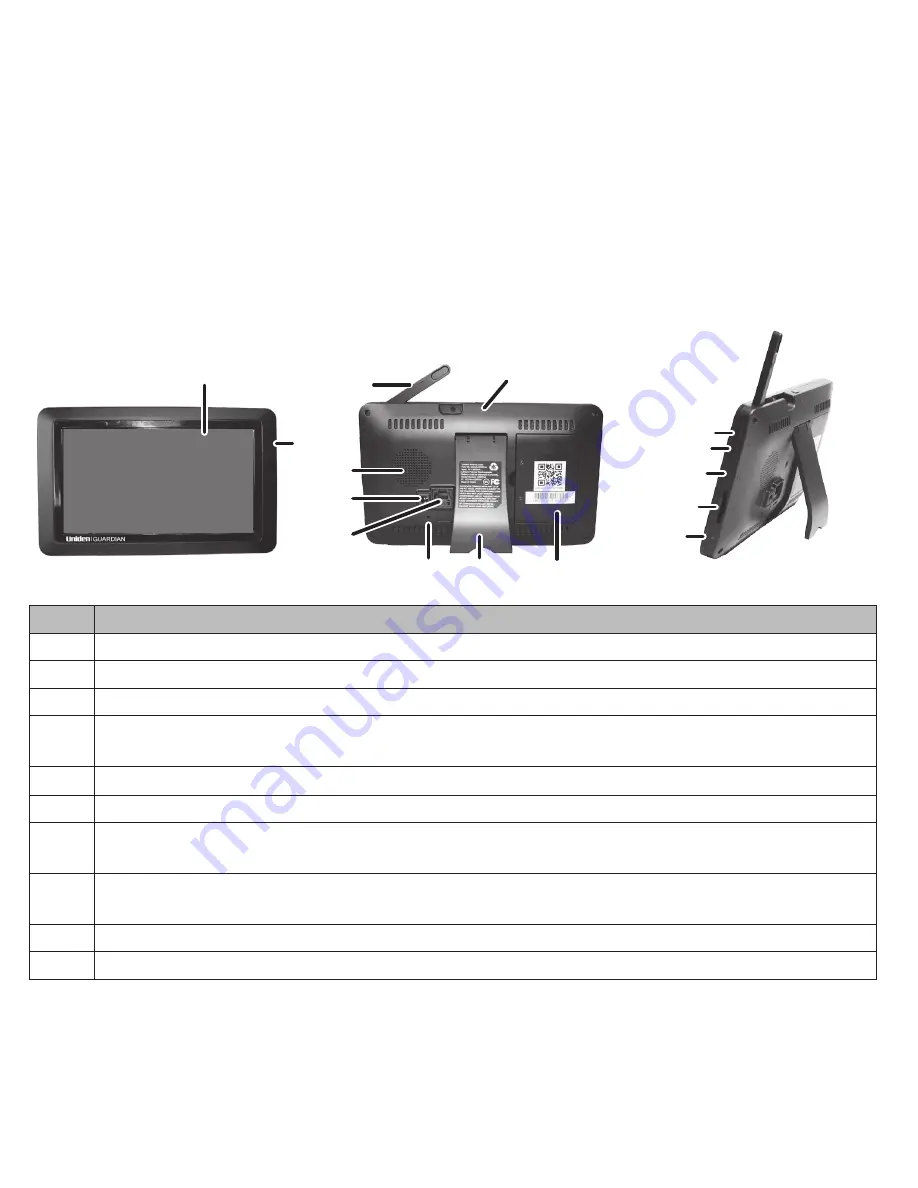
HARDWARE

UDR744 MONITOR

1

2

4

11

3

8

6

9

10

7

5

12

13

14

15

No. What it is

1

LCD Screen: Displays video from the camera(s) or system operation interface.

2

Microphone

3

Wireless Antenna

4

Power Button/ Scan Button: Press and hold to turn the receiver on/off. Press and release 

while the unit is powered on to turn Scan mode on/off.

5

Speaker

6

Power Port: Connert to a local power outlet using the included power adapter.

7

Ethernet Port (RJ45): Connect the receiver to your router using the included Ethernet cable 

to enable smartphone / tablet connectivity

8

Reset: Using a paper clip or other thin object, push the reset button to restore the system to 

its default settings..

9

Receiver Stand.

10

Battery Cover

Содержание UDR744

Страница 1: ...UDR744 OUTDOOR Issue 1 September 2014...

Страница 2: ...to your place of purchase Our customer care specialists are available to serve you Quickly find answers to your questions by 1 Reading your owner s manual included with this product 2 Visiting our cu...

Страница 3: ...LIVE VIDEO MONITOR ONLY 45 PLAYING BACK RECORDED VIDEO 45 ADDING NEW CAMERAS 46 Pair Cameras 47 Troubleshooting Camera Pairing 47 UDR744 BASIC OPERATION 48 MAINTAINING YOUR SYSTEM 52 UPGRADING YOUR UD...

Страница 4: ......

Страница 5: ...ou will find detailed descriptions of each screen and how it is used Remote Access This section tells you how to connect your surveillance system to the internet and access it from your iOS and Androi...

Страница 6: ...amera 9v DC 600mA 5 RF range 150 meter Line of sight New recording indicator Memory card full indicator Quad view PIR trigger and Video motion detect alert Night vision up to 40 feet Direct connection...

Страница 7: ...t RJ45 Cable 8G SD Card 1 2000mA Battery Monitor Mounting Hardware 2 sets Quick Start Guide 1 UDR744 Monitor 2 Camera with stand 2 9V 600mA Power Adapter Camera 2 Antenna may be attached to camera If...

Страница 8: ...rn the receiver on off Press and release while the unit is powered on to turn Scan mode on off 5 Speaker 6 Power Port Connert to a local power outlet using the included power adapter 7 Ethernet Port R...

Страница 9: ...9 No What it is 1 Camera Antenna Sends and receiveds signals to from the monitor 2 IR LEDs Infrared IEDs provide viewing in low no light conditions 3 Camera Lens Catches the video in front of the lens...

Страница 10: ...the LIVE view The screen remains dark until the cameras are powered up CAMERA General The UDR744 cameras included with your monitor are weatherproof and have an IP65 rating Water can be sprayed on th...

Страница 11: ...he camera bring the monitor along it s much easier to get the camera into the right position when you have the display handy 1 Position the camera where you want it plug it into power and check video...

Страница 12: ...he monitor s screen and speakers are off until a camera detects motion That camera then displays at full screen sound and video on until there has been no motion for 15 seconds After that the monitor...

Страница 13: ...change the Live screen video displays The UDR744 system always defaults to the Live screen in Quad mode after being idle for 2 minutes while in any other system screen This default ensures that the sy...

Страница 14: ...nnection Status Volume SEQ display mode Firmware Upload Available NOTE Icons on the monitor actually display in blue What the Icons Mean UDR744 Icon What it does SIGNAL INDICATOR Shows how strong the...

Страница 15: ...d with intranet mode Red Connection has failed or system is not connected to a network TIME STAMP Current date time in month day year hour minute second format SD CARD OVERWRITE Displays if the SD car...

Страница 16: ...lower the volume displays when the volume is off mute TALK BACK INDICATOR Displays when TALK is pressed Press and hold TALK on the side of the monitor to talk back through the camera Release TALK to...

Страница 17: ...17 UDR744 Icon What it does POP UP MENU TAB Tap to acces the pop up menu system...

Страница 18: ...es Set alarms Set the brightness level for each camera connected single channel display only Set up cameras for recording motion detection and other system and network requirements Tap and the pop up...

Страница 19: ...Tap the day you want to review and a list of recordings for that day displays 3 Tap the record you want and it plays with a control bar across the bottom of the screen Play Pause Reverse Forward Previ...

Страница 20: ...triggers the camera to begin recording the monitor sounds an alarm tone This screen lets you determine how loud that tone will be 1 Tap The following screen displays 2 Tap or to increase or decrease t...

Страница 21: ...in sub screens These sub screens let you set features about your system You can turn cameras on and off establish a specific schedule for specific cameras to record set the date and time and motion de...

Страница 22: ...e Recording see page 27 Set up a schedule for pre determined recording times and lengths File Overwrite see page 22 Overwrites the oldest recorded data on the SD card once the card is full System Sett...

Страница 23: ...page 37 Displays and allows you to change information about your network and the monitor s unique UID number Firmware Upgrade see page 23 Lets you select how you want to upgrade your firmware from SD...

Страница 24: ...d display 1 Tap Pairing on the Camera Setup screen 2 Tap the channel number you want to pair the camera to 3 A message displays with instructions to press the PAIR button on the camera Press and relea...

Страница 25: ...turns green when the camera is on It is greyed out when the camera is off Although the camera is turned off it is still powered The monitor will not receive video signals from that camera 3 Tap to re...

Страница 26: ...ers motion sensitivity Schedule a set time and duration to automatically record from a specific camera Set up file retention requirements Tap the following icons as they appear on the screens This scr...

Страница 27: ...tinues recording otherwise recording stops until space is available 1 Tap the Schedule Recording Overview screen displays 2 Tap MODIFY in the lower right corner The Schedule Recording Setup screen dis...

Страница 28: ...ically overwrite the oldest files once the SD card is full This will allow you to continue recording If you do not allow overwrite recording stops when the SD card is full 1 Tap to access the File Ove...

Страница 29: ...day and date 3 Tap the up or down arrow to set the time Tap the AM PM block to toggle between them Tap the up or down arrows to set the correct hour and minute 4 Tap Synchronize with an internet time...

Страница 30: ...zone the monitor is in Default GMT 5 00 Eastern Time USA Canada 1 Tap The Time Zone screen displays 2 Scroll up and down to your camera s time zone and then tap it The most commonly used time zones f...

Страница 31: ...ais 1 Tap the language you want your system to use 2 Tap The system returns to the previous screen and automatically changes over to the requested language no reboot is necessary Default Settings 1 T...

Страница 32: ...card 2 Tap YES on the All stored files will be deleted screen Default NO A confirmation screen displays Tap YES to it 3 A progress bar displays on the screen After formating is complete a Format OK m...

Страница 33: ...tor firmware see page 33 MOTION DETECTION SETTINGS SCREEN Motion detection settings control how strong the motion needs to be to trigger recording This settings screen also lets you mask off any areas...

Страница 34: ...ap High Low or Off to set sensitivity 3 Tap to return to the previous screen Mask Area Use this selection to mask off any parts of the viewing area you do NOT want to be included for motion detection...

Страница 35: ...are finished tap to return to the Motion Detection Settings screen NETWORK SETUP SCREEN This selection lets you determine your network connection type reset the APP password and review your network de...

Страница 36: ...Tap on your selection and fill in the fields requested DCHP is the most common connection Your router will automatically assign an IP address to your UDR744 system Static IP is for those that have the...

Страница 37: ...s password to the default 000000 Tap YES then tap to return to the Reset Password screen Information This screen displays current IP informatiion when the system is connected to the internet Tap to d...

Страница 38: ...to copy the new firmware to your monitor s SD card If you need to upgrade your monitor firmware see page 38 to copy the new firmware to your monitor s SD card and then follow the steps in this section...

Страница 39: ...y reboots Upgrade from Server 1 Use the Ethernet cable provided to connect your monitor to your router 2 Tap to upgrade the firmware through the Server 3 A confirmation screen displays Tap YES 4 The s...

Страница 40: ...re very similar REQUIREMENTS iOS or AndroidTM smartphone or tablet UDR744 monitor connected to your router SET UP THE U GUARD APP 1 Connect the UDR744 monitor to your router using the Ethernet cable i...

Страница 41: ...en manually enter this code Manually enter the UID code from the label on the back of the monitor Scan the QR code on the label on the back of the monitor The UID code now displays on the Add Device s...

Страница 42: ...des a list of cameras on your system and an option to add a new camera Tap to view available operations from that screen Icon Feature name Description App Options A dropdown menu provides these option...

Страница 43: ...ween alert notifications to 1 3 5 10 30 minutes or Off Device Information Displays the mobile device s network information View Event View a list of recordings Tap on a recording to view it Tap the ma...

Страница 44: ...Description View Snapshot View snapshots from the mobile device These snapshots display in thumbnail format Take Snapshot Tap this icon to take a snapshot of the image on video Camera Volume Turns cam...

Страница 45: ...iew screen tap the red for the camera to begin recording The icon blinks and turns blue while recording 2 Tap it again to stop recording The icon stops blinking and turns red You can record from all c...

Страница 46: ...s is visible you can fast forward rewind by dragging the playback bar forwards or backwards On the playback progress bar tap the double arrow to skip forward or backwards about 10 seconds Tap the arro...

Страница 47: ...he Live View screen accordingly TROUBLESHOOTING CAMERA PAIRING Consult the following table for camera pairing troubleshooting suggestions If Try the camera s signal status icon shows no bars making su...

Страница 48: ...Recording Setup tap icon The Schedule Recording Overview screen displays 2 Tap MODIFY to view the Recording Setup screen See Schedule Recording on page 27 NA Delete recording schedule 1 From General S...

Страница 49: ...een 1 Tap 2 Tap View Event 3 Find the recorded event you want to view Tap it The video displays Delete recorded videos 1 From the Recorded File List tap icon 2 Tap YES to confirm deletion NA Take snap...

Страница 50: ...ngs Network Setup tap 2 Tap YES to confirm the change 3 The app returns to the default password 000000 NA Hear audio from camera From the Live View screen tap Sound is now audible through the monitor...

Страница 51: ...ke sure that the camera s antenna is attached and the monitor s antenna is extended make sure the camera is paired to the correct channel re pair the camera and monitor NA the camera won t pair with t...

Страница 52: ...card and reinsert it into the monitor 6 Upgrade the firmware see page 38 TAKING CARE OF YOUR HARDWARE MONITOR As you use your monitor keep the screen clean by wiping it with a microfiber cloth to remo...

Страница 53: ...PUTER 1 Remove the SD card from the monitor 2 Insert it into your computer s SD card slot 3 Navigate to the SD card and locate your files 4 Copy them to the computer These files can now be deleted fro...

Страница 54: ...r from www apple com Video will play in players such as Windows Media Player if an H 264 CODEC plug in is installed I schedule a recording save the schedule and the recording does not happen at the sc...

Страница 55: ...he screen verifying that the cameras are turned on see page 54 verifying that the monitor is displaying a channel with a camera assigned to it The monitor picture has frozen Using a blunt object like...

Страница 56: ...n open area line of sight Image Specification Output Image resolution 640 x 480 VGA 320 x 240 QVGA Image processing MPEG 4 Exposure Auto White balance Auto System Specifications Camera Monitor Weight...

Страница 57: ...nitor Operating voltage 5 V DC 1 Amp 5 V DC 1 5 Amp Power consumption 650 mA max Low light solution 16 IR LEDs 1 Low light sensor N A Low light sensitivity 1 8 lux N A Picture sensor OV7725 1 4 Color...

Страница 58: ...s encouraged to try to correct the interference by one or more of the following measures Reorient or relocate the receiving antenna Move the equipment away from the monitor Plug the equipment into an...

Страница 59: ...center for a defect or malfunction covered by this warranty E used in any conjunction with equipment or parts or as part of any system not manufactured by Uniden or F installed or programmed by anyone...

Страница 60: ...rably in its original packaging Disconnect the battery from the Product separately secure the battery in its own separate packaging within the shipping carton The Product should include all parts acce...

Страница 61: ......

Страница 62: ...2014 Uniden America Corporation All rights reserved...

Отзывы: