background image

2

• 

Set Screen Resolution

• 

Set Motion Sensitivity

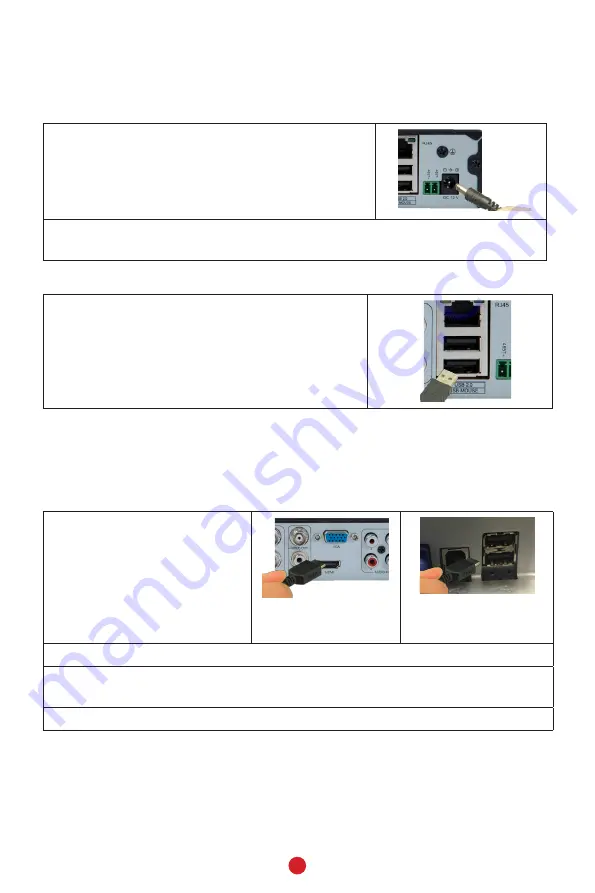
CONNECT DVR TO POWER

1.  Connect the DVR to 12V power using the 12V 

2A power adapter (supplied).

2.  Connect the power adapter to the surge protector plugged into 120V indoor 

power.

CONNECT MOUSE TO DVR

Connect the mouse to the DVR at the labeled USB 

port on the back of the DVR.

CONNECT DVR TO MONITOR

There are three different ways to connect the DVR and monitor, depending on 

what type of monitor port connection is available.

Monitor with HDMI Port

1.  Connect DVR and monitor 

using HDMI Cable 

(included).

HDMI cable to DVR

HDMI cable to Monitor 

(example)

2.  Connect monitor to surge protector plugged into 120V indoor power.
3. 

The DVR beeps as it powers up. After the UNIDEN welcome screen displays, 

the Wizard screen displays.

4.  Select 

Exit

 for now; we will return to the Wizard later in the setup process.

Содержание G6840D1

Страница 1: ...den America Corporation Issue 1 November 2016 Irving Texas Printed in China SET UP GUIDE Wired Video Security DVR System This Set Up Guide applies to the following models B6440D1 G6440D1 G6840D1 G6860D2 G6880D2 ...

Страница 2: ...hese products to be in compliance with all local state and federal law For further information on video surveillance and audio recording legal requirements please consult your local state and federal law 2016 Uniden America Corporation All rights allowed by law are hereby reserved Information in this document is subject to change without notice ...

Страница 3: ...ouse Ethernet Cable HDMI Cable Camera Mounting Kit If any items are missing or damaged visit www uniden com for assistance SETTING UP YOUR SYSTEM BASIC Images in these installation procedures show the front and back panels of the G6840D1 Other models back panels will be different but similar Basic setup connects the DVR to all peripheral equipment cameras mouse monitor etc and power Once connected...

Страница 4: ...R CONNECT DVR TO MONITOR There are three different ways to connect the DVR and monitor depending on what type of monitor port connection is available Monitor with HDMI Port 1 Connect DVR and monitor using HDMI Cable included HDMI cable to DVR HDMI cable to Monitor example 2 Connect monitor to surge protector plugged into 120V indoor power 3 The DVR beeps as it powers up After the UNIDEN welcome sc...

Страница 5: ...s as it powers up After the UNIDEN welcome screen displays the Wizard screen displays 4 Select Exit for now we will return to the Wizard later in the setup process CONNECT ETHERNET CABLE Connect one end of the Ethernet cable to the RJ45 jack on the DVR and the other to your ethernet connection device router cable box etc CONNECT CAMERAS TO DVR AND POWER Each camera connects to one end of the 60 fo...

Страница 6: ... INSTALL CAMERAS Video surveillance laws vary from state to state Check local regulations to be sure you are operating in a legal manner Installation Tips When selecting an outside location for your cameras keep in mind that most cameras are designed to operate between 14 F to 122 F 10 C to 50 C with a relative humidity of up to 95 Avoid installing cameras in direct sunlight and consider wind chil...

Страница 7: ...times the weight of the camera Avoid direct exposure to the weather Cameras which are weatherproof may be mounted outside such as under an eave or other overhang however the image will be affected by rain etc landing on the lens Do not allow direct sunlight to land on the lens 1 With the DVR connected to the camera hold it in the location where you want it mounted Check the display on the monitor ...

Страница 8: ...DVR to the power supply the DVR powers up and the POWER and HDD LEDs on the front light up 2 After the DVR powers up and the UNIDEN welcome screen displays the first of three Wizard screens displays Fill in the date and time information The most commonly used time zones for this system are GMT 05 00 Eastern Standard Default GMT 06 00 Central Standard GMT 07 00 Mountain Standard GMT 08 00 Pacific S...

Страница 9: ...on any Live View screen a menu shortcut screen displays 2 Select Main Menu the Login dialogue box displays The user name admin is already entered There is no password required so select Login set a password after you log in NOTE Uniden strongly recommends that you set a password for your system 3 The Main Menu screen displays SET PASSWORD 1 From the Main Menu screen select Setup Users The User Man...

Страница 10: ...lso block off mask certain areas of the camera s viewing window so normal movement in those areas trees wind chimes etc won t trigger recording 1 From the menu shortcut screen select Main Menu Setup Alarm Motion The Motion screen displays 2 Set each camera s motion detection specifications Select Camera Select the channel you want to record when motion is detected Select Holding Time Set how long ...

Страница 11: ... to the detailed Owner s Manual for other ways to mask areas from recording BASIC OPERATION This section covers the most common operations related to recording and viewing video files See the detailed Owner s Manual on www uniden com for more information on all operations and specifications for this system MANUAL RECORDING 1 From the menu shortcut list select Start Record A green square displays i...

Страница 12: ...eps for each channel or select Apply Settings To and enter the channel number to use those same settings VIEW RECORDED FILES 1 Go to Main Menu Search The Search screen displays 2 Set up your search parameters Select a date to search from the right hand calendar Select the cameras to search Select single channel or multiple channels to search Enter the timeframe to start searching 3 Select to play ...

Страница 13: ...els 3 Function Hidden Key 4 Operate Playback 09 07 2016 05 30 00 09 07 2016 05 30 00 Refer to the online Detailed Owner s Manual at www uniden com for more system operation details REMOTE ACCESS SMARTPHONE View live and recorded video remotely using an iOS or Android device and Uniden s ProHD App iOS screens are similar to the Android screens and are not shown 1 From the Apple App Store Google Pla...

Страница 14: ...not expressly approved by the party responsible for compliance could void your authority to operate the equipment Avis de conformité à la FCC Ce dispositif a été testé et s avère conforme à l article 15 des règlements de la Commission fédérale des communications FCC Ce dispositif est soumis aux conditions suivantes 1 Ce dispositif ne doit pas causer d interférences nuisibles et 2 Il doit pouvoir s...

Страница 15: ...product STATEMENT OF REMEDY In the event that the product does not conform to this warranty at any time while this warranty is in effect warrantor will repair the defect and return it to you without charge for parts service or any other cost except shipping and handling incurred by warrantor or its representatives in connection with the performance of this warranty THE LIMITED WARRANTY SET FORTH A...

Отзывы: