background image

ii

This page is a very condensed version of your owners manual. It is designed to allow you to get your
phone installed and operating as quickly as possible - however it does not attempt to explain any of the
advanced features of your phone.

Here!

Installation

TEL   PWR

Charge Base

AC Adaptor

Power point

Quick Reference Guide

Start

Start

Here!

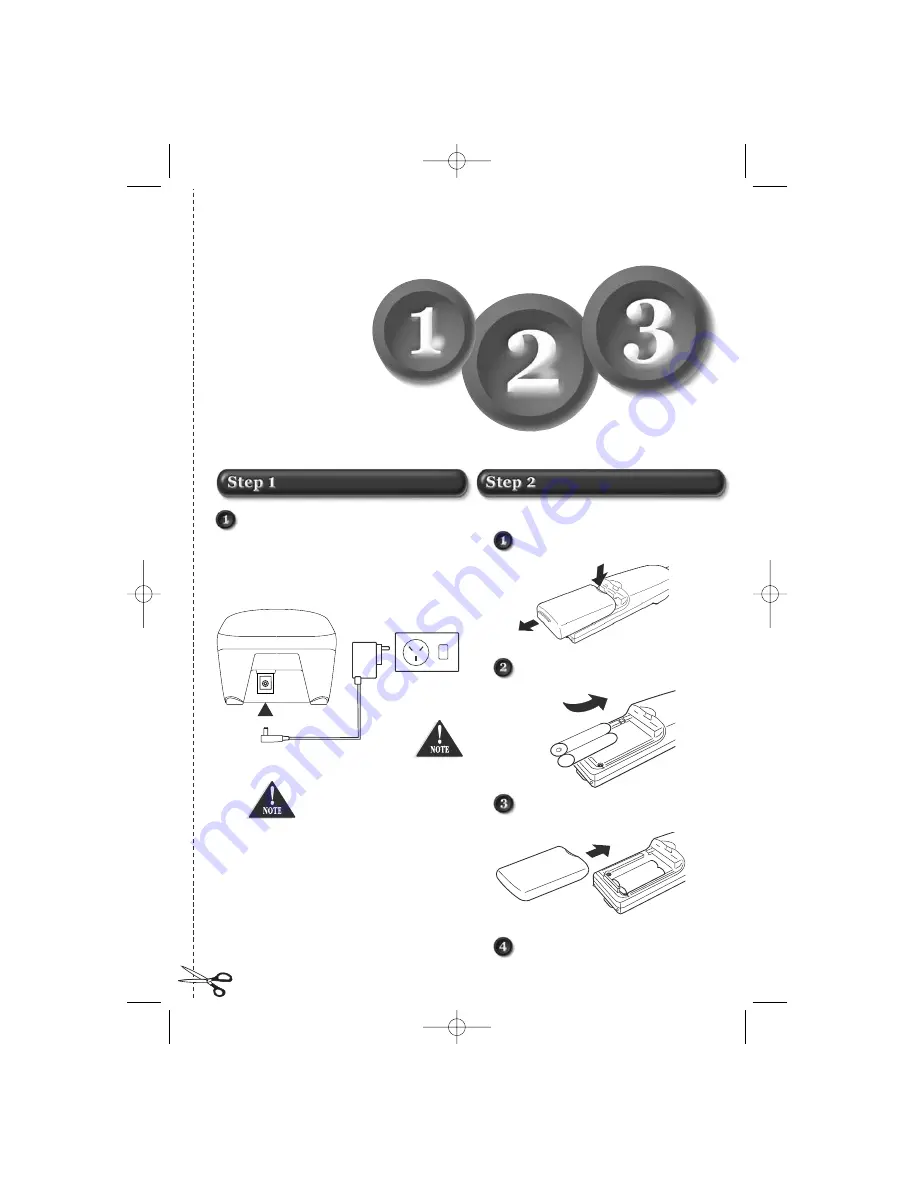
Installing the Handset Batteries

Press battery cover to release.          
Slide cover off.

Install the 2 rechargeable 
batteries in each handset.

Slide the battery covers back  
until they snap into place.

Place the handset on the charge base
and charge uninterrupted for 15 hours.

+

+

--

+

-

Plug the telephone cord into the main base unit,
then into the telephone socket on the wall.

Plug the AC Adaptor cord into the charge base unit,
then into the power point.

Make sure the AC 

Adaptor remains 

plugged in and 

switched on at  all 

times. Use only 

the Uniden AC

 Adaptor supplied 

with this unit.

Use only the battery

pack supplied or

rechargable AA

Ni-Cad Batterys.

DO NOT USE

STANDARD

BATTERYS

AC Adaptor

Additional Charger

PWR

Plug the AC Adaptor cord into the charge base unit,
then into the power point.

Use only the

Uniden AC

adaptors supplied

with this unit

Use only the battery

pack suppllied or

rechargable AA NiCad

Batteries.

DO NOT USE

STANDARD

BATTERIES

Dect 1802 Qk  7/19/02  3:44 PM  Page 3

Содержание DECT 1802

Страница 1: ...de DECT 1802 Quick Start Guide Here Quick Reference Guide Start Start Here Quick Start Guide next page Optional Handset and Charge Base Suits Models Dect 1805 Dect 1806 Dect 1807 Dect 1802 Qk 7 19 02...

Страница 2: ...s CHOOSE a central location AVOID Moisture INSTALLATION SAFETY Choosing the best location for your phone When choosing a location for your phone there are a number of appliances the phone should not b...

Страница 3: ...he charge base and charge uninterrupted for 15 hours Plug the telephone cord into the main base unit then into the telephone socket on the wall Plug the AC Adaptor cord into the charge base unit then...

Страница 4: ...base unit Remove handset from the base and speak If handset is off the base unit Pick up handset press and speak iii Registering a handset to a base unit Press and hold on the Main Base 5 seconds The...

Страница 5: ...tion 5 Base Station Registration Key 6 Handset De Registration 7 PIN Code Changes 8 Using Your phone Switching the Handset on and off 9 Locking and Unlocking the Keypad 9 Call Timer 9 Making an Extern...

Страница 6: ...tart Start Here Quick Start Guide next page Optional Handset and Charge Base Suits Models Dect 1805 Dect 1806 Dect 1807 Printed Materials Use only 1 2 volt Ni Cad Rechargeable Batteries INCLUDED IN YO...

Страница 7: ...ressing is equivalent to picking up a conventional telephone Memory Key Used to access Dialling Memories Up Down Cycle Key Some settings offer a series of options e g Five ring styles are offered Thes...

Страница 8: ...nternal calls may be made between these handsets BATTERY LEVEL Indicates the current battery status When the battery is empty the Low Battery Warning Tone will sound if it is set Thirty seconds later...

Страница 9: ...acturers provided that they also comply with the GAP requirements Similarly other manufacturer s handsets can be registered with the Base station For the registration procedure associated with non Uni...

Страница 10: ...If the handset is already registered onto a Base Station then the number of the Base Station will flash If you have more than one Base Station and are registering the handset onto a second Base Stati...

Страница 11: ...y a Handset number must be selected Each Base Station can support up to six Handsets The display shows the available handset numbers Select the first available Handset number eg Press Note that the di...

Страница 12: ...or the current System PIN Press the 4 digit PIN Press the new 4 digit PIN Confirm the new PIN digit keys by entering the number again Confirm the setting and ensure that you make a note of the new PIN...

Страница 13: ...ion cradle it will automatically switch back on LOCKING AND UNLOCKING THE KEYPAD Locking the Handset keypad prevents accidental key presses causing dialling or programming The only activities that can...

Страница 14: ...hen check that the number is correct before dialling Key in the number As the number is entered it is displayed Press If a digit is entered incorrectly use a short press of to delete it Press to dial...

Страница 15: ...r press to exit Dialling from memory by scrolling stored numbers Press Press Cycle to step through the numbers you previously stored until the number you wish to dial is displayed Press and the number...

Страница 16: ...ons press Press long press greater than 2 seconds Press to call the number directly The Caller ID Store location is numbered from 01 25 The telephone number of the most recent caller 01 will be displa...

Страница 17: ...tional Dect handset is required for this feature CALL TRANSFER THROUGH A PABX This telephone may not be compatible with all Business Telephone Systems Please contact your PABX provider for information...

Страница 18: ...igit may be removed by a short press of less than 2 seconds Changing the Number The number stored in a particular dial memory can be overwritten or changed simply by following the procedure for storin...

Страница 19: ...tored in the displayed location will be deleted RECEIVED SPEECH VOLUME The volume of received speech heard in the earpiece can be adjusted through five levels This must be done whilst a call is in pro...

Страница 20: ...tched off by following the procedure above and selecting the Zero level setting With the ringer switched off will be shown on the display The phone symbol will flash when an incoming call is detected...

Страница 21: ...ppliances or metal objects Place the handset back on the base unit for a few seconds You may have exceeded the Ringer Equivalence Number REN limit of how many phones can be connected to the same line...

Страница 22: ...year the Base Unit and Handset only All accessories AC Adaptor etc are covered for 90 days only STATEMENT OF REMEDY In the event that the product does not conform to this warranty at any time while t...

Страница 23: ...THANK YOUFOR PURCHASING A UNIDEN PHONE 2002 Uniden Australia Pty Limited Uniden New Zealand Limited Printed in China UAZZ01589ZZ Dect 1802 Qk 7 19 02 3 45 PM Page 23...

Отзывы: