background image

Use only the supplied AC adapter (AD-0005). Do not

use other AC adapters.

• Place the charger close to the AC outlet so that you can

unplug the AC adapter easily.

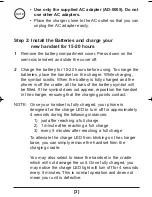
Step 2: Install the Batteries and charge your

new handset for 15-20 hours

1

Remove the battery compartment cover. Press down on the
semi-circle indent and slide the cover off.

2

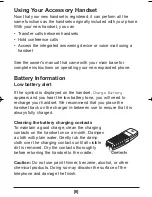
Charge the battery for 15-20 hours before using. To charge the
batteries, place the handset on the charger. While charging,
the symbol scrolls. When the battery is fully charged and the
phone is off the cradle, all the bars of the battery symbol will
be filled. If the symbol does not appear, reposition the handset
in the charger, ensuring that the charging points contact.

NOTE: Once your handset is fully charged, your phone is

designed for the charge LED to turn off for approximately
4 seconds during the following instances:

1) just after reaching a full charge
2) 1 minute after reaching a full charge
3) every 5 minutes after reaching a full charge

To alleviate the charge LED from blinking on the charger
base, you can simply remove the handset from the
charging cradle.

You may also select to leave the handset in the cradle
which will not damage the unit. Once fully charged, you
may notice the charge LED light will turn off for 4 seconds
every 5 minutes. This is normal operation and does not
mean your unit is defective.

[3]

UU01499BA_0  8/9/06  2:38 PM  Page 3

Содержание DCX100 - DCX 100 Cordless Extension Handset

Страница 1: ......

Страница 2: ...vice assistance or if you have any questions about how Uniden s products can accommodate persons with disabilities please call the accessibility voice TTY line 1 800 874 9314 A representative is avail...

Страница 3: ...ndset ready to use Step 1 Connect the Charger 1 Connect the AC adapter AD 0005 to the DC IN jack and to a standard 120V AC wall outlet 2 Set the charger on a desk or tabletop 2 Base Charger Accessory...

Страница 4: ...ill be filled If the symbol does not appear reposition the handset in the charger ensuring that the charging points contact NOTE Once your handset is fully charged your phone is designed for the charg...

Страница 5: ...uction Before registering make sure that you have the base and handset in front of you Also make sure all handsets and the base are in standby mode On the handset you want to register 1 Press to acces...

Страница 6: ...ore than one base registered to your handset s you can de register both the handset from the base or the base from the handset Before deregistering make sure all handsets and the base are in standby m...

Страница 7: ...d on the handset Charge Battery appears and you hear the low battery tone you will need to recharge your handset We recommend that you place the handset back on the charger in between use to ensure th...

Страница 8: ...book number Dial phonebook number Button press enter number Enter number During a call or or place handset on base charger Phone rings then or to display number During a call and select Mute repeat th...

Страница 9: ...teria for the amount of radio frequency energy various products may produce depending on their intended usage This product has been tested and found to comply with the FCC s exposure criteria For body...

Страница 10: ...ives in connection with the performance of this warranty Warrantor at its option may replace the unit with a new or refurbished unit THE LIMITED WARRANTY SET FORTH ABOVE IS THE SOLE AND ENTIRE WARRANT...

Страница 11: ...w uniden com or call 1 800 554 3988 Monday through Friday 8 AM to 5 PM CST If you need special assistance due to a disability or have questions on the accessibility features of this product please cal...

Страница 12: ...UUZZ01499BA 0...

Отзывы: