Uniden CXAI 5198 SERIES Скачать руководство пользователя страница 43

T H E   I N T E G R A T E D   A N S W E R I N G   D E V I C E   [ 4 2 ]

w w w . u n i d e n . c o m

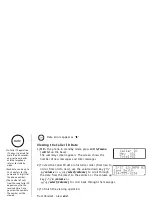
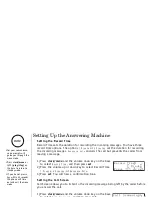
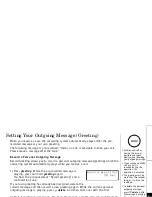
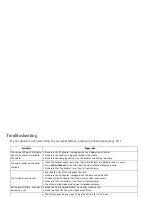
Setting Your Outgoing Message (Greeting)

When you receive a call, the answering system automatically plays either the pre-
recorded message or your own greeting.
The following message is pre-recorded: “Hello, no one is available to take your call. 
Please leave a message after the tone.”

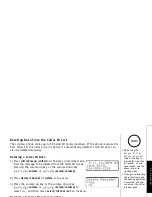
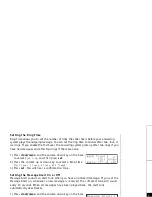
Record a Personal Outgoing Message

Record Greeting allows you to record a personal outgoing message (greeting) which the 
answering system automatically plays when you receive a call.

1) Press 

greeting

. While the pre-recorded message is 

playing, press and hold 

greeting

 again.

You hear the announcement “Record greeting” and a 
confirmation tone.

If your own greeting has already been recorded, delete the 
current message and then record a new greeting again. While the current personal 
outgoing message is playing, press 

delete

. And then start over with the first.

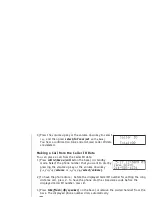
2) Start recording your message. You have 30 seconds, and the message counter starts 

to count down.

3) When you are finished recording your greeting, press 

greeting

 (play/stop)

 or 

set

. You hear a confirmation tone, and then your greeting plays back for you.

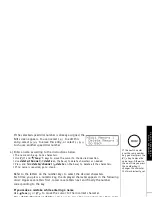
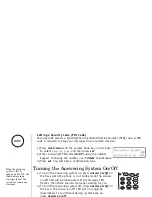
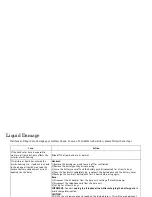
4 G E Q T F  ) T G G V K P I 
            U G E

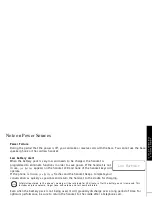
•Position yourself as 

near to the base as 
possible and speak 
clearly when recording 
your outgoing message.

•If you make an outside 

call or a call is 
received during the 
operation, the 
operation is canceled.

•The greeting must be 

more than two seconds 
long, or it will not be 
recorded.

•To delete the personal 

outgoing message, 
press 

delete

 while 

the message is playing. 
The system announces 
“Greeting has been 
deleted.”

note

THE IN

TEGRA

TED 

AN

SW

ERI

N

G DEVI

CE

Содержание CXAI 5198 SERIES

Страница 1: ...CXAI 5198 SERIES OWNER S MANUAL...

Страница 2: ...ume 23 Muting the Ringer 24 USING THE SPEED DIAL MEMORY 29 Using the Speed Dial Memory 29 CALLER ID 34 Caller ID and Caller ID on Call Waiting CIDCW 34 THE INTEGRATED ANSWERING DEVICE 38 The Integrate...

Страница 3: ...t charger Note Illustrations in this manual are used for explanation purposes Some illustrations in this manual may differ from the actual unit 5 8GHz Extended Range Technology Corded Cordless Telepho...

Страница 4: ...phone Be sure to visit our web site www uniden com Uniden is a registered trademark of Uniden America Corporation AutoTalk AutoStandby and UltraClear Plus are trademarks of Uniden America Terminology...

Страница 5: ...play 7 call id Caller ID menu P 16 35 8 vol volume scroll P 16 23 9 vol volume scroll P 16 23 10 tone left cursor P 25 30 11 redial pause P 21 31 12 select int com P 16 27 13 Handset microphone and ri...

Страница 6: ...l rec record P 46 47 22 Message LED 23 In use LED 24 repeat rewind P 44 25 call id P 35 34 hold hold LED P 22 35 mute mute LED P 24 25 36 Curl cord 37 find hs handset intercom P 27 38 clock menu P 13...

Страница 7: ...your new phone read Installation Considerations on page 59 Here are some important guidelines you should consider Avoid noise sources such as a window by a street with heavy traffic Avoid microwave o...

Страница 8: ...by a switch Place the base unit close to the AC outlet to avoid long extension cords 3 Connect the telephone line cord to the TEL LINE jack and to a telephone outlet 4 Set the base on a desk or table...

Страница 9: ...the jack only one way Match the wire colors to the polarity label in the battery compartment connect the battery and listen for a click to insure connection 3 Make sure you have a good connection by...

Страница 10: ...t the charger on a desk or tabletop and place the handset in the charger with the keypad facing forward 3 Make sure that the charge LED illuminates If the LED does not illuminate check to see that the...

Страница 11: ...DC IN 9V jack 3 Wrap the AC adapter cord inside the molded wiring channel as shown 4 Plug the AC adapter into a standard 120V AC wall outlet 5 Plug the telephone line cord into the TEL LINE jack 6 Wr...

Страница 12: ...l is capable of supporting the weight of the base and handset Use 10 screws minimum length of 1 3 8 inches with anchoring devices suitable for the wall material where the base unit will be placed 1 In...

Страница 13: ...adset To use this feature insert the headset plug into the headset jack Your phone is ready for hands free conversations Headsets may be purchased by visiting our website at www uniden com or by calli...

Страница 14: ...de setting Press clock menu or play stop on the base to return to standby mode If you do not press a key within 30 seconds the phone will time out and exit the menu mode When setting Day and Time the...

Страница 15: ...e system requires pulse dialing and you need to send DTMF tones in certain situations during a call you may switch over to tone dialing refer to Tone Dialing Switch over on page 25 1 Press clock menu...

Страница 16: ...ored number will be transferred to the handset If the transfer is successful you will hear a confirmation tone from the base and handset Otherwise Area Code Setting Failed appears on the display and a...

Страница 17: ...n press set 2 Press the volume up or down key to choose English Fran ais French or Espa ol Spanish 3 Press set You will hear a confirmation tone Handset Setup Using the interface Below are some tips f...

Страница 18: ...AutoTalk on 2 Press end The handset returns to standby mode Selecting a Language Handset only You can change the language the menu display will use Choose from English French or Spanish 1 Press and h...

Страница 19: ...set If you want to enter or edit the number refer to Setting the Area Code on page 15 1 Press and hold call id menu on the handset 2 You can check the number entered in Area Code 3 Press end The hands...

Страница 20: ...e following features will function even during a power failure Making and receiving calls with the corded base handset Adjusting the volume on the main base Call waiting flash feature on the main base...

Страница 21: ...ause is required press redial pause 2 Pick up the corded handset or press speaker Receiving a call From the handset 1 Remove the handset from the cradle If AutoTalk is on the phone will automatically...

Страница 22: ...dle 2 Press talk flash 3 Listen for the dial tone 4 Press redial pause OR 1 Remove the handset from the cradle 2 Press redial pause 3 Press talk flash From the base 1 Pick up the corded handset or pre...

Страница 23: ...ndset or flash on the base to accept the waiting call After a short pause you will hear the new caller 3 To return to the original caller press talk flash on the handset or flash on the base again You...

Страница 24: ...in standby mode press the volume up key or volume down key vol to cycle through Ringer A High Ringer A Low Ringer B High Ringer B Low and Ringer off 2 When the phone sounds the ring tone and volume y...

Страница 25: ...has ended Muting the Ringer Do Not Disturb DND The do not disturb feature DND allows you to mute the ringer on the base and handset at the same time The phone must be in standby mode Press and hold d...

Страница 26: ...feature is useful when you need tone dialing to use any automated menu systems such as telephone bank tellers telephone prescription refills customer support menus etc If your phone is set to pulse d...

Страница 27: ...59 Conferencing Up to three people can participate in a conference call using an outside line the handset and the base Joining a Conference Call You can easily join a call already in progress From the...

Страница 28: ...ress select int com end or return the handset to the cradle From the base 1 With the phone in standby mode press find hs intercom on the base 2 The handset will be paged An intercom tone sounds To can...

Страница 29: ...hs intercom Answering an Intercom Page From the handset 1 Pick up the handset from the cradle If AutoTalk is enabled the handset will automatically answer when you pick it up 2 Press talk flash or sel...

Страница 30: ...ing For example you can save your bank account number to speed dial memory When you call your bank s telephone teller service and are prompted to enter your account number simply press memory mem on t...

Страница 31: ...to delete all the characters If no name is required go to step 5 Refer to the letters on the number keys to select the desired characters Each time you press a numeric key the displayed character app...

Страница 32: ...t the display is ready for the number to be entered 6 Use the keypad to enter the phone number each number can be up to 20 digits If you need the phone to pause during the dialing sequence press redia...

Страница 33: ...wing the Caller ID data see page 35 1 Press call id menu call id on the base Select the phone number to be stored from the Caller ID list by pressing the volume up or down key volume or select volume...

Страница 34: ...set or base displays your programmed speed dial number 2 Enter the number 0 9 or press the volume up or down key volume or select volume to select the speed dial number you would like to dial 3 Press...

Страница 35: ...ed in the Caller ID list or save data to your Memory dial list When the Telephone Rings When the Caller ID data is received each the handset and base shows the caller s phone number along with the dat...

Страница 36: ...rough the data from the latest to the earliest or the volume up key volume or select volume to scroll back through the messages 3 To finish the viewing operation From Handset press end In Caller ID op...

Страница 37: ...ID list by pressing the volume up key or the volume down key volume or select volume 2 Press delete channel delete on the base 3 Press the volume up key or the volume down key volume or select volume...

Страница 38: ...the base in standby mode Select the phone number that you want to dial by pressing the volume up key or the volume down key volume or select volume 2 To have the phone dial a 1 before the displayed C...

Страница 39: ...e or announce a special outgoing message to callers when you re away from your phone Features Digital Tapeless Recording Up to 13 minutes of Recording Time Call Screening Personal or Prerecorded Outgo...

Страница 40: ...set 2 Press the volume up or down key to select Record Time 1 Minute 4 Minutes or Announce Only 3 Press set You will hear a confirmation tone Setting the Call Screen Call Screen allows you to listen...

Страница 41: ...key on the base to select Ring Time and then press set 2 Press the volume up or down key to select a Ring Time Toll Saver 2 Times 4 Times or 6 Times 3 Press set You will hear a confirmation tone Setti...

Страница 42: ...ll hear a confirmation tone Turning the Answering System On Off 1 To turn the answering system on press answer on off on the base when the phone is in standby mode The answer on off LED will be illumi...

Страница 43: ...is playing press and hold greeting again You hear the announcement Record greeting and a confirmation tone If your own greeting has already been recorded delete the current message and then record a n...

Страница 44: ...a pre recorded outgoing message or your own personal outgoing message but it will not allow the caller to leave a message To set announce only follow the steps on Setting the Record Time page 39 If y...

Страница 45: ...d the system announces End of messages The system returns to standby 3 After you have reviewed your new messages you can play your old messages by pressing play stop again Once you have listened to a...

Страница 46: ...s play stop at anytime to stop reviewing your messages and return to standby The message counter shows the number of messages stored in memory Deleting a message To maintain maximum record time delete...

Страница 47: ...n the base 2 You will hear the announcement Record Memo Message and a confirmation tone 3 Start your recording 4 When you have finished press play stop memo call rec or set to stop recording The syste...

Страница 48: ...ering system answers the base speaker will let you hear the calls as the machine records the message To adjust the volume press the volume up or down key If you turn the answering system off you canno...

Страница 49: ...elephone You can operate your answering system from a remote location using any touch tone telephone 1 Call your telephone number 2 During the greeting message press 0 and enter your PIN code see page...

Страница 50: ...in the command waiting mode You may enter another command at this time from the chart 6 When you are finished hang up to exit the system The answering system automatically returns to standby Command F...

Страница 51: ...ss 0 and then enter your PIN code The answering system announces the number of messages stored in memory You hear To play incoming messages press zero two For help press one zero 4 Press 0 then 6 to t...

Страница 52: ...time from the chart above 5 When you are finished press end to exit the system The answering system automatically returns to standby If the handset can t access the base within seven seconds you will...

Страница 53: ...he handset keys will operate If the phone is in use Low Battery flashes and the handset beeps Complete your conversation as quickly as possible and return the handset to the cradle for charging Inform...

Страница 54: ...the handset and charger once a month Dampen a cloth with plain water Gently rub the damp cloth over the charging contacts until all visible dirt is removed Dry the contacts thoroughly before returning...

Страница 55: ...h 3 6V Frequency 925 181424 927 451379 MHz 5739 320225 5746 130091 MHz To avoid damage to the phone use only Uniden AD 830 AD 310 and BT 905 with your phone If the handset is left off of the cradle th...

Страница 56: ...try again Press delete channel in the Talk mode to help eliminate background noise Make sure that the handset is not too far from the base Can t make or receive calls Check both ends of the telephone...

Страница 57: ...to wall outlet Make sure the answering system is turned on The answering system does not record any messages Set the record time to either the one minute or four minute option The memory may be full D...

Страница 58: ...set 1 Remove the battery cover and leave it off for ventilation 2 Remove the battery pack by disconnecting 3 Leave the battery cover off and the battery pack disconnected for at least 3 days 4 Once th...

Страница 59: ...not sure of the type of power supply to your home consult your dealer or local power company 8 Do not allow anything to rest on the power cord Do not locate this product where the cord will be damage...

Страница 60: ...andset away from sources of electrical noise such as motors or fluorescent lighting Be sure there is sufficient space to fully extend the base antenna The base can be placed on a desk or tabletop or m...

Страница 61: ...each terminal equipment provides an indication of the maximum number of terminals allowed to be connected to a telephone interface The termination on an interface may consist of any combination of dev...

Страница 62: ...lip 11 C Caller ID Caller ID services 34 Calling 37 D Dial mode 14 E F G H Earpiece volume 24 General information 54 Headset installation 12 Hold 22 I J K L I C notice 60 Important safety instructions...

Страница 63: ...ring 10 times until it answers 2 Press 0 and enter your PIN code 3 Press 0 then 5 to stop the announcement 4 Press 0 then 6 to turn the answering system on C U T REMOTE OPERATION CARD C U T Remote ac...

Страница 64: ...wering System On 0 6 Memo Record Stop 0 7 Greeting Message Record Stop 0 8 Answer System Off 0 9 Voice Prompts 1 0 Task Key Repeat a Message 0 1 Play Incoming Messages 0 2 Skip a Message 0 3 Delete a...

Страница 65: ...Memo...

Страница 66: ...Memo...

Страница 67: ...omer Hotline at 1 800 297 1023 Mon Fri 7 a m to 7 p m or Sat Sun 9 a m to 5 p m CST Phone support is closed on holidays Need a Part To order headsets additional handsets replacement batteries or other...

Страница 68: ......

Отзывы: