background image

77

Reverse Mode

This key will allow you to observe the reverse frequency of the repeater. While pressing

RVRS

, the standard pair frequency will be displayed. For a list of the standard pair

frequencies, refer to the table "Reverse List" in the Appendix. If the frequency that you have
chosen does not have an offset frequency, the display will indicate 

ERROR

and 

NO

REVERSE

. This feature does not work in the Weather Search mode.

Channel Step Selection

You can set channel steps, 5 kHz - 100 kHz or Auto, in Conventional mode or Chain search
mode. The default receive mode should be the proper mode setting in almost all cases. You
may wish to set some VHF channels for NFM mode, depending on any adjacent channel
interference problems. WFM is typically only used for broadcast frequencies, such as TV
audio or FM radio.

See 

STEPS

in "Menu Description" for details.

Mute On/Off

To manually turn ON the Mute function, press and hold 

MUTE

until 

MUTE ON

is displayed. 

You will not hear any audio. This feature does not function in the WX Alert mode, because
the audio is already muted. To turn it OFF, press and hold 

MUTE 

again.

Receiving Mode Selection

You can also set the receiving mode, AM or FM etc., in Conventional mode or Chain Search
mode.

See 

MODE

in "Menu Description" for details.

Frequency and Channel Tuning with the VFO Control

The 

VFO

knob can be used for stepping frequencies or through memory channels (for

Conventional channels or Talkgroup ID Scan Lists).

To switch the setting for the 

VFO

control, press the 

VFO

. This will change modes from

Channel to Frequency or Frequency to Channel.

1. In Conventional mode, when the setting for the 

VFO

is channel, rotate the 

VFO

to move

up (to step up through channels) or down (to step down through channels). If you are in
Trunk Manual mode, you will step through Scan List memory locations.

2. In Chain Search mode, when the setting for the 

VFO

is frequency, rotate the 

VFO

to move up

to step up through frequencies sequentially or to down to step down through frequencies. To
change the step, you will need to go into the Chain Search menu and adjust the step for the
desired memory location.

Remember! When you set Additional Features through the menu screen, you can also
use  

or 

instead of rotating the 

VFO

.

Also instead of pressing 

E

, you can press the 

VFO

control.

BC785D  11/8/2 1:01 PM  Page 77

Содержание BC785D

Страница 1: ......

Страница 2: ......

Страница 3: ...ble 16 Connecting the Tape Recorder 16 Basic Operation 17 Turn the Scanner On 17 Setting the Squelch 17 Understanding the Menu System 18 Menu Description and Numeric Keypad Equivalents 19 Programming 26 Storing Frequencies into Channels in Menu Mode 26 Deleting a Stored Frequency 27 Editing a Stored Frequency 27 Duplicate Frequency Alert 27 Transfer Frequencies 28 Storing Text Tags 28 Beep Alert 2...

Страница 4: ... ID 55 Moving between Scan List Memories 55 I Call Motorola EDACS 55 Multi Track 56 EDACS Reception 58 EDACS Tracking 58 Programming EDACS System Frequencies 58 An EDACS Trunked system 59 Special EDACS Features 59 EDACS SCAT 61 LTR Reception 62 LTR Tracking 62 Motorola Reception 63 Motorola Tracking 63 Fleet Map Programming 64 Selecting Preset Fleet Map 64 Programming a Fleet Map 64 Programming a ...

Страница 5: ...ities Marine and Amateur ham radio Bands Air Band And much more The chart below identifies the scanner band numbers the frequency range the modulation mode and the default step size settings 1 25 0000 26 9600 AM 5 2 26 9650 27 4050 AM 5 3 27 4100 27 9950 AM 5 4 28 0000 29 6900 FM 10 5 29 7000 49 9900 FM 10 6 50 0000 53 9900 FM 10 7 54 0000 71 9500 WFM 50 8 72 0000 75 9950 FM 5 9 76 0000 87 9500 WF...

Страница 6: ...85D 1000 CHANNEL digital ready RSM 1 2 3 4 5 6 7 8 0 9 E 1 100 301 400 601 700 RVRS 101 200 401 500 701 800 901 1000 201 300 501 600 801 900 SELECT 1 3 4 5 6 7 8 9 10 11 1213 14 15 16 17 2 33 Antenna Connector 34 Tape Recorder Output Jack 35 External Speaker Jack 36 DC Power Jack 37 Remote Control Terminal 38 Expansion Slot EXPANSION SLOT 33 34 35 36 37 10 Search Key SRCH 11 Limit Down Key LIMIT 1...

Страница 7: ... Search Direction Indicator Chain Search Mode Indicator Service Search Mode Indicator Scan Mode Indicator ID Scan Mode Indicator ID Search Mode Indicator Channel Type Indicator Conventional Type Trunk Type Morola Tracking Type LTR Tracking Type EDACS Tracking Type Digital Communications P25 APCO Project 25 Receiving Mode Indicators Signal Meter ICON P L O SRCH SRVC SCAN ID SCAN ID SEARCH C M L E P...

Страница 8: ...ter the text and using HOLD or LIMIT to the move cursor After the text is entered press This shortcut card is designed to assist you in getting through the menu screens using the direct entry mode for commonly used features Please read the manual thoroughly before using this card Be sure to back out of the menu screen after each shortcut by repeatedly pressing MENU or by pressing SCAN or SRCH keys...

Страница 9: ...Rotate the VFO control to enter the tag and use HOLD or LIMIT to move the cursor and then press MENU MENU MENU MENU MENU MENU E after each Frequency entered To begin Searching between the Range press To program and control your scanner remotely from a PC using Uniden s E Scanner third party software do the following Press BC785D SHORTCUTS If you need any assistance with this product please call ou...

Страница 10: ...session or use of this scanning radio in a motor vehicle may be prohibited regulated or require a permit in certain states cities and or local jurisdictions Your local law enforcement officials should be able to provide you with information regarding the laws in your community Changes or modifications to this product are strictly prohibited or operation of this product in any way other than as det...

Страница 11: ... more importantly you can stop on a channel and listen to an entire conversation This type of scanning is easy and fun As the demand for public communications has increased many public radio users don t have enough frequencies to meet their needs and this has created a serious problem Trunking radio systems solve this problem In a trunked radio system which contains up to 28 different frequencies ...

Страница 12: ...nced scanner operator you may want to skip to Programming and Receiving Digital and Trunked Systems on page 46 What is APCO Project 25 Digital Communications APCO Project 25 is a modulation process where voice communications are converted into digital communications This conversion is similar to the technology used with digital mobile phones There are several types of project 25 systems available ...

Страница 13: ...riority talkgroups Priority Plus Scan Allows you to scan only priority channels Preprogrammed Service Allows you to toggle through preprogrammed public safety news media TV broadcast audio Ham CB FRS special low power railroad aircraft marine racing and weather frequencies Unique Data Skip Allows your scanner to skip unwanted data transmissions and reduces birdies Memory Backup If power is disconn...

Страница 14: ... Time Monday through Friday Bearcat Radio Club 800 423 1331 Hours are from 8 00 a m to 5 00 p m Eastern Time Monday through Friday Scanner Master 800 722 6701 Hours are from 10 00 a m to 5 00 p m Eastern Time Monday through Friday To obtain another copy of the frequency guide contact one of the following Uniden Parts Department 800 554 3988 Hours are from 7 00 a m to 5 00 p m Central Time Monday t...

Страница 15: ...purchase or Uniden Customer Service at 800 297 1023 8 00 a m to 5 00 p m Central Time Monday through Friday BC785D Scanner AC Adapter AD 580D Cigarette Cord DC Cord Mounting Bracket Telescopic Antenna Operating Guide Trunk Tracker Frequency Guide Other Printed Material E Scanner Programming Software CD ROM Screwdriver ...

Страница 16: ...the scanner The antenna connector on your scanner makes it easy to use the scanner with a variety of antennas such as an external mobile antenna or an outdoor base station antenna Always use 50 ohm coaxial cable such as RG 58 or RG 8 to connect an outdoor antenna For lengths over 50 feet use RG 8 low loss dielectric coaxial cable If your antenna s cable does not have a BNC connector you will also ...

Страница 17: ... 61 x 176 5 x 167 mm Caution Be sure to avoid obstructions behind the mounting surface Follow these steps to mount the scanner in your vehicle 1 Choose a mounting location then use the supplied mounting bracket as a template to mark the positions for the mounting screw holes 2 In the marked positions drill holes slightly smaller than the supplied screws 3 Attach the mounting bracket to the mountin...

Страница 18: ...rminal before you begin Follow these steps to connect the supplied DC power cord 1 Connect the power cord s black wire to a chassis ground such as a metal screw attached to a metal part of the vehicle s frame Be sure that the screw is not insulated from the frame by a plastic part 2 Connect the power cord s red wire with in line fuse to a source of voltage that turns on and off with the ignition s...

Страница 19: ...re you disconnect it from the scanner 1 Insert the adapter s barrel plug into the DC 13 8 V jack on the back of the scanner 2 Plug the adapter into a standard AC outlet Note Use only the AC adapter supplied with your scanner Connecting an External Speaker In a noisy area an external speaker available at a local electronics store positioned in the right place might provide more comfortable listenin...

Страница 20: ... supplied Connect the cable between each scanner s REMOTE jacks See Clone Mode on page 73 You can also upload or download the programmed data to or from a PC using an optional PC interface kit available through your local electronics store Connecting the Tape Recorder You can use a standard tape recorder or a VOX Voice Operated Control recorder To connect the recorder to the scanner connect a cabl...

Страница 21: ...n the hold mode and you should not be receiving a signal on your scanner 1 Press HOLD until you do not hear a signal 2 Make sure that the VOLUME is set to a comfortable listening level 3 Think of the Squelch Control as a gate Turn the SQUELCH control fully counter clockwise This raises the Squelch Gate so high that only very strong signals can get through 4 Turn SQUELCH clockwise until you hear a ...

Страница 22: ...er are rotate the through the menu and press E or VFO to execute the command For simplicity we have chosen to rotate the VFO control up or down in order to scroll through the menu and the E key for entering or executing a command Once you have pressed the E key and executed the final choice for instance ON or OFF the display backs up to the previous level of options Also direct entry of the number...

Страница 23: ... to 10 search ranges The first time you program a range you will need to do so through the Menu After the first time you can program a range as you do on most any other scanner using the numeric keypad VFO control Use this Menu item to select the search range that you want to program You can program range 1 through 10 one at a time For each of the ranges the following options can be modified 1 CHA...

Страница 24: ...e You may wish to do this if you want to search a range but not hear transmissions on any frequency that has a particular subaudible tone Note Through the System Menu you can set the radio to operate in Tone Search mode during Search as well In this mode the radio will automatically determine the active subaudible tone on any frequency received during the search Set a delay for the search ranges T...

Страница 25: ...flagged channel s you will hear three beeps 5 ATTENUATOR The BC785D comes with an RF Attenuation feature If you are near an unusually strong signal source the signal may overload the scanner The scanner may stop repeatedly on that signal and miss other transmissions The RF Attenuation feature works in all modes and attenuates reduces the incoming signal strength to prevent stronger signals from ov...

Страница 26: ...el in this Menu 2 STEPS You can assign a variety of step sizes to the channel 3 TALK GROUP You can program IDs into the Scan List memory either during Trunk Scan or Search without going into the Menu However you can also use the Menu to program IDs This is particularly helpful when you are not near the trunked system you wish to later monitor You can set it up and have it ready to go at some later...

Страница 27: ...se what is typically known as a talkgroup There are some communications which are direct unit to unit conversations where one individual converses with another individual The call is initiated by a radio and is directed to another single radio Within the system no one outside of these two users hears the conversation Your BC785D defaults to I CALL OFF mode You can hear these conversations by using...

Страница 28: ...esent or not CNTRL CH ONLY TYPE 1 TYPE 2 800 900 With this mode you will be able to track Motorola Type I and II 800 and 900 MHz trunked systems by simply entering the control channel which manages the trunked system You will not have to program the voice channels There are 4 channel plans which you can select from 3 SYSTEM OPTION 1 DIMMER Allows you to change the brightness of the display 2 SCREE...

Страница 29: ...n this mode the scanner will stop on any transmission on a programmed frequency Squelch mode does not apply to trunking 2 TONE SQ In Tone Squelch mode if you have set a subaudible tone CTCSS or DCS for a frequency the scanner will only stop on that frequency if the transmission includes the prescribed tone 3 TONE SEARCH In this mode as soon as the scanner stops on any non trunked channel the scann...

Страница 30: ...bulance operations 462 950 Ambulance operations 462 5625 Family Radio Services channel one 2 Press MENU 3 Select 2 SCAN OPTION 1 CONVENTIONAL by rotating the VFO and pressing E 4 Select a channel a Enter the channel number using the keypad b Then press E 5 Select 1 FREQUENCY and enter the frequency a Enter the frequency number using decimal key and the keypad b Then press E 6 Enter the alpha tag a...

Страница 31: ...ncies are automatically locked out Editing a Stored Frequency 1 Press MENU 2 Select 2 SCAN OPTION 1 CONVENTIONAL by rotating the VFO and pressing E 3 Select the channel number you want to edit by rotating the VFO and pressing E 4 Select 1 FREQUENCY by rotating the VFO and pressing E 5 Edit the frequency by using decimal key and the keypad and pressing E Remember You can also use or instead of rota...

Страница 32: ...roup ID s please refer to page 49 Assigning a Bank Tag to a Bank 1 Press MENU 2 Select 3 SYSTEM OPTION 9 BANK TAG by rotating the VFO or using or and pressing E 3 Select the bank number by rotating the VFO or using or and pressing E 4 The cursor appears on the display Scroll the VFO to change the letters and then press or to move right or left Both capital and lower case letters are available as w...

Страница 33: ...ol Programming Tips Do not program a weather frequency into one of the channels since weather channels transmit continuously Use the Weather Search feature to select the weather information band Group similar services into a bank For example program police frequencies in channels 1 through 10 and fire emergency into channels 51 through 60 and so on Put the frequency that you listen to the most or ...

Страница 34: ...l scanning the scanner skips unprogrammed or locked out channels 4 When a transmission is received the scanner stops on that channel When the transmission ends scanning resumes automatically Scan Hold Feature If you want to stop on a channel during scanning press HOLD Note When you press and hold SCAN for 2 seconds the scanner will move to the smallest empty channel If you want to resume scanning ...

Страница 35: ...tronger signals from overloading the scanner The RF attenuation is set at the Menu mode 1 Press MENU 2 For Search mode select 1 SERVICE OPTION CHAIN SEARCH 1 CHAIN SEARCH 1 ON 4 ATTENUATOR 1 ON by rotating the VFO and pressing E OR For Scan mode select 2 SCAN OPTION 1 CONVENTIONAL by rotating the VFO and pressing E Then select the channel number by rotating the VFO and pressing E Select 4 ATTENUAT...

Страница 36: ...y before re scanning 5 sec Stays for 5 sec only before re scanning 10 sec Stays for 10 sec only before re scanning Setting negative delay periods are useful if you are only interested in small seg ments of conversations For example If you set a 5 second delay you will only hear 5 seconds of the conversation and then the scanner will resume scanning whether or not the conversation is finished Remem...

Страница 37: ...cked out Channel 1 Press HOLD 2 Select a locked out channel a Enter the channel number using the keypad b Then press HOLD again 3 Press L O to unlock the channel The L O disappears Restoring All Locked out Channels You can restore all locked out channels in a bank only when a bank is selected for scan If you have deselected a bank and you want to restore all of its locked out channels using the st...

Страница 38: ...not eliminate the Priority Channel but you can change it to any one of the 100 available channels in each bank 1 Press HOLD 2 Select a new Priority Channel a Enter the channel number using the keypad b Then press HOLD again 3 Press and hold PRI for 2 seconds to designate this channel as your new Priority Channel Two beeps indicates that the Priority Channel has been changed The P icon appears on t...

Страница 39: ...els in the banks you selected To activate Priority Channel Plus Only in Scan mode 1 Press PRI to select PRIORITY PLUS 2 Press PRI to select PRIORITY ON or PRIORITY OFF on the display to deactivate Priority Channel Plus Scan Note Priority or Priority Plus Scan are disabled while Search mode is selected ...

Страница 40: ... highest frequencies as above using the keypad and then press LIMIT you can also set a search range The scanner can continuously search up to 10 ranges Chain Search You can select or deselect the search range freely by pressing the corresponding number with the keypad The scanner automatically increases its search speed from 100 to 300 steps per second for the bands having 5 kHz steps Turbo Search...

Страница 41: ...ature 1 Press HOLD or LIMIT at anytime to stop the search 2 Press RSM or SRCH to resume searching Data Skip A scanner will normally stop on any transmission it receives This means the BC785D will occasionally stop on data signals and unmodulated transmissions You can automatically skip many of these types of transmissions during search To activate the Data Skip feature enter into the Menu mode 1 P...

Страница 42: ...ickly store any frequency you find during Search 1 During Search press HOLD or LIMIT to store or when the scanner stops on the frequency you want to store 2 Press TRNFR to store the frequency in the channel you selected The smallest empty channel number flashes on the display If necessary you can also change the channel by scrolling the VFO or using or 3 Press E Note If the frequency you want to s...

Страница 43: ...times again because during the first pass there may not have been any transmissions at that particular time on that frequency Squelch SQ Mode The scanner can be set to the following SQ modes Carrier SQ mode default setting The scanner will stop on any transmission or squelch opening regardless of whether any subaudible tone has been programmed for the channel or search range Tone SQ mode The scann...

Страница 44: ...CS by rotating the VFO and pressing E With CTCSS or DCS Tone Lock ON is set by pressing L O 2 For Search mode select 1 SERVICE OPTION CHAIN SEARCH 5 TONE DATA 1 CTCSS or 2 DCS by rotating the VFO and pressing E With CTCSS or DCS Tone Lock ON is set by pressing L O Remember You can also use or instead of rotating the VFO Also instead of pressing E you can press the VFO control Note To set Tone Lock...

Страница 45: ...ON by rotating the VFO and pressing E ATTENUATOR for more information see page 31 1 Press MENU 2 Select 1 SERVICE OPTION CHAIN SEARCH 4 ATTENUATOR by rotating the VFO and pressing E 3 Select 1 ON by rotating the VFO and pressing E Remember You can also use or instead of rotating the VFO Also instead of pressing E you can press the VFO control DELAY Refer to page 31 Tone SQ ON CTCSS 250 3 Hz settin...

Страница 46: ...cond delay searching begins for the selected service If you want to start searching immediately press RSM 4 To change the searched service rotate the VFO or directly enter the number listed above after pressing SRVC Remember You can also use or instead of rotating the VFO Also instead of pressing E you can press the VFO control Note When you start searching select RACING or SPECIAL by rotating the...

Страница 47: ... beep and the scanner moves to the Hold mode NWR SAME Alert In addition to the conventional weather broadcasts your BC785D is compatible with NWR SAME weather alert When the scanner receives NOAA s Specific Area Message Encoding SAME coded weather emergency signal it sounds the alert siren with a specified message You must program your FIPS code to identify the specific area where you are located ...

Страница 48: ...OUR HEARING COULD OCCUR Programming FIPS Code The 6 digit Federal Information Processing System FIPS codes established by the National Weather Service NWS must be programmed in your scanner These codes specify an emergency and the specific geographic area such as county affected by the emergency 1 Press MENU 2 Select 1 SERVICE OPTION 1 WEATHER 2 ALERT by rotating the VFO and pressing E 3 Select 1 ...

Страница 49: ... the 935 940 MHz band many by utilities See page 58 EDACS SCAT These systems are mainly used in the Midwestern United States and are one channel trunking sites using the EDACS format LTR These systems are mostly for business users and found on the UHF 800 and 900 MHz bands See page 62 For details on the operation and programming for all of these systems see pages 45 71 When tracking these types of...

Страница 50: ...s into channels Here you need to program Talk Group ID s into Locations STEP 1 Selecting or Changing Trunking System Type Before using the Trunk Tracking system you must select the bank and trunk type You can only track one trunked system per bank total of 10 trunked systems 1 Press MENU Remember You can also enter the Trunk Tracking programming mode by pressing TRUNK 2 Select 2 SCAN OPTION 2 TRUN...

Страница 51: ...y for the trunked system using the keypad and pressing E 6 Enter the alpha tag and pressing E See page 49 7 You can also change the step size in this menu See page 93 Note To clear a mistake while entering the frequency press decimal key twice and the display is cleared If you enter a frequency which is out of the system s trunking range a beep sounds and ERROR appears on the display If you enter ...

Страница 52: ...list number will appear on the display You can program your Scan Lists either manually or during Trunking Search mode Check the web site www bearcat1 com free htm for a complete list of talkgroups for your area that you can program into your Scan Lists In order to program Talk Group ID s you must first complete Step1 Selecting or Changing Trunking System Type page 46 and Step 2 Programming Trunked...

Страница 53: ...kgroup displays for EDACS only To enter a LTR ID For a LTR ID the Area Code Home Repeater number and ID make up the Talk Group ID Please see page 62 for more information 1 Enter the Area Code and then press decimal key 2 Enter the Home Repeater number and then press decimal key 3 Enter the ID you want to store 4 Press E Note To clear a stored ID while entering an ID press 0 and E successively and ...

Страница 54: ...he system in several different ways You will find that Search Hold Lockout Scan and Delay are all similar to conventional scanning ID SCAN lets you receive those talkgroups that you store in Scan Lists ID SCAN HOLD lets you selectively listen to a talkgroup in your Scan Lists TRUNKED SEARCH lets you hear all system talkgroup activity unit to unit I Calls may be received as well This is the best wa...

Страница 55: ... hold TRUNK for 2 seconds you can switch Trunk Tracking modes Scan or Search Note While ID Scanning to change all trunking banks to the Service Search mode press SRVC Selecting a Scan List is also possible in the Menu mode LTR only ID SCAN appears on the display during Trunk Scan instead of simply SCAN ID Scan Hold Feature If you want to stop on a ID during ID scanning press HOLD If you want to re...

Страница 56: ... the radio will seek and acquire the trunked system control channel ID Search Hold and Direct Entry ID Hold Mode Just like in Conventional Search Hold lets you pause ID Search on an interesting transmission without storing the talkgroup into memory If you hear an interesting ID during Search mode and want to continue listening to it Press HOLD or LIMIT to stop the search If you want to listen to a...

Страница 57: ...partial AFS entry be sure to read the section EDACS Reception Review ID Lockout You can check all IDs already locked out 1 Press MENU OR 1 When you press and hold L O for 2 seconds in trunking you can also check all IDs locked out 2 Select 2 SCAN OPTION 2 TRUNK by rotating the VFO and pressing E 3 Enter the bank number using the keypad and pressing E 4 Select 7 L O ID REVIEW Remember You can also ...

Страница 58: ...ty in your trunking lists just as you do in your conventional ones You can set the priority by pressing and holding PRI for 2 seconds in ID Scan Hold mode After you ve set up your Scan List press PRI to activate it It s very similar to conventional priority although there is no interrupt during the transmissions Priorities are checked in between transmissions With Priority ON you can hold on an ID...

Страница 59: ...t to unit transmissions that are not heard by other system users Your BC785D can receive these transmissions How you receive I Calls depends on whether you are in Search or Scan mode During I Call reception the display will show the Unit ID number of either the transmitting or receiving mobile unit not a talkgroup Unit IDs will display differently according to the type of trunked system and will r...

Страница 60: ...EDACS or Motorola Type 1 Press decimal key followed by the Unit ID digits then E Motorola Type 2 Press 7 followed by the Unit ID digits then E HINT There is a special code to let you receive all I Call IDs with a single Scan Lists entry Press decimal key 0 E This will store the special code i0 in an EDACS Scan Lists or 700000 in a Motorola Scan Lists or Digital Then whenever you Scan this entry or...

Страница 61: ...tional channels in the same bank or to the next active bank If the scanner finds that a talkgroup in one of your active Scan Lists you will begin to hear that communication and the scanner will of course display the proper talkgroup number and any alpha tag When the communication ends the scanner will wait for the specific periods for any further replies and if none the scanner will move to the co...

Страница 62: ...1heJ YgV W2 J Y gV Lh 5 J Yg X 7 hJ 5 h 7 5gJ HheN J 5he7 5 f W Y gJ 5 J 5 J 5 h 7 5gJ HheN J 5he7 5 hfO 0M V L Hhe 3 h 7 Hh3 he7 H g N 7 7 Hh N 1h H 7 H g 3 1 J 5 h7 H h Hg7 5 he 7 Hhe H f 7 Yg O Y 7 H 7 H h Hg7 5 he 7 Hhe H heW2 M N 1 hf hJ 5 hV4 h J 5he 0Y 5 he3 h J 5h V W H h heJ 5 g H he h J 5g heJ 5 g H he h J 5he W 0Y 5 Lhe 7 h7 H 7 H 0M H he h 7 HheN 7 5 h he7 H f J 5hfJ 5 h 7 HgJ H J 5 he...

Страница 63: ... f 5h 3 e3 Khf g J e h hJ L f hf3 K h f Hh N eN 6Khe gW e h h7 1 f hfN 6K f he e 6Kh f O 5 e h g J 5 3 Lf hf 6K f he fI4 6X f H e h g 7 H N 1f I4 6X f he gI4 Xf f h gJ e L e I4 X h f he hI4 X e 0M f h g7 1 e I4 X h f Lh J he I 1 e h g e I 1 h f 1h 7 hfV e h f J Le V h f3 L g 5 e h f 7 g 1e h fN KfW2 H hfO e h fJ 5 g3 L O h f 3 6K O 5f 6KeO2 e h f7 H gN 1 hf 6KeO2 h f V 0Yf e h f 5h 3 e h gV4 Mg 0M...

Страница 64: ... users with an Emergency mode on their radios Users in trouble can alert the dispatcher and other units and get priority access to the radio system When a user activates Emergency mode EMERGENCY will flash the display during the entire transmission At the beginning of each transmission it will sound a distinctive emergency alert tone three times To turn Emergency Alert ON OFF enter into the Menu m...

Страница 65: ...nications on EDACS SCAT systems To monitor EDACS SCAT systems you only need to turn this feature 8 EDCS SCT ON with designated frequency You do not need to enter group ID s Note As EDACS SCAT is different from the other tracking feature and it is not a feature which the scanner tracks any ID you do not need to program Talk Group ID in the Menu mode ...

Страница 66: ...numbers These numbers are in the form AHHUUU where A Area code 0 or 1 H Home repeater 01 through 20 U User ID 000 through 254 When the scanner receives a transmission on a channel set to the LTR mode it first decodes the LTR data included with the transmission In the ID Search mode the scanner stops on the transmission and displays the talkgroup ID on the display In the ID Scan mode the scanner on...

Страница 67: ...the database instead of reprogramming individual radios Another difference between the systems is that Type I systems are arranged in a Fleet Subfleet hierarchy For example its possible for a city using a Type I system to designate 4 Fleets each with 8 Subfleets Their fleets might be the Police Department the Fire Department Utilities and Administration The Police may decide to further divide thei...

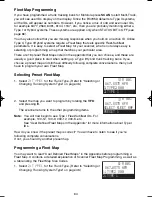
Страница 68: ...oose a preset map and still have difficulty following complete conversations then you ll have to program your own Fleet Map Selecting Preset Fleet Map 1 Select 2 TYPE1 for the Trunk Type Refer to Selecting or Changing Trunking System Type on page 46 2 Select the map you want to program by rotating the VFO and pressing E The scanner returns to the other programming items Note You will now begin to ...

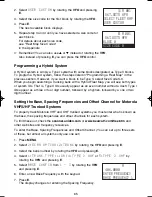
Страница 69: ...digit number followed by a hyphen followed by a one or two digit number Setting the Base Spacing Frequencies and Offset Channel for Motorola VHF UHF Trunked Systems To properly track Motorola VHF and UHF trunked systems you must enter what is known as the base the spacing frequencies and offset channels for each system To find these out check the scanner uniden com or www bearcat1 com free htm and...

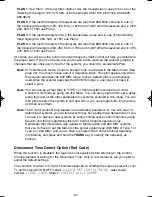
Страница 70: ...ple and there is an emergency call within the group you will hear it on 33264 The only time you may wish to turn Status Bits OFF is if you re trying to figure out the proper Fleet Map of a Type I trunking system To turn Status Bits OFF enter into the Menu mode and select 2 SCAN OPTION 2 TRUNK select bank number 0 STATUS BIT This feature does not apply to EDACS and LTR operation within the scanner ...

Страница 71: ...ge a user does not need to select a plan Note You can assign a Fleet Map to TYPE 1 or Hybrid systems scanned in Control Channel Only mode by going into the Menu You can also program IDs set a delay alpha tags and all the other parameters for systems scanned in this mode You can then either search the system to find new IDs or you can program IDs into memory and then scan them Note The Control Chan...

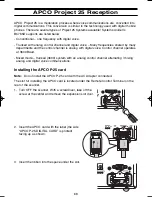
Страница 72: ...analog with digital voice Control channel operates at 3600 Baud Mixed mode trunked 3600 system with an analog control channel alternating mixing analog and digital voice communications Installing the APCO P 25 card Note Do not install the APCO P 25 card with the AC Adapter connected The slot for installing the APCO card is located under the Remote Control Terminal on the rear of the scanner 1 Turn...

Страница 73: ...the BCi25D card into the slot 3 Hold the BCi25D card by its edges when inserting it into the slot 4 Do not touch any of the terminals The BCi25D is a sensitive electrical device 5 Do not operate with an open expansion slot door This exposes the circuitry to dust and other environmental particles that causes the unit to function improperly 6 When you remove the BCi25D card pull out the card by the ...

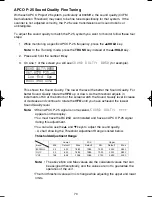
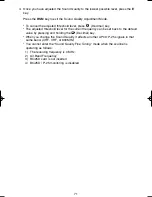
Страница 74: ...old adjusts in increments of 50 at the bottom of the screen watch the Sound Quality level increase or decrease and continue to rotate the VFO until you have achieved the lowest Sound Quality level Note When APCO P 25 signal is not received SOUND QULTY appears on the display You must have the BCi25D card installed and have an APCO P 25 signal during this adjustment You can also use the and keys to ...

Страница 75: ...level for the current frequency can be set back to the default value by pressing and holding the Decimal key When you change the Sound Quality it affects all other APCO P 25 signals in that same band UHF VHF or 800MHz You cannot enter the Sound Quality Fine Tuning mode when the scanner is operating as follows 1 The receiving frequency is 0 MHz 2 Air Band Frequency 3 BCi25D card is not inserted 4 B...

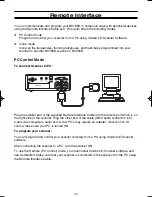
Страница 76: ...the supplied Remote Interface Cable into the remote port which is on the right side of the scanner Plug the other end of the cable DB 9 serial connector into a personal computer s serial port A few PC s may require an adapter most will not Of course make sure your PC is turned ON To program your scanner You can program and control your scanner remotely from a PC using Uniden s E Scanner software A...

Страница 77: ...m to 5 00 p m Central Time Monday through Friday scanner uniden com PC Control Parameter For your information Transfer speed 2400 4800 9600 19200 bps adjustable Start Stop 1 bit 1 bit Data Length 8 bit Parity bit None Code ASCII code Flow Control None Return Code Carriage Return only Clone Mode You will need to purchase a Gender Changer and a null modem adapter Gender Changer cables are available ...

Страница 78: ...s etc After connecting the two scanners turn the radios ON Prepare each scanner for clone mode as follows 1 Press MENU 2 Select 3 SYSTEM OPTION 6 CLONE by rotating the VFO and pressing E 3 Determine the scanner that has the frequency data that you want to transfer This one must be set up as the Master Unit and the other must be set as the Slave Unit 4 On the scanner that is the Master Unit select ...

Страница 79: ...Note To clear ERROR press decimal key To exit the Clone mode press MENU repeatedly Note Once you have completed the cloning of the scanners reset the scanners by turning the scanners OFF and then ON again This is particularly important to know if you wish to clone another scanner right away Remember You can also use or instead of rotating the VFO Also instead of pressing E you can press the VFO co...

Страница 80: ...3 SYSTEM OPTION 4 ENTER LOCK by rotating the VFO and pressing E 3 Select 1 ON by rotating the VFO and pressing E Key Beep Option To choose key beep sound 1 ON or 2 OFF 1 Press MENU 2 Select 3 SYSTEM OPTION 3 KEY BEEP by rotating the VFO and pressing E 3 Select 1 ON or 2 OFF by rotating the VFO and pressing E Screen Mask The trunk frequency receiving mode and signal meter indications on the display...

Страница 81: ...audio is already muted To turn it OFF press and hold MUTE again Receiving Mode Selection You can also set the receiving mode AM or FM etc in Conventional mode or Chain Search mode See MODE in Menu Description for details Frequency and Channel Tuning with the VFO Control The VFO knob can be used for stepping frequencies or through memory channels for Conventional channels or Talkgroup ID Scan Lists...

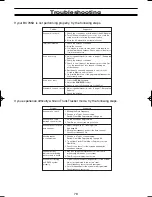
Страница 82: ...ctrical noise move it or its antenna away from the source of the noise If possible a higher elevation may provide better reception Cleaning Disconnect the power to the unit before cleaning Clean the outside of the scanner with a mild detergent To prevent scratches do not use abrasive cleaners or solvents Be careful not to rub the LCD window Do not use excessive amounts of water Repairs Do not atte...

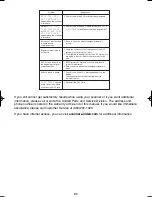
Страница 83: ...trol 3 Check to see if all channels are Locked Out Weather Scan won t work 1 Adjust squelch threshold refer to page 17 Setting the Squelch 2 Check the antenna Problem Suggestion Scanner won t track 1 Missing the Data Frequency 2 Change to a Type 1 Scanner setup Review Fleet Map Programming on page 64 Scanner won t stop 1 No IDs have been programmed during Scan List mode 2 The IDs you have stored a...

Страница 84: ...ications Digital communication is not heard DATA sound is heard at the beginning of digital communications Robotic sound is heard CARD ERROR appears every 10 seconds while you are using P 25 card 1 Check to see if the P 25 card is properly installed 1 Check to see if the APCO CARD Mode is ENABLE or DISABLE in the Menu mode See page 68 69 1 Move to a location where the signal strength is strong 1 V...

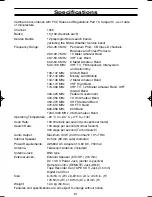
Страница 85: ... Federal Government 420 450 MHz 70 cm Amateur Band 450 470 MHz UHF Standard Band 470 512 MHz UHF TV Band 806 956 MHz 800 Band 1240 1300 MHz 25cm Amateur Band Operating Temperature 20 C to 60 C 4 F to 140 Scan Rate 100 channels per second conventional mode Search Rate 100 steps per second Normal Search 300 steps per second Turbo Search Audio Output Maximum 3 0W 2 3W normal 10 THD Internal Speaker 8...

Страница 86: ...y when a carrier modulated with a specific tone is received This method may be used to restrict access to the repeater or receiver or reduce interference where several stations with output frequencies in close proximity of each other make it difficult to hear the conversation you are interested in With CTCSS squelching you can eliminate the possibility of hearing unwanted conversations by selectin...

Страница 87: ...ow have a silent keypad You will not hear a tone each time you press a key NWR S A M E Weather Alert In 1994 the National Oceanic and Atmospheric Administration NOAA began broadcasting coded signals called FIPS Federal Information Processing System codes along with the standard weather broadcasts for stations in your area These codes identify an emergency and the specific geographic area such as y...

Страница 88: ...ccur on a specific talk group number then you will not miss the transmission even if you have not programmed all the talk group numbers With the Status Bit on and you have programmed the unique number then you don t have to worry what the rest of the groups numbers are The topic of interest will be picked up Talkgroup A group of users within a trunked system that communicates with one another 84 ...

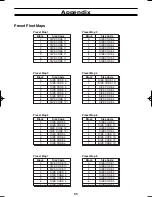
Страница 89: ...E CODE 4 SIZE CODE 4 SIZE CODE 12 SIZE CODE 12 SIZE CODE 4 SIZE CODE 4 SIZE CODE 4 SIZE CODE 4 Block 1 0 2 3 4 5 6 7 Preset Map 7 Size Code SIZE CODE 10 SIZE CODE 10 SIZE CODE 11 SIZE CODE 4 SIZE CODE 4 SIZE CODE 4 SIZE CODE 4 SIZE CODE 4 Block 1 0 2 3 4 5 6 7 Preset Map 8 Size Code SIZE CODE 1 SIZE CODE 1 SIZE CODE 2 SIZE CODE 2 SIZE CODE 3 SIZE CODE 3 SIZE CODE 4 SIZE CODE 4 Block 1 0 2 3 4 5 6 ...

Страница 90: ...0 Block 1 0 2 3 4 5 6 7 Size Code SIZE CODE 3 SIZE CODE 3 SIZE CODE 11 SIZE CODE 4 SIZE CODE 4 SIZE CODE 0 SIZE CODE 0 SIZE CODE 0 Block 1 0 2 3 4 5 6 7 Size Code SIZE CODE 4 SIZE CODE 4 SIZE CODE 4 SIZE CODE 11 SIZE CODE 11 SIZE CODE 0 SIZE CODE 12 SIZE CODE 12 Block 1 0 2 3 4 5 6 7 Size Code SIZE CODE 3 SIZE CODE 10 SIZE CODE 10 SIZE CODE 11 SIZE CODE 0 SIZE CODE 0 SIZE CODE 12 SIZE CODE 12 Bloc...

Страница 91: ... Type I system designer are highly dependent on the specific needs of the systems users Some organizations may want many subfleets with only a few radios each while another organization may want only a few subfleets with many radios each Your task is to program your fleet map with the same size code assignments as the trunked system If you do this accurately you ll track all the Fleet Subfleet com...

Страница 92: ... prompted for the next available block when programming a Fleet Map For example if you assign Block 0 as an SIZE CODE 12 you will be prompted for Block 2 the next block available instead of Block 1 And if you assign Block 0 as SIZE CODE 14 you would not see another prompt because all available blocks have been used Size Fleets Subfleets IDs Blocks Used 0 Reserves block for Type II IDs 1 128 4 16 1...

Страница 93: ... TSUNAMI Coastal Flood Watch CFA 0 COASTAL FLOOD Avalanche Watch AVA 0 AVALANCHE Volcano Watch VOA 0 VOLCANO Event Code Standard Event Level Siren Type LCD Display Warning Watch Statement Test Emergency Action Notification EAN 0 EMG NOTIFY Emergency Action Termination EAT 0 EMG TERMINATE National Information Center NIC 0 NATIONAL INFO Tornado Warning TOW or TOR 0 TORNADO Service Thunderstorm Warni...

Страница 94: ...OOD Hurricane Statement HLS 0 HURRICANE National Periodic Test NPT 0 NATION PERIOD Required Monthly Test RMT 0 MONTHLY Required Weekly Test RWT 0 WEEKLY System Demonstration Practice DMO Note SYSTEM DEMO National Hazard Warning NHW 0 NATION HAZARD Unknown Emergency Tune TV E 0 UNKNOWN TV Unknown Warning Tune TV W 0 UNKNOWN TV Unknown Watch Tune TV A 0 UNKNOWN TV Unknown Statement Tune TV S 0 UNKNO...

Страница 95: ...8 5 114 8 151 4 203 5 023 051 114 143 174 245 266 332 411 452 506 612 703 025 053 115 145 205 246 271 343 412 454 516 624 712 026 054 116 152 212 251 274 346 413 455 523 627 723 031 065 122 155 223 252 306 351 423 462 526 631 731 032 071 125 156 225 255 311 356 431 464 532 632 732 036 072 131 162 226 261 315 364 432 465 546 654 734 043 073 132 165 243 263 325 365 445 466 565 662 743 047 074 134 17...

Страница 96: ... SELECT DELAY ATTENUATOR TONE DATA RECORD AUTO STORE 1 ON 2 OFF 1 NONE 2 1 SECOND 3 2 SECONDS 4 4 SECONDS 5 INFINITE 6 2 SECONDS 7 5 SECONDS 8 10 SECONDS 1 ON 2 OFF 1 CTCSS 2 DCS 3 OFF 1 ON 2 OFF 1 ON 2 OFF 1 2 3 4 5 RANGE RANGE SELECT STEPS MODE ALPHA TAG TRUNK 1 SERVICE OPTION 2 OFF 1 5KHz 2 7 5KH 3 10KHz 4 12 5KHz 5 25KHz 6 50KHz 7 100KHz 8 AUTO 1 AM 2 FM 3 WFM 4 NFM 5 AUTO PLAN 1 PLAN 2 PLAN 3...

Страница 97: ... EDACS END CODE MOTOROLA CNTRL CH ONLY TYPE1 TYPE2 800 900 1 2 1 NONE 2 1 SECOND 3 2 SECONDS 4 4 SECONDS 5 INFINITE 6 2 SECONDS 7 5 SECONDS 8 10 SECONDS 1 ON 2 OFF 1 ON 2 OFF 1 ON 2 OFF 3 ONLY FREQUENCY STEPS ALPHA TAG 1 5KHz 2 7 5KH 3 10KHz 4 12 5KHz 5 25KHz 6 50KHz 7 100KHz 8 AUTO 1 2 3 4 5 6 7 8 9 1 2 ON OFF TYPE2 800 TYPE1 TYPE2 900 TYPE2 UHF TYPE2 VHF EDCS WIDE EDCS NARROW EDCS SCT LT 1 2 3 4...

Страница 98: ...K PC CONTROL CLONE DATA SKIP SQ MODE BANK TAG SELECT BANK P 25 CARD 1 ON 2 OFF 1 ON 2 OFF 1 ON 2 OFF 1 2400 bps 2 4800 bps 3 9600 bps 4 19200 bps 5 OFF MASTER SLAVE 1 ON 2 OFF 1 CSQ 2 TONE SQ 3 TONE SEARCH 1 ENABLE 2 DISABLE 1 HIGH 2 MEDIUM 3 OFF 3 SYSTEM OPTION ...

Страница 99: ...tor or its representatives in connection with the performance of this warranty Warrantor at its option may replace the unit with a new or refurbished unit THE LIMITED WARRANTY SET FORTH ABOVE IS THE SOLE AND ENTIRE WARRANTY PERTAINING TO THE PRODUCT AND IS IN LIEU OF AND EXCLUDES ALL OTHER WARRANTIES OF ANY NATURE WHATSOEVER WHETHER EXPRESS IMPLIED OR ARISING BY OPERATION OF LAW INCLUDING BUT NOT ...

Страница 100: ......

Отзывы: