background image

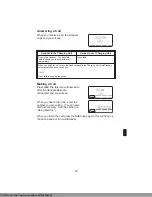
Answering a Call

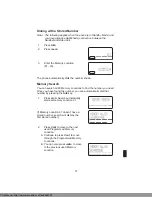
When you receive a call, the Handset
rings and you will see:

Handset in the Charging Unit

Handset out of Charging Unit

Pick up the Handset. The AutoTalk
feature allows you to answer the call
immediately.

Press

talk

When you finish the call, place the Handset back in the Charging Unit. AutoStandby
automatically hangs up the phone.

—OR–

Press

talk to hang up the phone

Making a Call

Press

talk. The talk icon will illuminate

after the Handset/Base are
connected, and you will see:

When you hear a dial tone, enter the
number you are calling. (You can also
dial from memory. See the section on
“Using Memory.”)

When you finish the call, press the

talk button again, this will hang up

the phone and put it in AutoStandby.

25

This Manual: http://www.manuallib.com/file/2664034

Содержание ANA 9710

Страница 1: ...Lib com ManualLib com collects and classifies the global product instrunction manuals to help users access anytime and anywhere helping users make better use of products Home http www manuallib com Ch...

Страница 2: ...ANA 9710 900 MHz Analog PBX Cordless Telephone Operating Guide This Manual http www manuallib com file 2664034...

Страница 3: ...or or its representatives in connection with the performance of this warranty THE LIMITED WARRANTY SET FORTH ABOVE IS THE SOLE AND ENTIRE WARRANTY PERTAINING TO THE PRODUCT AND IS IN LIEU OF AND EXCLU...

Страница 4: ...460 5 426 690 5 434 905 5 491 745 5 533 010 5 574 727 5 650 790 5 660 269 5 661 780 5 663 981 5 671 248 5 717 312 5 754 407 5 787 356 5 794 152 5 838 721 and other patents pending OMANA9710 2001 Unid...

Страница 5: ...argeable Nickel Cadmium Battery used in this equipment in any charger other than the one designed to charge this battery as specified in this Guide Using another charger may damage the battery or caus...

Страница 6: ...k talk Key 5 Numeric Keypad 6 Pause pause Key 7 Redial rdl Key 8 Microphone 9 Head Set Jack 10 Volume r vol Key 11 Mute mute Key 12 Transfer xfer Key 13 Conference conf Key 14 Flash flash Key 15 Chann...

Страница 7: ...Base Unit Controls Functions 18 DC Power Jack 19 Hold hold Key 20 Page find page find Key 21 Tone Pulse Switch This Manual http www manuallib com file 2664034...

Страница 8: ...Pack 19 Charging Spare Battery Packs 20 Low Battery Indicator 20 Cleaning the Battery and Charging Unit Contacts 21 Using Your ANA 9710 Handset 21 ANA 9710 Handset Controls 22 Using the Handset 24 An...

Страница 9: ...type of power source indicated on the marking label 8 Do not allow anything to rest on the power cord Do not place this product where the cord will be damaged by persons walking on it 9 Do not overloa...

Страница 10: ...only the appropriate type and size Battery Pack specified in this Operating Guide 2 Do not dispose of the Battery Pack in a fire The cell may explode 3 Do not open or mutilate the Battery Pack Release...

Страница 11: ...the Handset and Base Unit illustration foldout from the front cover Your ANA 9710 includes the following items If any of these items are missing or damaged contact your PBX Administrator If your ANA...

Страница 12: ...he environment in which the telephone is used Many factors limit range and it would be impossible to include all the variables in our rating The Maximum Range rating of this phone is meant to be used...

Страница 13: ...different channel Finally it should be noted that some cordless telephones operate at frequencies that may cause interference to nearby TVs and VCRs To minimize or prevent such interference the base o...

Страница 14: ...es n Four Function Keys PAUSE FLASH REDIAL SEARCH n 20 Number Memory Store and Search n Separate Charging Stand with Spare Battery Charging Capability n AutoStandby n AutoTalk n Vibrate Ringer Alert n...

Страница 15: ...nd Handset away from sources of electrical noise motors fluorescent lighting computers Connecting the Telephone Line There are two types of phone outlets 1 Modular Jack Plug the telephone line cord fr...

Страница 16: ...during a lightning storm n Never touch uninsulated telephone wires or terminals unless the telephone line has been disconnected at the network interface n Use caution when installing or modifying tel...

Страница 17: ...Note Most systems are Tone dialing Check with your PBX Administrator if you are not sure whether your system is Tone or Pulse dialing Applying Power to the Base and Charger Units 10 Use only the supp...

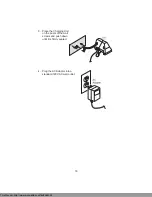
Страница 18: ...replacing the outlet The unique design of your ANA 9710 allows you to place the Handset in the Charging Unit with or without the Beltclip attached The Charging Unit also has the ability to charge a se...

Страница 19: ...Adapter into the Base Unit as previously described 3 Place the AC Adapter cord inside the molded channel of the Wall Mount stand 4 Plug one end of the short telephone cord into the LINE jack on the Ba...

Страница 20: ...your phone directly on a wall Before mounting your phone consider the following n Select a location away from electrical cables pipes or other items behind the mounting location that could cause a ha...

Страница 21: ...dard Wall Plate Mounting 3 Plug one end of the telephone line cord into the LINE jack on the Base Unit Optionally plug one end of a standard 2500 type desk phone into the PHONE jack Then place the tel...

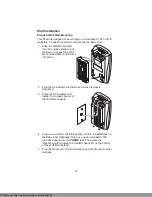
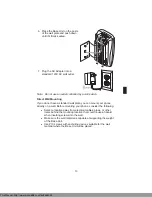
Страница 22: ...ipes or other items behind the mounting location that could cause a hazard when inserting screws into the wall n Make sure the wall material is capable of supporting the weight of the Charging Unit n...

Страница 23: ...lace the Charging Unit on the posts of the wall screws and push down until it is firmly seated 4 Plug the AC Adapter into a standard 120V AC wall outlet 16 This Manual http www manuallib com file 2664...

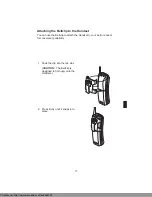
Страница 24: ...ch the Handset to your belt or pocket for convenient portability 1 Slide the clip into the tab slot CAUTION The Beltclip is designed to fit snugly onto the Handset 2 Press firmly until it snaps into p...

Страница 25: ...e Installing the Handset Battery Pack 1 Remove the battery cover by pressing the latch and sliding the cover down until it comes off the Handset 2 Slide the Battery Pack down into the Handset Note You...

Страница 26: ...r ANA 9710 for the first time Note Charge the Battery Pack without interruption for 5 hours 1 Place the Handset in the front slot of the Charging Unit 2 Make sure the CHARGE indicator lights If the CH...

Страница 27: ...out on the latch and remove the Battery Pack for use Or if you don t need the Battery pack immediately leave it in the Charging Compartment it will not overcharge Low Battery Indicator When the Batte...

Страница 28: ...d Charging Unit about once a month Use a pencil eraser or a soft dry cloth Do not use any liquids or solvents Using Your ANA 9710 Handset Before using your ANA 9710 be sure to raise the antenna to the...

Страница 29: ...ANA 9710 Handset Controls Earpiece Volume Press r vol on the side of the Handset during a call to change the earpiece volume on the handset 22 This Manual http www manuallib com file 2664034...

Страница 30: ...Handset will vibrate when there is an incoming call If you set the ringer off and the Handset is on the charger the Handset will ring as Ring Type A Low Handset Ringer Switch The switch on the side of...

Страница 31: ...the Handset and Base you will see Or you may see one of the following Condition Indicator LCD Screen No Connection to Base Unit Error Tone Line in Use Error Tone If the Handset is at the range limit...

Страница 32: ...Charging Unit AutoStandby automatically hangs up the phone OR Press talk to hang up the phone Making a Call Press talk The talk icon will illuminate after the Handset Base are connected and you will...

Страница 33: ...u will hear a beep and see The dial numbers saved in xfer memory is shown on the display after 2 seconds When the receiving party answers press xfer to complete the transfer Connecting a Conference Ca...

Страница 34: ...xample to program the xfer key for Hook Flash and 9 for outside transfers only Press mem Press flash Press 9 Press mem Press xfer Note The ANA 9710 conference and transfer keys are operated by the Hoo...

Страница 35: ...once to cause a Hook Flash while on a call Press once to program a Hook Flash in a Feature Button REDIAL To dial the last number called press talk then rdl The phone will redial the last number called...

Страница 36: ...rogram a Pause in the dialing sequence press pause 3 Press mem You will see the message 4 Enter the number 01 to 20 for the memory location to store You will hear a confirmation beep and see the messa...

Страница 37: ...he Handset beeps This is confirmation that you have programmed 5551234 into memory location 12 and you will see The phone then returns to Standby Erasing a Stored Number 1 Press mem 2 Press mem 3 Ente...

Страница 38: ...the number you need Once you have found the number you can automatically dial that number by pressing the talk key 1 Press srch Search automatically starts at memory Location 01 If Memory Location 01...

Страница 39: ...alk icon appears The phone will then automatically dial the number Chain Dialing You can dial any stored number while you are on a call This is sometimes needed for Long Distance Access Codes or Accou...

Страница 40: ...sk top phone which the ANA 9710 is connected to press hold on the Base unit then pick up the desk top phone 2 To resume using the Handset press hold on the Base unit then press talk on the Handset The...

Страница 41: ...o install the optional Headset open the cover over the Headset Jack and plug the Headset in No other settings are needed Operation of the ANA 9710 using the Headset is exactly the same as using the Ha...

Страница 42: ...telephone cord from the Desk phone to the LINE OUT jack on the ANA 9710 Base Unit The Desk phone can now be used to answer or place calls in the normal manner Transferring a Call to the ANA 9710 1 Pre...

Страница 43: ...ence occurs 1 Your PBX telephone rings first 2 If you don t answer the PBX telephone after a set number of rings the call is automatically transferred to the ANA 9710 3 If you don t answer the call af...

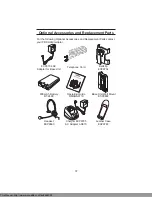
Страница 44: ...rts contact your PBX Administrator 37 EXP9704 AC Adapter for Base Unit Telephone Cord Beltclip EXP9702 800 mAh Battery BT 2499 Operating Guide OMANA9710 Base Unit Wall Mount EXP9660 Headset EXP9660 Ch...

Страница 45: ...e sure Handset is properly seated in Charging Unit Make sure the Battery Pack is properly placed in the Handset Make sure that the charging contacts on the Handset and Charging Unit are clean Conversa...

Страница 46: ...lied AC Adapter Size 4 1 4 in W x 7 1 2 in D x 2 1 4 in H Weight Approx 15 4 oz Handset Receive Transmit Frequency 902 MHz to 928 MHz Power Requirements Nickel Cadmium Battery Pack Size 2 1 5 in W x 1...

Страница 47: ...MEMO 40 This Manual http www manuallib com file 2664034...

Отзывы: