background image

The Meter Structure


(see figure 1)

(figure 1)


LCD Display


Functional Buttons


Rotary Switch


HzV 


 Input Terminal:

Input for voltage, frequency/rpm, resistance, diode
and


continuity measurements.


COM

 Input Terminal:

Return terminal for all measurements.


AmA 

Input Terminal:

Input for 0.1 A to 340.0mA current measurements.


10A

 Input Terminal:

Input for 0.01A to 10.00A current measurements.

1

2
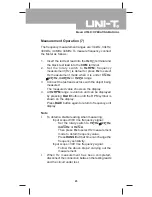
3
4

5

6

7

Model UT60D: OPERATING MANUAL

9

Содержание UT60D

Страница 1: ...anging Measurement Operation A AC DC Voltage Measurement B Measuring Continuity Diodes Resistance C Frequency Revolution RPM Measurement D DC or AC Current Measurement Turning on the Display Backlight The BLUE Button The RS232C Button Operation of Hold Mode Full Icons Display Sleep Mode Analogue Bar Graph Display General Specifications Table of Contents Page 3 4 5 6 8 9 10 11 13 15 15 15 17 17 19 ...

Страница 2: ... AC Current Maintenance A General Service B Testing the Fuses C Replacing the Battery D Replacing the Fuses RS232C Serial Port A RS232C Port Cable B Setting of RS232C Serial Ports C System Requirements for Installing the UT60D Interface Program Page 30 30 30 31 32 32 33 33 34 34 35 36 37 38 38 38 39 Model UT60D OPERATING MANUAL 2 ...

Страница 3: ...he enclosure structure design adopted advanced co injection technique in order to provide sufficient insulation In addition to the conventional measuring functions it is equipped with a 34 segments analogue bar graph and RS232C standard serial port for easy connection with computer to realize macro recording and monitoring and capture of transient dynamic data displaying change of waveform during ...

Страница 4: ...ion Item 1 2 3 4 5 Description Operating Manual Test Lead 9V Battery NEDA1604 6F22 or 006P installed RS232C Interface Cable CD ROM Installation Guide Computer Interface Software Qty 1 piece 1 pair 1 piece 1 piece 1 piece In the event you find any missing or damage please contact your dealer immediately Model UT60D OPERATING MANUAL 4 ...

Страница 5: ...ms etc Use the Meter only as specified in this operating manual otherwise the protection provided by the Meter may be impaired In this manual a Warning identifies conditions and actions that pose hazards to the user or may damage the Meter or the equipment under test A Note identifies the information that user should pay attention on International electrical symbols used on the Meter and in this O...

Страница 6: ...than the rated voltage as marked on the Meter between the terminals or between any terminal and grounding l The rotary switch should be placed in the right position and no any changeover of range shall be made during measurement is conducted to prevent damage of the Meter l When the Meter working at an effective voltage over 60V in DC or 30V rms in AC special care should be taken for there is dang...

Страница 7: ...ical specifications replacement parts l The internal circuit of the Meter shall not be altered at will to avoid damage of the Meter and any accident l Soft cloth and mild detergent should be used to clean the surface of the Meter when servicing No abrasive and solvent should be used to prevent the surface of the Meter from corrosion damage and accident l The Meter is suitable for indoor use l Unde...

Страница 8: ...lternating Current DC Direct Current AC or DC Grounding Double Insulated Deficiency of Built In Battery Continuity Test Diode Fuse Warning Refer to the Operating Manual Conforms to Standards of European Union Model UT60D OPERATING MANUAL 8 ...

Страница 9: ...nput for voltage frequency rpm resistance diode and continuity measurements COM Input Terminal Return terminal for all measurements AmA Input Terminal Input for 0 1 A to 340 0mA current measurements 10A Input Terminal Input for 0 01A to 10 00A current measurements 1 2 3 4 5 6 7 Model UT60D OPERATING MANUAL 9 ...

Страница 10: ...o 1000V or AC voltage measurement range from 3 400V to 750 0V Continuity test Diode test Resistance measurement range from 340 0 to 34 00M Frequency measurement range from 3 400KHz to 34 00MHz or RPM measurement AC or DC current measurement range from 340 0 A to 3400 A AC or DC current measurement range from 34 00mA to 340 0mA AC or DC current measurement 10 00A Function Model UT60D OPERATING MANU...

Страница 11: ...asurements the Meter beeps Resistance is default Switches between Hz unit display and RPM unit display the Meter beeps This function is suitable for RPM Frequency interchanging measurement Switches between AC and DC current range from 340 0 A to 3400 A the Meter beeps DC is default Switches between AC and DC current range from 34 00mA to 340 0mA the Meter beeps DC is default Switches between AC an...

Страница 12: ...disable Sleep Mode feature Turn on or off the serial port interface without changing the original setting Press RS232C button while turning on the Meter to disable Sleep Mode feature Press HOLD H to enter and exit the Hold mode in any mode the Meter beeps l Press and hold HOLD H button while turning on the Meter to display full icons l Press HOLD H again to return to normal display mode RANGE RS23...

Страница 13: ...rent The Meter is in the auto range mode in which the Meter automatically selects the range with the best resolution Data output is in progress Data hold is active The battery is low Warning To avoid false readings which could lead to possible electric shock or personal injury replace the battery as soon as the battery indicator appears Test of diode The continuity buzzer is on 1 2 3 4 5 6 7 8 Mod...

Страница 14: ...unit of voltage mV Millivolt 1 x 10 3 or 0 001 volts A Amperes amps The unit of current mA Milliamp 1 x 10 3 or 0 001 amperes A Microamp 1x 10 6 or 0 000001 amperes Revolution Measurement The unit rev min Sleep Mode feature is enabled It can be disabled by pressing RANGE Hz or RS232C when turning on the Meter Indicates negative reading Analogue bar graph display Display Symbols 2 see figure 2 k M ...

Страница 15: ...ange options l In the autorange mode the Meter selects the best range for the input detected This allows you to switch test points without having to reset the range l In the manual range mode you select the range This allows you to override autorange and lock the Meter in a specific range The Meter defaults to the autorange mode in measurement functions that have more than one range When the Meter...

Страница 16: ...eturns to the autorange mode and is displayed Note l If you manually change the measurement range after entering Hold mode the Meter exits this mode l Under diode continuity and A range measurement only manual range mode is available Measurement Ranges 2 Model UT60D OPERATING MANUAL 16 ...

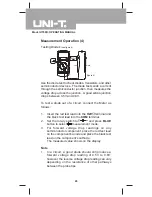
Страница 17: ...he red test lead into the HzV terminal and the black test lead into the COM terminal 2 Set the rotary switch to V Hz and press BLUE button to select AC measurement mode 3 Connect the test leads across with the object being measured The measured value shows on the display which is effective value of sine wave mean value response Note l In each range the Meter has an input impedance of 10M This load...

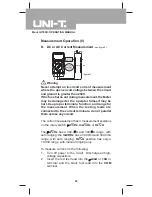
Страница 18: ...e rotary switch to V Hz DC measurement is default or press BLUE button to select DC measurement mode 3 Connect the test leads across with the object being measured The measured value shows on the display Note l In each range the Meter has an input impedance of 10M This loading effect can cause measurement errors in high impedance circuits If the circuit impedance is less than or equal to 10k the e...

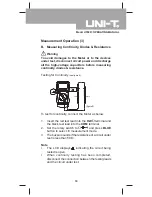
Страница 19: ...ct the Meter as below 1 Insert the red test lead into the HzV terminal and the black test lead into the COM terminal 2 Set the rotary switch to and press BLUE button to select measurement mode 3 The buzzer sounds if the resistance of a circuit under test is less than 50 Note l The LCD displays indicating the circuit being tested is open l When continuity testing has been completed disconnect the c...

Страница 20: ...zV terminal and the black test lead into the COM terminal 2 Set the rotary switch to and press BLUE button to select measurement mode 3 For forward voltage drop readings on any semiconductor component place the red test lead on the component s anode and place the black test lead on the component s cathode The measured value shows on the display Note l In a circuit a good diode should still produce...

Страница 21: ...ng leads and the circuit under test Resistance Measurement see figure 7 figure 7 The resistance ranges are 3 400k 34 00k 340 0k 3 400M and 34 00M To measure resistance connect the Meter as follows 1 Insert the red test lead into the HzV terminal and the black test lead into the COM terminal 2 Set the rotary switch to resistance measurement is default or press BLUE button to select measurement mode...

Страница 22: ...resistance measurement 1M it is normal taking several seconds to obtain a stable reading l If reading with shorted test leads is not 0 5 check for loose test leads incorrect function selection or enabled Data Hold function l The LCD displays indicating open circuit for the tested resistor or the resistor value is higher than the maximum range of the Meter l When resistance measurement has been com...

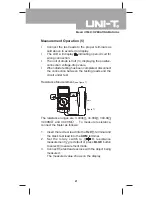
Страница 23: ...revolution unit can be displayed by pressing BLUE button until the RPM symbol is shown on the display Press BLUE button again to return to frequency unit display Note l To obtain a stable reading when measuring Input scope 30V rms frequency signal Set the rotary switch to V Hz A Hz mA Hz or Hz A Then press Hz to select Hz measurement mode to obtain frequency value Press RANGE at that time can chan...

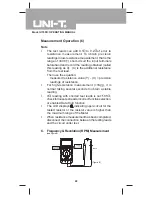
Страница 24: ...ted to the current terminals do not parallel them across any circuit The current measurement has 3 measurement positions on the rotary switch A Hz mA Hz or Hz A The A Hz has a 340 0 A and 3400 A range with auto ranging the mA Hz has a 34 00mA and 340 0mA range with auto ranging Hz A position has only a 10 00A range with manual ranging only To measure current do the following 1 Turn off power to th...

Страница 25: ... path to be tested Connect the red test lead to the more positive side of the break and the black test lead to the more negative side of the break 6 Turn on power to the circuit The measured value shows on the display Note l For safety sake the measuring time for high current should be 10 seconds for each measurement and the interval time between 2 measurements should be greater than 15 minutes l ...

Страница 26: ...es for selecting the required measurement function when there is more than one function at one position of the rotary switch The RS232C button Press RS232C to enter or exit data output mode In RS232C serial port data output mode if the Meter is under the Hold operation the Meter will display the corresponding operation s data However the serial port output the instantaneous data from the input ter...

Страница 27: ...de until the LCD enters normal display mode when the HOLD H is pressed again Sleep Mode l To preserve battery life the Meter automatically turns off if you do not turn the rotary switch or press any button for 10 minutes l The Meter can be activated by turning the rotary switch or pressing any button other than l The Meter will display the last measurement value before it entered Sleep Mode if it ...

Страница 28: ... to the full range value of the measurement range that has been selected The polarity of the measured value is displayed as on the left of the analogue display positive polarity is not displayed For example when 34V range is selected the full range value of the analogue display is 34V and as the full range is uniformly divided into 34 grades each grade denotes 1V If the input is 17V the high light...

Страница 29: ...40 o C 2000 m Storage 10000 m One piece of 9V NEDA1604 or 6F22 or 006P Display Display H Display Display 177 x 85 x 40 mm Approximate 300g battery included IEC61010 CAT III 1000V CAT IV 600V overvoltage and double insulation standard UL CUL l Maximum Display l Measurement Speed l Temperature Operating Storage l Relative Humidity l Altitude Operating l Battery Type l Battery Deficiency l Data Holdi...

Страница 30: ...ts guarantee for 1 year Operating temperature 23 o C 5 o C Relative humidity 75 Temperature coefficient 0 1 x specified accuracy 1 o C A AC Voltage Remarks l Input impedance 10M l Displays effective value of sine wave mean value response l Frequency response 34V 45Hz 20kHz 3dB can reach 1000kHz 34V 45Hz 1kHz 3dB can reach 30kHz B DC Voltage Remark Input impedance 10M 1 5 3 lf the signal frequency ...

Страница 31: ...circuit resistance 1 2 1 2 2 1 5 2 Overload Protection 600Vp Remarks l Continuity Test 340 0 Range Buzzer beeps continuously Open circuit voltage approximate 1 2V l Diode Range Open circuit voltage approximate 2 8V Displays approximate forward current drop reading 1mA l 340 Range Open circuit voltage approximate 1 2V l 3 4k 34M Range Open circuit voltage approximate 0 5V Model UT60D OPERATING MANU...

Страница 32: ...rotection 600Vp Remarks l 100mV Input amplitude 30V rms l At voltage and current range VAHz Range 10Hz 1kHz Accuracy 2 3 Input amplitude 1000 digits E Revolution RPM Range 34k 340k 3 4M 34M 340M Resolution 0 01k 0 1k 1k 10k 100k Accuracy 0 2 2 Overload Protection 600Vp Remark l 100mV Input amplitude 30V rms Model UT60D OPERATING MANUAL 32 ...

Страница 33: ...ous measurement 10 seconds and interval time between 2 measurements greater than 15 minutes Range 340 A 3400 A 34mA 340mA 10A Resolution 0 1 A 1 A 10 A 100 A 10mA Accuracy 1 2 2 1 5 2 Overload Protection 0 5A 250V fast type Glass fuse 5x20 mm 10A 250V fasttype Glassfuse 5x20mm Range 340 A 3400 A 34mA 340mA 10A Resolution 0 1 A 1 A 10 A 100 A 10mA Accuracy 1 5 5 2 5 5 Overload Protection 0 5A 250V ...

Страница 34: ...ter do not get water inside the case A General Service l Periodically wipe the case with a damp cloth and mild detergent Do not use abrasives or solvents l To clean the terminals with cotton bar with detergent as dirt or moisture in the terminals can affect readings l Turn the Meter to OFF position when it is not in use and take out the battery when not using for a long time l Do not store the Met...

Страница 35: ...test the fuse 1 Set the rotary switch to and select by pressing BLUE button 2 Plug a test lead into the terminal HzV and touch the probe tip to the 10A or µAmA terminal l If the Meter beeps the fuse is good l If the display shows replace the fuse and test again l If the display shows any other value have the Meter serviced and contact your dealer immediately If the Meter does not work while the fu...

Страница 36: ...and remove all connections from the terminals 2 Remove the screw from the battery compartment and separate the battery compartment from the case bottom 3 Remove the battery from the battery compartment 4 Replace the battery with a new 9V battery NEDA1604 6F22 or 006P 5 Rejoin the case bottom and battery compartment and reinstall the screw C Replacing the Battery see figure 10 Maintenance 3 Model U...

Страница 37: ...y compartment and separate the battery compartment from the case bottom 3 Remove the 2 rubber feet and 2 screws from the case bottom and separate the case top from the case bottom 4 Remove the fuse by gently prying one end loose then take out the fuse from its bracket 5 Install ONLY replacement fuses with the identical type and specification as follows and make sure the fuse is fixed firmly in the...

Страница 38: ...s 7 Parity 1 odd The Meter A RS232C Port Cable D sub 9 Pin Male 2 3 4 5 6 7 8 Computer D sub 9 Pin Female 2 3 4 5 6 7 8 D sub 25 Pin Female 3 2 20 7 6 4 5 Pin Name RX TX DTR GND DSR RTS CTS Remark Receiving Data Transmitting Data Data Terminal Ready Grounding Data Set Ready Request To Send Clear To Send 6 Rejoin the battery compartment and the case top and reinstall the screw 7 Rejoin the case bot...

Страница 39: ...itor l Microsoft Windows 95 or above l At least 8MB of RAM l At least 8MB free space in hard drive l Can access to a local or a network CD ROM l A free serial port l A mouse or other pointing device supported by Windows Please refer to the included Installation Guide Computer Interface Software for installing and operating instructions of the UT60D Interface Program END This operating manual is su...

Страница 40: ...Model UT60D OPERATING MANUAL 40 ...

Страница 41: ...Model UT60D OPERATING MANUAL 41 ...

Страница 42: ...ong Guan City Guang Dong Province China Headquarters Uni Trend International Limited Address Rm901 9 F Nanyang Plaza 57 Hung To Road Kwun Tong Kowloon Hong Kong Tel 852 2950 9168 Fax 852 2950 9303 Email info uni trend com http www uni trend com Copyright 2001 Uni Trend International Limited All rights reserved Model UT60D OPERATING MANUAL 42 ...

Отзывы: