UltraLux SDC1 Series Скачать руководство пользователя страница 15


15 


w

w

w

.ul

tral

u

x.bg


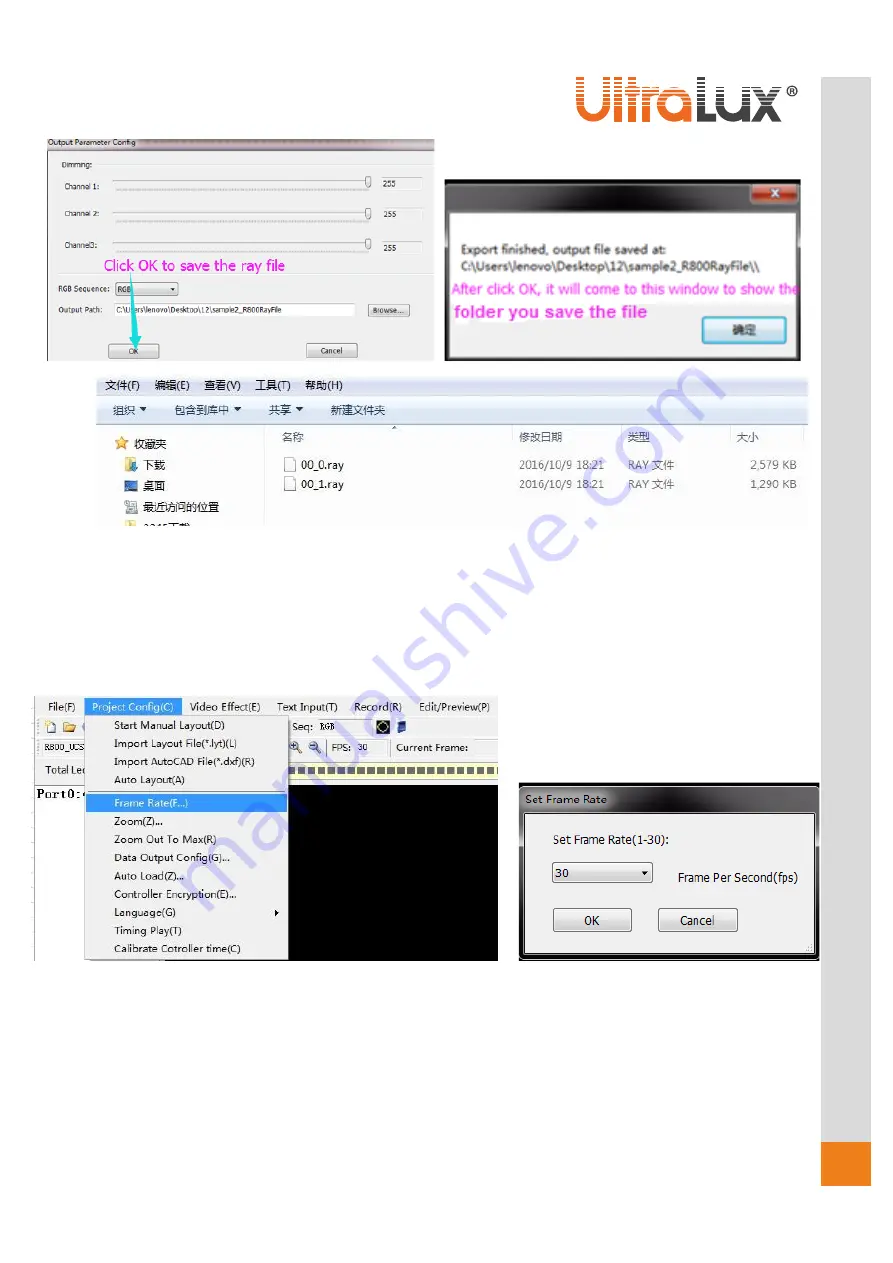
Picture 3.3.2.7 Export to ray files 

3.4 Project Config instruction 

Let’s introduce some funct

ion of the Config Menu. 

1. Frame Rate 
We can  click  Frame  Rate  key then  go  into the  Set  Frame  Rate  window  to  set  up  the  Frame  rate  of the 
program. 


Picture 3.4.1 Frame Rate set up 

2. Language 

We can click Language to change the software interface between Chinese and English. 

Содержание SDC1 Series

Страница 1: ...play multiple programs on a SD card There s 1 output port on SDC1 and 8 output ports on SDC8 each port can drive up to 2048 pixels at 30 fps Picture 2 1 Appearance 2 Appearance Connections Introductio...

Страница 2: ...3 MODE key Press Mode key to change the programs load in the SD card in loop 4 SPEED SPEED Press SPEED key to speed up the program and press SPEED to slow down the program 5 INDICATORS RUN ALM When th...

Страница 3: ...project Picture 3 1 3 interface of New Project In interface of new project select Controller Type R800 SDC1 or R808 SDC8 select chip the chip number would be used for the project select Frame Rate 30...

Страница 4: ...t Single port layout When the project is small 1 port would be enough the auto layout can be set up by following step 1 Select the main menu Project Config C Auto Layout A show as Picture 3 2 1 1 Pict...

Страница 5: ...the main interface as Picture 3 2 1 3 Picture 3 2 1 3 main interface with layout We can see there are 40 Horizontal Pixel and 2 Vertical Pixels and total 80 pixels in this project 3 2 2 Manual Layout...

Страница 6: ...ould be as shown on the Picture 3 2 2 4 the left is the Light Horizontal layout and the right is Light Vertical layout Picture 3 2 2 4 Layout pattern 4 Click the port option there would be a cursor cl...

Страница 7: ...the text you want Click OK The text will follow the cursor click the place you want to put the text It will stay there click Quick wire come to the quick wire option window choose the wire type such a...

Страница 8: ...bg Picture 3 2 2 6 making a text 2 Multiple port layout When the project is big we need multiple ports for the project The set up operation is similar as the single port layout Please see the result P...

Страница 9: ...eck if all the LEDs are wired and it will also show the port numbers and LED quantity of each port Please see Picture 3 2 3 1 Picture 3 2 3 1 click Analysis lines to check the wiring 3 2 4 Save Layout...

Страница 10: ...e After saving the Layout we can close the Layout window and then import Layout file to go on the program record The step is Click Import Layout File Choose the Layout File name Click Open Import the...

Страница 11: ...any of them and then record directly and speed is adjustable by pressing F6 F7 Picture 3 3 2 1 Preset programs We can record the program by following step Choose the preset programs Click the record k...

Страница 12: ...e program in Flash software and then import to Rayshow The record operation is similar as the preset programs as below Click Video Effect it will come out to Picture 3 3 2 1 click Open Flash Video Cho...

Страница 13: ...h Video 3 Preview and Edit program We can preview and edit the program by following steps Click Edit Preview Click the Pause key to pause the preview Choose the frames and then click the right key of...

Страница 14: ...file come to the window showing the folder of the file Click OK to confirm the folder come to the folder of the ray files For example when setup the new project we choose R800 and the program have 2...

Страница 15: ...s introduce some function of the Config Menu 1 Frame Rate We can click Frame Rate key then go into the Set Frame Rate window to set up the Frame rate of the program Picture 3 4 1 Frame Rate set up 2 L...

Страница 16: ...n loop or set as starting at specific time and stop in specific time For example 1 There are 3 programs in loop if we choose Item Period set the time of program 1 as 5 hours 30 minutes 0 seconds the p...

Страница 17: ...utes 0 seconds then the LED will start to play at 6 30 every day and stop playing at 21 30 every day 4 Calibrate Controller time We can set up the Calibrate controller time by click Calibrate Controll...

Отзывы: