background image

19

GB

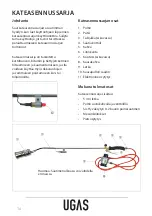
•   Working temperature 1,000-1,200 °C
•   Wrist support
DG number: DG-4027

Special safety instructions

The roo� ng set may only be handled and 

used outdoors in locations with good air 

circulation.
Avoid modifying or repairing the roo� ng 

set yourself, as this may involve serious 

safety risks. Only use original accessories or 

accessories recommended by the retailer. 

Do not use the roo� ng set if it is damaged, 

defective or worn.
Use soapy water to check that all 

connections are sealed before use. Never use 

a naked � ame to perform a leakage test. 
Use an approved 5, 11 or 33 kg gas bottle. 

The gas bottle may only be connected and 

replaced in the open air. Do not smoke, 

use a naked � ame or electrical equipment 

while the gas bottle is being connected or 

replaced.
The gas bottle must stand stable so that it 

cannot tip over while the roo� ng set is in 

use. The gas bottle must be upright with the 

regulator facing upwards when in use. 
Make sure the hose does not break or twist 

when using the roo� ng set.
Keep the gas bottle at a safe distance from 

heat sources during use. Make sure that 

the gas bottle and hose do not come into 

contact with the surfaces you are working 

on.
Do not leave the roo� ng set unattended.
The burner and the area around it will get 

very hot during use. Avoid touching these 

parts and allow them to cool fully before 

transporting or storing the roo� ng set.
Avoid inhaling smoke or fumes created as a 

result of work.

The roo� ng set and gas bottle should be 

stored out of the reach of children in a dry, 

dust-free and well-ventilated location.
Note: If the roo� ng set is to be used in a 

business context, hose-break protection 

must be � tted so that the gas is automatically 

and immediately turned off  in the event of 

the hose breaking.

Assembly

The roo� ng set has been assembled by the 

supplier and tested for leaks. However, it 

is not impossible for couplings to loosen 

during transport, so we recommend using a 

tool to tighten them and to check for leaks.
If the set is subsequently taken apart, it must 

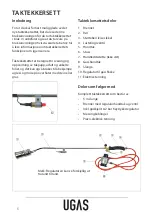
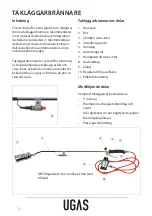
be assembled as follows before use: Connect 

the hose (9) to the regulator (10) and roof 

burner (6). Use a tool to carefully tighten all 

connections. The hose (9) and connector 

near the burner handle (6) are equipped with 

a left thread, while all the other connections 

are equipped with a right thread. Carry out a 

leakage test using soapy water before using 

the roo� ng set.

Use

Check that all the valves are fully closed and 

the hose connections are completely tight. 

If necessary, carry out a leakage test using 

soapy water.
1.  Attach the regulator (10) to the gas bottle 

and open it.

2.  Then open the regulator (10) and the 

adjustment valve (4), press the gas 

throttle in (8) and wait a moment until 

the air has been forced out of the system. 

3.  Light the � ame on the burner (1) using 

the built-in spark lighter (11) or a naked 

� ame. Make sure not to touch the � ame 

once the gas is lit with an external � ame 

source!

Содержание 86507

Страница 1: ...Brugsanvisning Bruksanvisning Bruksanvisning K ytt ohje Instruction manual DK NO SE FI GB Brugsanvisning Model 86507...

Страница 2: ...pap asfalt og visse folier og det kan ogs bruges til bek mpelse af ukrudt og mos p over ader med sten eller ral Tagd kkers ttets dele 1 Br nder 2 R r 3 St tteben ikke vist 4 Indstillingsventil 5 Greb...

Страница 3: ...erer eller opbevarer tagd kkers ttet Undg at ind nde r g og dampe som opst r i forbindelse med arbejdet Tagd kkers ttet og gas asken skal opbevares utilg ngeligt for b rn p et t rt st vfrit og godt ve...

Страница 4: ...sbr nder skal du v re opm rksom p nedenst ende vejledning Flammebehandling af ukrudt er milj rigtig ukrudtsbek mpelse men kr ver ogs fuld opm rksomhed og ansvarlig brug af udstyret 1 Ukrudt skal ikke...

Страница 5: ...ing Servicecenter Bem rk Produktets modelnummer skal altid oplyses i forbindelse med din henvendelse Modelnummeret fremg r af forsiden p denne brugsanvisning og af produktets typeskilt N r det g lder...

Страница 6: ...alt og enkelte folier og det kan ogs brukes til bekjempe ugress og mose p over ater med stein eller grus Taktekkersettets deler 1 Brenner 2 R r 3 St tteben vises ikke 4 Justeringsventil 5 H ndtak 6 St...

Страница 7: ...transporterer eller oppbevarer taktekkersettet Unng puste inn r yk og damp som oppst r i forbindelse med arbeidet Taktekkersettet og gass asken skal oppbevares utilgjengelig for barn p et t rt st vfri...

Страница 8: ...nner m du f lge r dene nedenfor Flammebehandling av ugress er milj riktig ugressbekjempelse men krever ogs full oppmerksomhet og ansvarlig bruk av utstyret 1 Ugresset skal ikke brennes det skal svis N...

Страница 9: ...S DK 6000 Kolding Servicesenter Merk Ved henvendelser om produktet skal modellnummeret alltid oppgis Modellnummeret st r p fremsiden av denne bruksanvisningen og p produktets typeskilt N r det gjelde...

Страница 10: ...asfalt och vissa folier och den kan ocks anv ndas f r bek mpning av ogr s och mossa p ytor av sten eller grus Takl ggarbr nnarens delar 1 Br nnare 2 R r 3 St dben visas inte 4 Inst llningsventil 5 Han...

Страница 11: ...vid anv ndning Undvik att r ra vid dessa delar och l t dem svalna helt innan du transporterar eller l gger undan takl ggarbr nnaren f r f rvaring Undvik att andas in r k och nga som uppst r i samband...

Страница 12: ...der staket natur osv Om du anv nder takl ggarbr nnaren som ogr sbr nnare ska du observera nedanst ende information Br nning av ogr s r milj v nlig ogr sbek mpning men den kr ver full uppm rksamhet och...

Страница 13: ...lnummer ska alltid uppges vid kontakt med terf rs ljaren Modellnumret nns p framsidan i denna bruksanvisning och p produktens m rkpl t N r det g ller Reklamationer Reservdelar Returvaror Garantivaror...

Страница 14: ...mentamiseen ja sit voidaan k ytt my s rikkaruohojen ja sammaleen poistamiseen kivi tai tiilipinnoilta Kateasennussarjan osat 1 Poltin 2 Putki 3 Tukijalka ei kuvassa 4 S t venttiili 5 Kahva 6 Liitinkan...

Страница 15: ...kana l kosketa kuumentuneita osia ja anna niiden j hty kokonaan ennen kuin siirr t kateasennussarjaa tai viet sen varastoon l hengit savua ja h yry jota muodostuu ty n aikana Kateasennussarja ja kaasu...

Страница 16: ...en polttaminen on ymp rist s st v tapa torjua rikkaruohoja mutta se edellytt ett laitetta k ytet n varoen ja vastuullisesti 1 Rikkaruohoja ei polteta vaan ne paistetaan Liekin avulla rikkaruohoa paist...

Страница 17: ...ing Huoltokeskus Huomaa Tuotteen mallinumero on aina mainittava mahdollisessa yhteydenotossa Mallinumeron voi tarkistaa t m n k ytt ohjeen etusivulta ja tuotteen tyyppikilvest Kun asia koskee Reklamaa...

Страница 18: ...to combat weeds and moss on surfaces containing stone or pebbles Main components 1 Burner 2 Pipe 3 Support leg not shown 4 Adjustment valve 5 Knob 6 Connector 7 Wrist support not shown 8 Gas throttle...

Страница 19: ...r storing the roo ng set Avoid inhaling smoke or fumes created as a result of work The roo ng set and gas bottle should be stored out of the reach of children in a dry dust free and well ventilated lo...

Страница 20: ...o ng set as a weed burner you need to be aware of the instructions below Treating weeds using a ame is an environmentally friendly method of weed control but also requires full attention and responsib...

Страница 21: ...HP Schou A S DK 6000 Kolding Denmark Service centre Note Please quote the product model number in connection with all inquiries The model number is shown on the front of this manual and on the produc...

Отзывы: