22
e.
When done, touch the bottom of the screen and locate the save icon, touch save,
when prompted, touch yes to save.
SPECTRALYZER
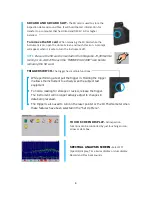
The onboard Spectralyzer displays sound events in either an FFT screen, a
Time Series Screen or Both screens at the same time. There are 6 buttons
to use at the bottom of the displayed screen: START/STOP, PLAY,
CAPTURE, REC, SETTINGS, AND EXIT.
Start/Stop:
When the Spectra screen
opens it will start to display sounds sensed
by the Ultraprobe, to stop this, touch the
Square Red icon to STOP, to start testing a
sound sample, touch it again to start.
Play:
To play a recorded sound back on the
Ultraprobe and to view it while hearing it,
touch the Green Arrow icon to play.
Capture:
To capture an image of the screen, touch the third icon from the left. This
image can be used in reports.
Record:
To record sound sample touch this Round Red icon. If in the MANUAL record
mode, press the REC icon. To stop in the Manual mode, press STOP. If the instrument
has been set for a preset recording time in the Setup Mode, then just touch and release
the record icon.
Exit:
Touch this icon to exit to a previously selected screen.
Levels:
To set up the Spectralyzer, touch the “Settings” icon
once
Spectralyzer
is open. The first screen has adjustments for setting the levels for the
Spectra screen and for the Time Series Screen. There are 3 adjustments:
dB (decibel) Scale: This can be used for both the Spectra and Time Series screens.
Freq (Frequency) Scale: This is used in the Spectra Screen.
Time Scale: This allows for adjustments to the ms or milliseconds.
To exit back to the main Spectra screen, select Done.

