5
Chapter 2: Installation
UniFi® VoIP Phone User Guide
Ubiquiti Networks, Inc.
Chapter 2: Installation
Hardware Installation
The UniFi VoIP Phone is designed for desktop placement.
To connect the phone, perform the following steps:
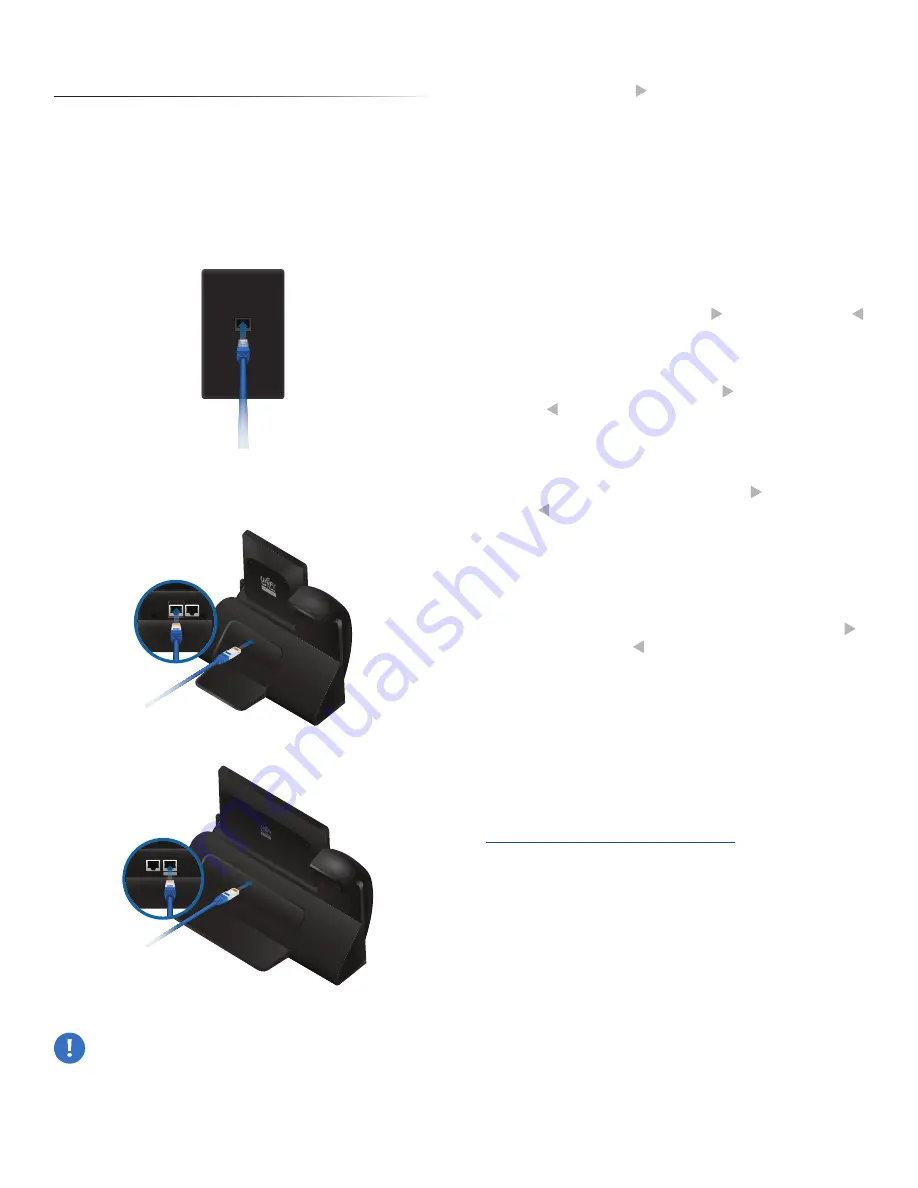
1. Connect one end of an Ethernet cable to the wall jack
that is connected to your 48V, 802.3af-compliant switch
(UVP) or 48V, 802.3at-compliant switch (UVP-Pro,
UVP-Executive).
2. Connect the other end of the Ethernet cable to the port
labeled PoE/LAN on the UniFi VoIP Phone.
PoE/LAN
PC
UVP, UVP-Pro
PC
PoE/LAN
UVP-Executive
WARNING:
Ensure that you refer to the correct
illustration for your model (the PoE/LAN port is
not in the same position on all models). Do NOT
connect a powered Ethernet connection to the port
labeled PC.
3. When the Select Language screen appears, select your
language and press to continue.
4. The Got Google? screen appears. If you do not have a
™
account, create one as follows:
a. Select No, and then select Get an account.
b. Enter the user information for your account:
i. The Your name screen displays a keyboard.
ii. Enter your first name and press Next.
iii. Enter your last name and press Done.
iv. Press the down arrow below the keyboard.
v. The Your name screen displays the First and Last
names you entered. Click to continue or click
to return to the previous step.
vi. The Choose username screen displays a keyboard.
Enter a username (6-30 characters in length) for
your Google account. Click to continue or click
to return to the previous step.
5. When the Sign In screen appears, enter your account’s
Email address and Password. Then press Next.
6. The Google services screen appears. Select or unselect
the services you want, and then press to continue or
click to return to the previous step.
7. The Set up payment info screen appears. To skip this
step, press SKIP. To provide payment information,
make the desired selection and press Continue.
8. The Date & time screen displays your time zone. To
change time zones, press the time zone, scroll through
the list, and select the desired time zone. Then press
to continue or click to return to the previous step.
The Welcome screen is displayed. Initial configuration is
complete.
PBX Configuration
If you will be using the UniFi VoIP Phone with a Public
Branch eXchange (PBX) system, you must configure
both the phone and the PBX for use with each other.
For detailed instructions, refer to the UniFi VoIP Quick
Provisioning Guide, which is available for download at
www.ubnt.com/download/unifi-voip
www.4Gon.co.uk [email protected] Tel: (0)0330 088 0295 Fax: +44 (0)1245 808299
Содержание UniFi UVP
Страница 2: ...www 4Gon co uk info 4gon co uk Tel 0 0330 088 0295 Fax 44 0 1245 808299...
Страница 28: ...www 4Gon co uk info 4gon co uk Tel 0 0330 088 0295 Fax 44 0 1245 808299...
Страница 32: ...www 4Gon co uk info 4gon co uk Tel 0 0330 088 0295 Fax 44 0 1245 808299...
Страница 40: ...www 4Gon co uk info 4gon co uk Tel 0 0330 088 0295 Fax 44 0 1245 808299...
Страница 48: ...www 4Gon co uk info 4gon co uk Tel 0 0330 088 0295 Fax 44 0 1245 808299...
Страница 50: ...www 4Gon co uk info 4gon co uk Tel 0 0330 088 0295 Fax 44 0 1245 808299...
Страница 58: ...www 4Gon co uk info 4gon co uk Tel 0 0330 088 0295 Fax 44 0 1245 808299...
Страница 60: ...www 4Gon co uk info 4gon co uk Tel 0 0330 088 0295 Fax 44 0 1245 808299...
Страница 62: ...www 4Gon co uk info 4gon co uk Tel 0 0330 088 0295 Fax 44 0 1245 808299...


