background image

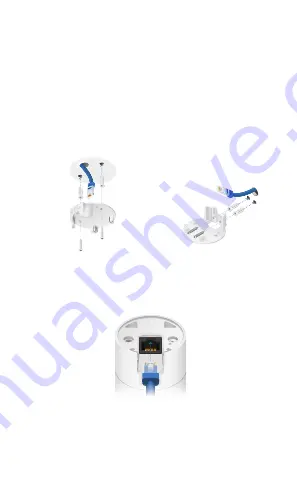
Wall/Ceiling

1.  If the Ethernet cable is coming from the inside of a wall:

a.  Drill or cut a hole in the wall and feed the Ethernet 

cable through the opening.

b.  Pull the Ethernet cable forward and slide it through the 

opening in the mount.

2.  Use the Screws and Screw Anchors to secure the Base Mount 

to the wall.

Top Side Down Mounting

or

Vertical Upright Mounting

3.  Connect the Ethernet cable to the Ethernet Port in the base 

of the camera.

Содержание UniFi UVC-G3-Flex

Страница 1: ...1080p Indoor Outdoor IP Camera with Infrared and 802 3af Support Model UVC G3 Flex...

Страница 2: ...Phillips screwdriver Drill and 6 mm 1 4 bit for drywall anchors and 3 mm 1 8 for screws Category 5e or above Ethernet cable Note When using the Outdoor Cover use an Ethernet cable without a strain rel...

Страница 3: ...ou protect your networks from harmful outdoor environments and destructive ESD events with industrial grade shielded Ethernet cable from Ubiquiti Networks For more details visit ui com toughcable Surg...

Страница 4: ...model UCK G2 PLUS UniFi Cloud Key Gen2 Plus model UCK G2 PLUS For more information on UniFi Protect visit us on the web at unifi protect ui com Note The UVC G3 Flex camera will also work with the UniF...

Страница 5: ...g LED State Status Alternating White Blue Device is busy do not touch or unplug it This usually indicates that a process such as a firmware upgrade is taking place Steady Blue Connected to Controller...

Страница 6: ...tself to install the G3 Flex camera on a desktop or tabletop Out of the box this mount comes preinstalled on the camera Use the Base Mount with two screws to install the G3 Flex camera on a wall verti...

Страница 7: ...Mount Cover to install the G3 Flex camera on a solid horizontal surface or ceiling Use the optional Ceiling Mount Mount Cover and Back Plate Assembly to install the G3 Flex camera on a drop tile ceili...

Страница 8: ...l Ceiling For installing in a secure location used more for stationary or permanent installations Pole For installing on a pole indoor or outdoor Proceed to the appropriate section for your installati...

Страница 9: ...Port and the other end into a PoE 802 3af compliant switch 3 Attach the camera to the Base Mount by lining up the notches with the slots in the base of the camera Press firmly together until the came...

Страница 10: ...ion 5 Adjust the viewing angle or surveillance coverage as needed by following these steps Tilt the lens up or down to adjust the angle vertically Turn the camera body left or right to adjust the angl...

Страница 11: ...he Ethernet cable through the opening b Pull the Ethernet cable forward and slide it through the opening in the mount 2 Use the Screws and Screw Anchors to secure the Base Mount to the wall Top Side D...

Страница 12: ...e notches with the slots in the base of the camera Press firmly together until the camera is secure Vertical mounting on ceiling or Vertical mounting on a wall Installation complete Horizozntal Surfac...

Страница 13: ...tion from moisture 1 Attach the Pole Mount to a pole using the included Zip Ties 2 Insert and pull an Ethernet cable through the back port opening of the Outdoor Cover Note When using the Outdoor Cove...

Страница 14: ...era to the Pole Mount a Press the camera against the Pole Mount and line up the notches on the mount with the slots on the bottom of the camera b Slide the camera down onto the Pole Mount until it is...

Страница 15: ...and into the base of the camera This secures the camera to the mount 7 Adjust the camera to the desired viewing angle by Tilting the lens up or down for vertical adjustment Turn the camera body left o...

Страница 16: ...C G3 Flex Note When you first launch UniFi Protect the app will prompt you to enable Bluetooth and other relevant features necessary to provide the best user experience possible Please allow these fea...

Страница 17: ...Cameras to add a new camera Note If setting up multiple cameras UniFi Protect allows you to add more than one camera during the setup process 4 When the Select cameras screen appears tap each camera...

Страница 18: ...ected in step 4 Enter a name for each camera and tap Next repeating this process until all cameras have been named 6 If necessary any camera requiring a firmware upgrade will update at this time Once...

Страница 19: ...ilter Video Compression H 264 Resolution 1080p FHD 1920 x 1080 Maximum Frame Rate 25 FPS Image Settings Brightness Contrast Sharpness Saturation Noise Reduction 50 60 Hz Microphone Yes Management Inte...

Страница 20: ...ere may be a remote risk of electric shock from lightning Electrical Safety Information 1 Compliance is required with respect to voltage frequency and current requirements indicated on the manufacture...

Страница 21: ...his equipment has been tested and found to comply with the limits for a Class A digital device pursuant to part 15 of the FCC Rules These limits are designed to provide reasonable protection against h...

Страница 22: ...ment please contact your local authorities waste disposal service or the shop where you purchased the product Deutsch Die Europ ische Richtlinie 2012 19 EU verlangt dass technische Ausr stung die dire...

Страница 23: ...que tout autre mat riel lectrique ou lectronique par les moyens de collecte indiqu s par le gouvernement et les pouvoirs publics des collectivit s territoriales L limination et le recyclage en bonne e...

Страница 24: ...uomi Finnish UBIQUITI vakuuttaa ett radiolaitetyyppi UVC G3 Flex on direktiivin 2014 53 EU mukainen EU vaatimustenmukaisuusvakuutuksen t ysimittainen teksti on saatavilla seuraavassa internetosoittees...

Страница 25: ...zgodny z dyrektyw 2014 53 UE Pe ny tekst deklaracji zgodno ci UE jest dost pny pod nast puj cym adresem internetowym www ui com compliance Portugu s Portuguese O a abaixo assinado a UBIQUITI declara...

Страница 26: ...Networks Inc in the United States and in other countries Apple the Apple logo and iPhone are trademarks of Apple Inc registered in the U S and other countries App Store is a service mark of Apple Inc...

Отзывы: