background image

34

Chapter 8: Analytics Tab

 Ubiquiti Networks, Inc.

airVision

 User Guide

4.  Click to define as many additional points as you need 

until you close the zone by clicking on the starting 
point again.

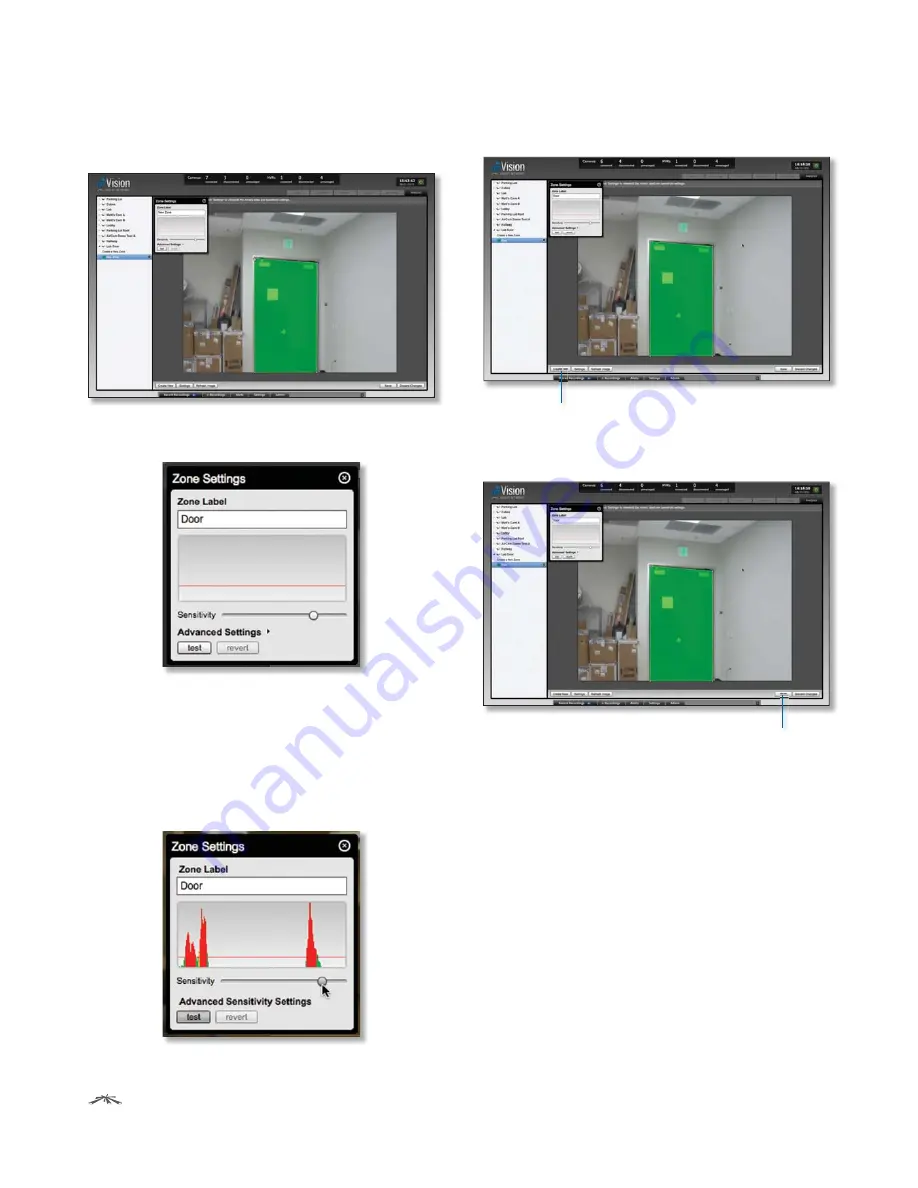
5. The 

Zone Settings

 window will appear. Type in a name 

for the zone in the 

Zone Label

 field. 

6.  Adjust the sensitivity using the 

Sensitivity

 slider. If you 

want to test the sensitivity, click the 

test

 button. As 

various degrees of motion occur, you’ll see different 
level spikes. Adjust the sensitivity to a level that 
best suits your needs. Motion spikes that exceed the 
sensitivity threshold you define will be recorded when 
motion detection is enabled. Click 

test

 again to stop 

the test.

7.  (Optional) If you want to create additional zones, click 

the 

Create New

 button.

Create New button

ew


8.  Once you’ve created your zone(s), click 

Save

 to add the 

zone(s) or 

Discard Changes

 to discard your zone(s).

Save button

bu

Содержание airVision

Страница 1: ...IP Camera NVR Management System For use with the following airCam models...

Страница 2: ...Adding a Map 10 Chapter 4 Live View Tab 17 Views 17 Cameras 19 Quality 20 Chapter 5 Devices Tab 21 Cameras 21 NVRs 22 Chapter 6 Statistics Tab 28 Activity Distribution Last 24 Hours 28 Disk Usage NVR...

Страница 3: ...ernet Explorer 8 or above Hardware Installation Follow the directions in the Quick Start Guide that accompanied your airCam to install your camera Software Installation airVision has three different i...

Страница 4: ...ill begin When the option becomes available click Launch a Browser to Access AirVision NVR Software Install Only 1 Insert the airVision software CD into your CD ROM drive and launch Setup exe 2 Click...

Страница 5: ...again or if you didn t select the option you can launch airVision via the following methods 1 Launch the NVR software if it isn t already running using one of the following methods Start Programs air...

Страница 6: ...iple NVRs use the Prev NVR and Next NVR buttons to navigate through the detected NVRs Click manage for each additional NVR that you want to include Click Next 5 The first detected camera will appear Y...

Страница 7: ...nish to save your settings Once finished you will be redirected to the management interface via your web browser 9 A login screen will appear for the airVision management interface Enter the admin nam...

Страница 8: ...specific tab refer to the appropriate chapter Map Tab on page 10 Live View Tab on page 17 Devices Tab on page 21 Statistics Tab on page 28 Recordings Tab on page 31 Analytics Tab on page 33 Common Int...

Страница 9: ...ings Search Allows you to search for specific text Simply begin typing there is no need to press enter The results are filtered in real time as soon as you type two or more characters Designated recor...

Страница 10: ...The default value of 1 ensures that any alarm frame generates an event Although a value of up to 16 may be entered here typically anything larger than 3 or 4 will not be useful Event Frame Pre Padding...

Страница 11: ...rd again in the Confirm field and then click Apply to save your new password Confirm Used to confirm your new password Language Selects the language for use in the interface Admin Server Information V...

Страница 12: ...sample map is displayed Adding a Map You can add an image you ve created as a map image or use Google Maps to generate an image for use as a background Image Maps To add a custom map you must first c...

Страница 13: ...te the file to use as a map valid file formats are jpg gif and png Click Continue 4 Click Close 5 You can adjust the zoom using the slider on the right 6 Drag the Camera icon s from the Cameras list o...

Страница 14: ...a new web browser window Do not close the airVision window http code google com apis maps signup html b You need to be signed in with a Google account to obtain a Google Maps API key c Review the ter...

Страница 15: ...key Google Maps API Key h Navigate back to the airVision window and paste the API Key into the API Key field Click continue 5 The default Google Map location will appear Click the Set Location button...

Страница 16: ...the location of the camera s Click and hold the icon to drag the camera to another location on the map Click on the Camera icon to reveal additional options Click a blank area of the map to hide the a...

Страница 17: ...he X in the upper right corner to close the Live Feed window Remove Remove the Access Point from the location on the map Alert This icon will appear to indicate activity for a specific camera Click on...

Страница 18: ...orks Inc airVision User Guide 3 Enter the distance that the line represents in the Distance field The distance is specified in meters by default but you can switch to feet using the drop down selectio...

Страница 19: ...r create custom multiple camera views Note Camera streams are viewable without assigning the camera to an NVR but for optimal performance cameras should be assigned it to a monitor Views Custom views...

Страница 20: ...ere the camera will be placed Release the mouse to lock a camera into place The scale of the camera is determined by the location it is placed on the screen and the number of cameras in the view 4 To...

Страница 21: ...laced Release the mouse to lock a camera into place If you want to replace an existing camera with another simply click drag the new camera from the list and place it over the camera you want to repla...

Страница 22: ...nc airVision User Guide Quality The camera quality can be changed at the bottom of the Live View tab This selection applies to all of the cameras viewed in the Live View window Select the quality of t...

Страница 23: ...ast recording date and time camera status and an action button to locate the camera on the map and another action button to view the live feed of the camera Add Camera Click this button to add a camer...

Страница 24: ...s Displays the connection status information Actions Select an action button to perform the desired action Locate Click this button to locate the camera on the map You will be taken to the map screen...

Страница 25: ...lays the recording mode of operation that the camera is using Monitor Monitor has two selectable options below it Camera Connection Realtime Displays real time camera transmission information in kbps...

Страница 26: ...ents generated in this mode Monitor In Monitor mode no image analysis is done and no events are generated In Monitor mode the NVR will downscale live feeds to suit the users feed size quality settings...

Страница 27: ...solution setting for the camera and allows you to change the setting Note The resolution selected must be supported on the camera or the image may not appear properly Orientation Defines the image ori...

Страница 28: ...ween every single frame recorded Image Buffer Size Determines how many frames are held in the image buffer 40 is the default value Replay Image Buffer Defines the total number of frames for the replay...

Страница 29: ...tamp on top of the image Scheduling Select a schedule Add Click to apply a schedule that you ve created to the camera Edit Select the schedule that you want to edit from the Select a schedule drop dow...

Страница 30: ...st 24 hours You can highlight areas of the chart to view the total number of recordings for each camera in the last 24 hours This will also display the percentage of activity that each camera represen...

Страница 31: ...h all of the recordings that took place that hour The first recording will begin playing and the rest of the recordings will play in order NVR Load NVR The NVR Load Statistics window displays three di...

Страница 32: ...details the transmitting bandwidth usage from all of the cameras connected to the selected NVRs Drag the mouse over the timeline to view detailed statistics in the timeline CPU Utilization Displays th...

Страница 33: ...select an hour To Click in the To date field and a calendar will appear that will allow you to select an ending date Click the time field and either manually enter a time or use the arrows to select a...

Страница 34: ...for specific search criteria Any text that is entered is used as real time search criteria and anything that doesn t match the entered characters will be removed from the view Delete the search string...

Страница 35: ...hreshold This allows your NVR to record only when motion is detected in areas of a camera feed that you ve defined Setting the sensitivity level allows you to define how much motion is required to tri...

Страница 36: ...nt to test the sensitivity click the test button As various degrees of motion occur you ll see different level spikes Adjust the sensitivity to a level that best suits your needs Motion spikes that ex...

Страница 37: ...it If you need to add a point click in between two defined points white in color to add another point to the zone 3 If you need to change the zone name or sensitivity level of the zone click Settings...

Страница 38: ...ware hardware compatibility or field issues as quickly as possible We strive to respond to support inquiries within a 24 hour period Email support ubnt com Phone 408 942 1153 9 a m 5 p m PST Online Re...

Отзывы: